The
4th Armoured BrigadeEngagements - 194
444 the 4th Armoured Brigade was involved in the following battles and campaigns. These include, Preparations for Normandy, The Normandy Campaign (including Douvres Radar Station, Operation Epsom - River Odon, Odon Bridgehead and Hill 112, Operation Bluecoat - Vire, Closing the Falaise Pocket) and Belgium and Holland (including Operation Garden - Nijmegen, Clearing the Wilhelmina Canal and the Lower Rhine, Winter on the Maas).
Returning Home
The Sharpshooters sailed from Taranto on 27th January 1944 on board MV Tegelberg and reached the Clyde on 8th February. The 44 RTR arrived in Taranto on 12th January and three days later they held a memorial service for the growing numbers killed in action in Africa, then Sicily and now Italy. On 25th January 1944, they celebrated their last night on Italian soil and then sailed for home on the SS Ranchi also on 27th January. The 2nd Battalion KRRC, with 31 officers and 639 Other Ranks, embarked from Naples on HM Almanzora and docked at Glasgow on 9th February 1944, which was two years since they encountered Rommel at Agedabia. A band greeted the brigade on arrival and there were free tea, cigarettes, buns and newspapers. The Royal Scots Greys had rejoined the brigade before it left Italy and the 'Black Rats' stepped ashore at the King George V Dock and went by train south to Worthing to join I Corps, settled into their billets and went off on leave.
Now they were back in the UK, it soon became known that General Montgomery had specially asked for 4th Armoured Brigade to be part of the invasion team of the Northern European mainland. This was obviously an honour, but a dangerous one, too!
After their leave the 'Black Rats' spent the months of March, April and May 1944 were spent in preparation for the D Day Landings, mainly training along side 51st (Highland) Division, whom the Brigade was expected to support when the landings took place. On March 16th Brigadier Currie returned to command the Brigade, while Brigadier Cracroft transferred to 8th Armoured Brigade, who were also destined for Normandy. The Brigade was were re-equipped with new Shermans, unfortunately not diesel ones, and it got their first 17 Pounder Sherman Firefly tanks. These were mostly the original Wright Whirlwind engined model, and each regiment was equipped with having twelve 17 Pounder tanks for the first time, which was enough for one for each troop. During this time 3rd CLY formed an additional 'D' Squadron on 9th March 1944.
On 3rd June 1944, the Brigade received its orders to move to the marshalling areas in preparation for the Normandy Invasion and 3rd CLY move to the Marshalling Area some 8 miles to the North of Portsmouth, while 44th RTR moved from Worthing to Portsmouth, on 4th June. Meanwhile, 4th RHA, under the command of I Corps, at this time, had boarded their landing ships on 5th June at Tilbury docks.
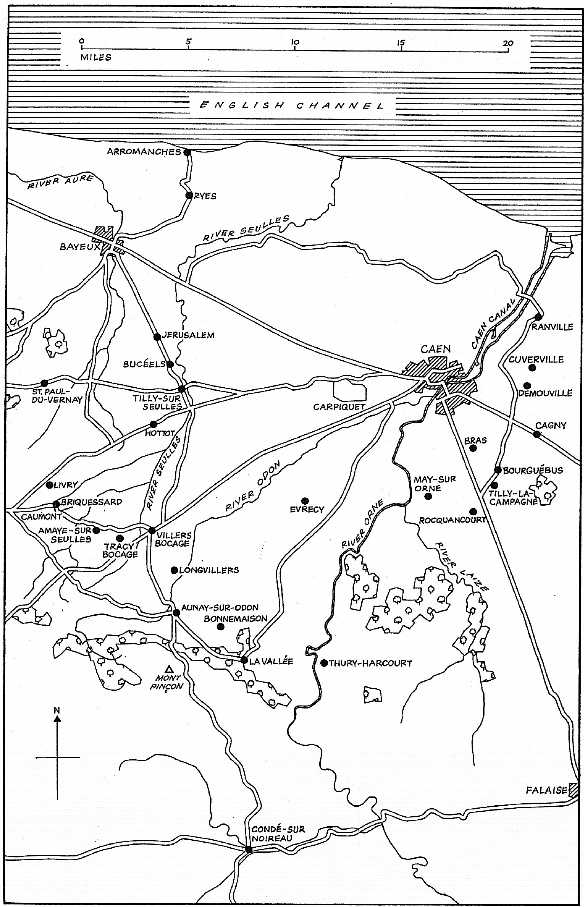
On June 6th 1944, D Day, the Brigade began to move from the marshalling areas, embarking at Stokes Bay and anchoring in the Solent, listening with bated breath for the news of the assault on the beaches. Following the success of the landings the first troops of the brigade landed on 'M' Sector, Sword beach at La Rivière at eight o'clock on the morning of June 7th under command of the 51st (Highland) Division. Click here to see the Brigade Order Of Battle at this time
The Sharpshooters (3rd CLY) were among the first ashore landing near Mont Fleury La Rivière, which was about 5 kilos West of their allotted beach. They were placed in support of 153rd Brigade. 'B' Squadron were attached to 1st Bn. Gordon Highlanders who were at Colombiers Sur Seulles and 'C' Squadron to support of the 5/7th Bn. Gordon Highlanders in defensive positions near Le Fresene Camilly. Having landed with 18 tanks, 'A 'Squadron were ordered to support the 5th Bn. Black Watch in an attack on a pocket of resistance at the strongly fortified radar station at Douvres. Also in support were a Squadron of AVRA - Armoured Vehicle Royal Artillery - (Churchill tanks armed with a block-busting Petard), a battery of Field Artillery and in addition the RAF and Royal Navy could be called upon. Liaison was to be made with the Canadians who were operating in this area.
Douvres Radar Station: It was necessary to obtain possession of a wood West of Douvres as this was the only point of observation on the town. Information obtained from a Canadian Brigadier showed the wood was held by the enemy, and he categorically stated that no Canadian troops were in the wood. The attack started at 19:50 and was led by No. 2 Troop of 'A' Squadron. The wood proved to be empty of enemy despite the information received, but there were Canadian troops digging in among the trees and shots were exchanged between the Black Watch and the North Shore Regiment, with casualties received on both sides. On reaching the exit from the wood, the Squadron came under fire from the radar station which consisted of 2 localities, one directly East about 400 yards and one SE 1000 yards. Two Canadian tanks moved towards the main radar station and were fired on and one tank set on fire. One of the leading 'A' Squadron tanks sustained injuries when his tank was hit by a small calibre Armoured Piercing shot. After some readjustment of positions No. 3 Troop moved forward to the nearer locality and reached the wire perimeter. No. 2 Troop and the AVRA worked forward to the main station and came under fire from larger calibre guns, probably 88mm. There was also some 50mm and possibly 75mm shooting but it was now 21:30 and visibility was poor. Two AVRA Churchills advanced through the wire and immediately had their tracks blown off by mines. They discharged their Petards at a gun emplacement and one was then hit by an 88mm or 75mm and blew up. The Germans then laid smoke across their own front and under cover of this 'A' Squadron withdrew. It was then decided to allow heavy bombers to attack the position and accordingly they evacuated the wood and leaguered some distance away.
On 8th June, the area around the Radar station was heavily shelled in the morning, and Nos. 1 and 4 Troops were moved out to watch the South and Southwest corners of the wood. It was now decided to shell the place with two naval cruisers. At 15:00 'A' Squadron withdrew from the wood. The force then concentrated to the West of the wood and awaited the naval bombardment. This did not materialise as the FOOs and their infantry protection had been shot up. The Black Watch then re-entered the wood supported by 'A' Squadron and No. 4 Troop remained in the Forward Defence Lines overnight. In the evening Centaurs tried to shell the station but their shots fell so dangerously short that they were hastily stopped. On 9th June, 'A' Squadron rejoined the rest of 3rd CLY
Also on 8th June there were rumours of an enemy counter-attack with tanks in the area of Coulombs, on the boundary between 1st and 30th Corps. The Sharpshooters (apart from 'A' Squadron) moved to the high ground south of Creully where they joined hands with 1st RTR of 22nd Armoured Brigade, 7th Armoured Division, sent there to support 50th (Northumberland) Division against the same counter-attack which never actually developed.
The Scots Greys landed along with 3rd CLY on 7th June and 44th RTR had sailed from Gosport on the 8th June landing in France on the 9th June, and they concentrated on the village of Anblie. This meant that by 10th June all the fighting troops of the Brigade were ashore, with the Scots Greys had taking over support of 153rd Brigade on the left flank.
On the 11th June the Brigade concentrated near Colomby-sur-Thaon, on the main road from Courseulles to Caen to support 9th Canadian Brigade of 3rd Canadian Division against a supposed German counter attack. The Sharpshooters took up fire positions among the infantry near Villons Les Buissons, the rest of the Brigade being on either side of Colomby. However, the main Brigade HQ was in the chateau at Beny sur Mer which was an obvious target for the enemy artillery and was finally forced to evacuate it on 13th June, after several direct hits had set the chateau on fire. From then until the 25th June, the Brigade was engaged in supporting 51st (Highland) Division and 3rd Canadian Division in the same area and during this time 3rd CLY carried out a range shoot on 16th June 1944, in the direction of the Germans, who did not appreciate this and soon afterwards the Regimental area was shelled.
On 25th June, the Brigade, now with 4 RHA under its command, came under command of 11th Armoured Division in 8 Corps and 44th RTR, 'F’ Battery, 4th Royal Horse Artillery and ‘B’ Company, 2nd Bn. Kings Royal Rifle Corps, formed a Battle Group which was to remain together until the end of the war. On 26th June 1944, the Brigade suffered the loss of its Commander Brigadier J. C. Currie DSO MC, who was killed by shell fire, having just given orders to Commanding Officers at the level crossing south of Bretteville, and the Commanding Officer of 3rd CLY, Lt-Col A. A. Cameron DSO MC, took over the command the Brigade, which meant that the 2nd i/c of 3rd CLY, Major A. W. Grant MC, assumed command of the 3rd CLY. With his death the Brigade lost a gallant and inspiring commander who had led them with great success and skill from Foum Tatahonine, by the Mareth Line, to victory in North Africa, through Sicily and Italy to the fields of Normandy. On 27th June, Brigadier R. M. P. Carver, RTR, arrived to take over the command of the Brigade.
Operation Epsom - River Odon: Meanwhile, on 26th June, as part of Operation Epsom 1944, 15th (Scottish) Division had reached the line St Mauvieu to Cheux and 11th Armoured Division were passing through to seize a crossing of the river Odon. In the afternoon enemy tanks were reported at Rauray and 4th Armoured Brigade was called forward to support 29th Armoured Brigade. By that time 29th Armoured Brigade, with 44th Royal Tanks temporarily under its command, had crossed the Odon near Baron, 159th Infantry Brigade of 11th Armoured Division, were holding the area of the crossing and we were protecting both flanks between Cheux and the River. This allowed the 15th (Scottish) Division to move up behind, taking over the ground gained by 11th Armoured Division. 44th RTR had moved up to Norrey-en-Bessin and then to Cheux all at close contact with the enemy. The regiment then crossed the River Odon on the 28th June engaged the enemy all day.
Elsewhere, 3rd CLY was supporting the Highland Light Infantry (15th Scottish Div) into Mouen. Little was known of the enemy situation there but it was thought to be weak. The plan was simple, and consisted of a barrage to the North West of the town was to come down on the woods in that area and 2 Companies of infantry were to advance, with one each side of the railway, each supported by a Squadron of tanks, with 'C' Squadron on the right and 'B' Squadron on the left. 'A' Squadron was to be held in reserve to give covering fire if necessary. In the early stages 'C' Squadron's leading troop was fired on by a dug-in Mark IV which held its fire until 80 yards. In all it knocked out three tanks until engaged by Squadron HQ. MG fire was very heavy from the woods and made observation poor and at the time the Commander of the infantry lost contact with all his Company commanders which made it impossible to keep a coherent account of events. At last light the when 3rd CLY leaguered for the night it had accounted for a total of 2 Tigers, 4 Mark IV Specials, 2 Self-Propelled Guns and 2 Personnel carriers. In return 3rd CLY losses were 1 tank destroyed, 3 knocked out, 3 Honeys knocked out.On the open high ground between the Odon and the Orne, 29th Armoured Brigade could make no headway against strong opposition from tanks and SP guns. The 29th June was a day of fierce fighting and heavy loss which thwarted a massive German counter attack around Evrecy, west of Caen, but 44th RTR lost 13 tanks and 3 damaged, with 9 men killed, 27 wounded and 9 missing during the one day on the right flank. The Germans made constant efforts to penetrate both flanks of the narrow salient in the valley of the Odon and north of it, with the situation on several occasions becoming extremely confused in the thick hedgerows of the Bocage.
Odon Bridgehead and Hill 112: The 4th Armoured Brigade continued to clear up and protect the flanks, supporting 159th Brigade and succeeding Brigades of 15th (Scottish) Division and later 53rd (Welsh) Division, until the bridgehead over the Odon was securely established and eventually it contact made with the Canadians a few miles south-west of Caen. The 11th Armoured Division were then withdrawn and on 3rd July and the brigade came under command of 53rd (Welsh) Division. The 43rd (Wessex) Division then arrived to take over the area between the Canadians and Baron and the Brigade then came under its command. On July 8th an attack by 43rd (Wessex) and 15th (Scottish) Divisions was launched to extend the bridgehead over the Odon towards the Orne, which we supported, though Churchills of 31st Armoured Brigade did most of the direct support of the infantry. This attack got no further than the outskirts of Evrecy and to Maltot with casualties being very heavy particularly round Hill 112 and Maltot, with the latter being eventually abandoned. For the next ten days the Brigade was engaged under command of 12 Corps in supporting 43rd and later 53rd Divisions in this area, which was a most unpleasant one. Shellfire was intense and accurate, and casualties to tank commanders were heavy.
On 20th July the Brigade was withdrawn into reserve near Carpiquet aerodrome coming under command of 11th Armoured Division in 8 Corps. While at Carpiquet 3rd CLY was amalgamated with 4th CLY from 22nd Armoured Brigade, 7th Armoured Division, to become 3rd/4th County of London Yeomanry (The Sharpshooters).
On July 28th (towards the end of Operation Spring) the Brigade came under command of 2nd Canadian Corps. The Scots Greys were order to move through Caen to support 4th Canadian Brigade, 2nd Canadian Division in the area of Ifs and Hubert Folie south of the town. This was a very unpleasant area of accurate and heavy shell and mortar fire and one squadron was attacked one morning by a detachment of "Beetles". These were the German remote-controlled miniature tanks designed to move underneath allied tanks and then be exploded by remote control. Fortunately, none got as far as the Scot Greys tanks. On 29th July, 3rd/4th CLY also moved to that area under command of 7th Armoured Division, on the left of the Scots Greys, with 4 RHA coming under 4th Canadian Armoured Division in the same area on the 30th June. The Brigade had thought that they were going to take part in the Canadian attack towards Falaise, but on August 2nd it was placed under 8 Corps again and moved round to near St Paul Du Vernay, half way between Bayeux and Caumont.
Operation Bluecoat - Vire: On the 4th August, the Brigade came under command of 3rd British Division, moving on 6th August to join them west of Beny Bocage. On 8th August 1944, The Scots Greys were placed in support of 185th Infantry Brigade, while 3rd/4th CLY supported 8th Infantry Brigade and 44th RTR were with 9th Infantry Brigade in their attack over the River Alliere and on to the high ridge beyond, with the aim of outflanking Vire from the east. After some fierce fighting, including crossing the river by a Scissors Bridge and climbing an almost vertical slope beyond, 44th RTR captured the ridge with 9th Infantry Brigade, while 8th Infantry Brigade with the Sharpshooters passed through on the right and the Scots Greys with 185th Infantry Brigade did so on the left. After a short fight the enemy withdrew out of contact. The Brigade was relieved by 11th Armoured Division on 9th August.
On 11th August, 'C' Squadron, 3rd/4th CLY supported in supported 1st Bn. South Lancashire Regiment to their first objective Pt.272. Progress was very slow owing to the nature of the ground, but tanks equipped with hedge and bank cutting equipment were used for the first time, with success. With the cross country progress being so slow, a company of infantry with a troop of tanks were sent down the main road. Two tanks were hit by fire by fire from the area of Pt.272 and an SP gun was seen, but as the infantry said they had troops in the immediate area it was not possible to engage it. Subsequently it was found that no infantry were in the area and the gun was engaged and knocked out. 'B' Squadron, 3rd/4th CLY, then moved at 15:00 in support of 2nd Bn East Yorkshire Regiment to an objective North of Pt.272, but the country was almost impossible for tanks and touch with the infantry was soon lost. When the tanks were 300 yards from their objective the infantry were seen to be digging in to the left and the Troop leader dismounted to find out the reason. Whilst he was away enemy infantry crept up and damaged the leading tank with a Panzerfaust.
Closing the Falaise Pocket: On 12th August, 4th Armoured Brigade were relieved by a battalion of 6th Guards Armoured Brigade and were moved again, this time by transporter, to join 12 Corps near our old battleground by Evrecy. On the following day the Brigade came under 53rd (Welsh) Division and moved to a further concentration area east of the Odon round Mulrecy, 'D' Squadron of The Royal Dragoons, with Armoured Cars, came under the Brigades command. On the 14th the Brigade moved up to Bois Halbout, with 3rd/4th CLY passing through 71st Infantry Brigade to the high ground beyond, while 'D' Squadron of The Royals found a way through the thick woods to Bonnoeil, which was occupied by 2nd KRRC with a squadron of 44th RTR by last light. On 15th August, 3rd/4th CLY with two companies of 2nd KRRC continued the advance through very thick "bocage" on the left of 44th RTR as far as Treprel, where determined resistance by enemy infantry, backed up by SP anti-tank guns, held them up until the afternoon, by which time 44th RTR had come up on their right, after dealing with the enemy on the west edge of Treprel.
By last light 44th RTR, with one company of 2nd KRRC, had cut the main road from Conde to Falaise, south-west of Treprel, and The Sharpshooters had done the same further east. During the night the 6th Bn. Royal Welsh Fusiliers of 160th Brigade, 53rd (Welsh) Division, caught up with 3rd/4th CLY and helped to make the area secure and two companies of 4th Bn. The Welch Regiment took over behind 44th RTR.
On 16th August 160th Infantry Brigade took over the area we had captured and began to mop up and extend it, while the Scots Greys supported 1st Bn. Highland Light Infantry on a cross-country move to Martigny and beyond. They continued to support them on the following day in seizing the high wooded ridge south-west of Falaise. Meanwhile the rest of the brigade concentrated behind 71st Infantry Brigade, ready to pass through when they reached the Falaise-Argentan road. This they did by a brilliant night attack down the ridge. Soon after first light the Scots Greys, with one company of 2nd KRRC, passed through 71st Brigade heading down the main road to Argentan.
Near Ronai the leading squadron ran into a column of guns and horse-drawn transport which it dealt with effectively, but they continued to have considerable trouble from German tanks and SP guns to their front and open left flank. The Sharpshooters meanwhile had got down the steep wooded ridge further west, but were held up at a village covering the exit from the woods. Meanwhile 44th RTR who had been moving across country between the two, came up on the right of the Scots Greys and were soon in action against enemy columns trying to move east. During the night of 17th/18th August, the infantry with 3rd/4th CLY had made a considerable advance and this point 3rd/4th CLY Regiment took over the advance with the intention of cutting the enemy's last escape route through the village of Pi. 'B' Squadron, led the advance and found enemy infantry mining the road which were quickly dispersed. The leading troop was then fired on by Anti-Tank guns but no hits were scored, and another troop was sent round to the East but was also held up by Anti-Tank guns. The country was too close for deployment so smoke was put down and the leading tanks moved forward and fired HE. This was successful, with one Anti-Tank gun being knocked out and another one abandoned. This allowed the advance to continue. A Mark IV special was seen and knocked out but shortly afterward the two leading tanks were hit by Anti-Tank fire. The driver of one tank succeeded in driving his badly damaged tank back out of range and was able to rescue his wounded crew. Artillery fire was brought down on the suspected gun positions and another attempt was made to go forward but the leading tank was immediately hit. Many attempts were made to find a way round and 'A' Company 2nd KRRC was sent into the village ahead to try and locate the Anti-Tank guns and clear the area of the enemy. At 18:00 'A' Squadron succeeded in finding a way round and took up position South of the village of Rouffigny. 'B' Squadron were then able to go forward and sent a troop into the village to assist 2nd KRRC whilst the remainder of 3rd/4th CLY were together further North. During the day 'C' Squadron had taken up a commanding position on high ground and accounted for several enemy vehicles attempting to escape. Although by last light the 3rd/4th CLY had got one Squadron round behind the village of Rouffigny, they had not cleared it up. Elsewhere, 44th RTR were on the edge of Ronai, with 'A’ Squadron losing two tanks, and the Scots Greys on the outskirts of Pierrefitte. Each had their motor company with them. The woods and hedge rows were full of German infantry and there were a considerable number of German tanks and Self-Propelled Guns in place, trying to stop the Brigade from closing the narrow gap between themselves and Argentan.
On the 19th the Brigade pushed a little further south, with 3rd/4th CLY clearing Rouffigny, with 2 tanks from 'C' Squadron being knocked out. Considerable quantities of enemy transport were accounted for both by the tanks and 'DD' Bty, 4th RHA and a number of guns were destroyed in the village of Rouffigny by the 2nd KRRC. Meanwhile, 'B' Squadron, 44th RTR cleared Ronai, taking 200 prisoners. The Brigade continued to inflict considerable damage on the enemy attempting to move east, which the Germans now only dared do by single vehicles travelling very fast and by crawling up hedgerows. 4th Armoured Brigade were relieved by 71st Infantry Brigade in the afternoon and moved to the area of St Clair, coming under command of 15th (Scottish) Division, prepared to move south-east to clear up the final pocket between 53rd (Welsh) Division and the Canadians. Plans were changed and on 21st August, the Brigade came under command of 2nd Canadian Corps to carry out the same task, 53rd Reconnaissance Regiment (from 53rd Divison) was placed under the command of the Brigade and in the afternoon 44th RTR and 2nd KRRC supported by 4 RHA passed through 53rd Reconnaissance Regiment. By last light the Brigades work was over, with the capture of 3000 prisoners, and the "Falaise pocket" had been finally eliminated.
The Brigade briefly reverted to the command of 53rd Division at midnight, but changed to 15th (Scottish) Division again next day, the 22nd August. Between 23rd and 28th August the Brigade moved from Trun to Ailly, on the west bank of the Seine, without opposition except from the mass of dead horses and derelict vehicles blocking every road. Here 4th RHA left the Brigade for a while to re-equip with Sexton SP guns, being relieved by 6th Field Regiment. On 29th August the Brigade crossed the Seine at St Pierre du Vauvray, concentrating in the bridgehead formed by 15th (Scottish) Division, with 'D' Squadron of The Royal Dragoons again under its command.
At first light on 30th August 1944, 4th Armoured Brigade led 53rd (Welsh) Division out of the bridgehead, towards their objective of Gournay. 3rd/4th CLY followed close behind of 'D' Squadron of the The Royals and little opposition was met. By last light we were beyond Gournay on three sides, with 3rd/4th CLY to the north-west, 44th RTR to the north-east and the Scots Greys to the west, each with a company of 2nd KRRC, in support. During the night a column of Germans, escaping from Rouen, got astride the centre line between 3rd/4th CLY and their forward squadron which, with the Royals and a company of 2nd KRRC, was holding the bridge three miles north of Gournay. There was a action which took some time to resolve, by many prisoners were taken. Meanwhile, the Scots Greys were advancing on a separate axis on the left. The Brigade was now under the command of 7th Armoured Division, with which it had served for so long in the desert, which was crossing the Seine behind 53rd (Welsh) Division. Click here to see the Brigade Order Of Battle at this time

After 3rd/4th CLY had cleared Bazancourt, with the assistance of the FFI, and Villers Vermont, capturing 200 prisoners and knocking out a number of guns in the process, 44th RTR passed through them, clearing each village on the axis in turn. Little opposition was met in Grandvilliers and, after completely destroying its flank guard, they came upon a dense column of transport trying to move through Poix. On the 31st, after a short battle, 44th RTR entered Poix taking 800 prisoners. The advance continuing the next day through Mollensvidon, Hangest-sur-Somme. ‘A’ Squadron, 44th RTR, having had to fight for the village of Berneuil, captured a Colonel, 15 officers and 317 men of the 859th Grenadier Regiment
The Scots Greys had found the tail of another column some six miles further west and both regiments began to inflict heavy punishment on the enemy. They were both low in petrol and ammunition and while they were being refuelled, the Typhoons of the RAF were given a free hand with more German columns to the north, bringing all German movement to a stop. Towards last light both regiments continued their advance, clearing a way through the carnage as best they could and halting after dark about six miles north of Poix. On that day alone, 4th Armoured Brigade captured, 1500 prisoners, 5 guns and untold quantities of transport, motor and horse-drawn.
The next objective for 1st September, was a crossing over the Somme. 44th RTR were on the right and were directed on Picquigny, while the Scots Greys on the left to moved Longpre. 3rd/4th CLY were following up the Scots Greys protecting the open left flank between the Brigade and 4th Canadian Armoured Division. Both the lead regiments met the enemy on the line of the road through Molliens Vidame and after some short actions the resistance was soon dealt with and the advance resumed. Meanwhile, TAC R (reconnaissance) had reported that the brigade at Picquigny was blown and 44th RTR were therefore redirected to Ailly, further east and as they approached the bridge there, it too was blown. The Scots Greys found the main road bridge east of Longpre blown, but with great skill and dash they managed to seize the smaller bridge to the west before the enemy could destroy it. They managed to get two troops over, but the bridge itself was weak and there was a wet crater in the road this side of it and while several attempts were made to improve it, but for most of the day the bridgehead in and around the village of Long (on the north side of the river) was held only by two troops of tanks and a company of a KRRC. There were several fierce counter attacks, but every attempt by the enemy to get back to the bridge was foiled in spite of the thick country, and the rest of the Squadron had crossed over by nightfall.
Meanwhile, 3rd/4th CLY, on to the left rear of the Scots
Greys had made contact with the Canadians, leaving
Airaines behind them still occupied by the enemy. This isolated party resisted
strongly and unfortunately Lt-Col Littledale, commanding 2nd KRRC, drove
straight into the village and was killed instantly.
At 16:00 'A' Squadron, 3rd/4th CLY, made one
attempt, with 'A' company, 2nd KRRC, to clear it from the north-west, but there
were not the men to complete task, as very strong resistance was met and with
the defenders having some Anti-Tank guns, which hit one tank that caught fire,
but two 75mm Anti-Tank guns were knocked out. 'A'
Squadron withdrew at last light and the
attack continued by a stronger formation of the Canadian Army. At this time the Brigade been ordered to move round north of
Amiens to secure an area north of the Somme in which 7th Armoured Division could
concentrate during the night. Accordingly in the failing light 44th RTR,
followed by TAC Brigade HQ, crossed the river at the western outskirts of Amiens and
continued in the moonlight to the high ground north of Canaples, twelve miles to
the north.
On 2nd September 1944, 44th RTR advanced to Bernaville, where, protecting the left
flank of 7th Armoured Division, they completely destroyed a German column moving
east, taking some 600 prisoners. Having crossed the river at Picquigny 3rd/4th
CLY then turned left clearing the north bank for fifteen miles and linking up with
the Greys bridgehead at Long. With 'C' Squadron leading, they made contact with
the enemy North of Elexecourt, when 'C' Squadron observed a troop of 88mm guns
shelling across the Somme. The gun position was quickly overrun and many
prisoners taken. The advance was continued and the village of Ailly was taken,
with six more 88mm guns being captured. 3rd/4th CLY tally for the day was nine
88mm guns and approximately 100 POWs. On the morning of 3rd September, 3rd/4th
CLY took up positions on the high ground North of Ailly and later in the
morning made contact with the Canadians and the Poles. They then moved on
without opposition to the high ground overlooking Auxi which was reported to be
strongly held by the Germans. Here 'A' Squadron shot up some German transport
seen moving out of Auxi to the North. Here 3rd/4th CLY found time to inspect the
first Flying Bomb site they had seen, which had been completely destroyed by the
RAF. For the rest of 3rd September and for 4th September, under command of 12 Corps,
the Brigade protected the left flank
of the Corps axis, stepping up behind 53rd (Wessex) Division and clearing the area to the
west as far north as St Pol, past the old World War One
battlefields. On 5th September, the Brigade returned to the command of 7th Armoured
Division, moving behind 22nd Armoured Brigade through Aubigny, Vermelles, Carvin
and Secin, crossing the Belgian frontier at Estambourg, finally halting with
3rd/4th CLY at Oudenarde, 44th RTR at Kerkhove and the Scots Greys at Avelgem. The
Brigade was then ordered to remain concentrated there while 131st Lorried
Infantry Brigade passed through with a completely open left flank, facing an area in which there were known to be
large numbers of Germans, who were being pressed from the south by the Canadians and Poles. So, that night, Brigadier Carver obtained permission from the commander of 7th
Armoured Division to face westwards the next day and protect the Corps axis from that
direction. At first light the Brigade took up battle positions on a
front of fifteen miles on the high ground between the River Escaut and the Lys
canal, with 3rd/4th CLY covering Oudenarde, 44th RTR at Kerkhove and the Scots Greys
at Avelgem. It was not long before Brigadier Carver's suspicions were proved correct and a
stream of Germans began moving east heading for the River Escaut along the whole
Brigade front. However, with only one motor company with each armoured regiment it was impossible
to prevent infiltration through the villages and hedge-rows and in spite of heavy
losses the Germans continued to try and break through. All through the afternoon
the tanks were sweeping their areas over and over again. It was now clear that
the Brigade could not hold them during the night on such a broad front and
luckily there was a
road running east of the river which could be used as an alternative Corps axis,
provided the Brigade held the bridge at Avelgem and kept the Germans from crossing the
river anywhere.
By now 3rd/4th CLY had moved on to the North and took up positions NW of
Oudenarde and were on high ground with instructions to protect the Lines of
Communications running through Oudenarde. They made contact with the enemy at
the villages of Wortegem, Knock and Nokere, destroying many guns and lorries,
plus taking many prisoners. 'A' Squadron pushed on to the town of Cruyhauten,
killing a large number of enemy infantry, before linking up with a patrol of
11th Hussars. The town was full of enemy troops hiding in the houses and it
proved impossible to deal with them without adequate infantry support.
Unfortunately, one of a large number of prisoners surrounding a tank threw a
hand grenade into its turret, killing two of the crew. Later a German tank
managed to position itself unseen and knocked out two of 'A' Squadrons tanks.
Eventually the 'A' Squadron was forced to withdraw as it could no longer hold
the town without further infantry support. Leaguer was made North of the
Oudenarde road and there was no contact with the enemy during the night.
After warning the Commander of 7th Armoured Division of the situation and securing his
agreement, 4th Armoured Brigades regiments were pulled back at last light to the immediate vicinity of
the bridges and Brigade HQ and all echelons moved east of the river. During the
night the German 712th Division tried several times to reach the bridges, but got
no further than the main road between the villages. At first light on 7th
September each regiment counter-attacked and drove the disorganised enemy back to the high
ground. During these actions 3rd/4th CLY took up position again on the high
ground facing North West and 'C' Squadron took over 200 POWs from a column
attempting to escape East of Knock. The Brigade made use of local members of the
Belgian Resistance Movement to escort prisoners and carry our patrols. A large number of prisoners were taken and many casualties inflicted.
The enemy made no further attempt to break out to the east and the second battle
of Oudenarde was over. During the afternoon and night of the 7th September the Brigade handed over the area to a
brigade of 15 (Scottish) Division. On 8th September 3rd/4th CLY moved at first
light to Antwerp to join 53rd (Welsh) Division there, while the rest of the
brigade, including 4th RHA who had returned on 5th September equipped with
Sexton Self-propelled Guns, to relieve 6th
Field Regiment, concentrated south of Termonde by last light. The Brigade was still
under command of 7th Armoured Division and its task was to clear the area west of
the Scheldt and north of the River Durne. Both the 11th Hussars and the Royals had patrols in
the area and reported that more and more Germans were flooding in from the north and west. From 8th to 19th September 3rd/4th CLY served with 53rd (Welsh) Division
helping it to clear the Germans from Antwerp and the Sheldt. They moved to
Antwerp and took up positions, with 'A' Squadron patrolling East bank of Sheldt
with members of the Resistance movement while 'B' Squadron remained n in the
dock area. 'C' Squadron were to the East of the city with a troop in the village
of Wyneghem. Between 9th and 11th September, 3rd/4th CLY remained in these
positions, and a troop of 'B' Squadron shelled enemy troops attempting to use
ferry North of the city. During this time they accounted for two motor boats,
one 88mm gun and a number transport vehicles. On 13th September, 3rd/4th CLY moved
into the Gheel bridgehead and took over from the Sherwood Rangers. Here 'A'
Squadron supported of 46th Infantry Brigade to the East of Gheel, while 'B'
Squadron supported 227th Infantry Brigade to the west of Gheel and south of Moll
and 'C' Squadron supported of 44th Infantry Brigade to the North. 'B' Squadron
carried a company of infantry on their tanks and having deposited them in the
area of the Escaut Canal North of Moll, supported them in an attempt to cross.
The bridge was found to be blown and there was heavy opposition from the far
bank. The infantry dug in and at last light the tanks withdrew. 'A' and 'C'
Squadrons supported the infantry forward to the South bank of the canal against
little opposition and withdrew at last light. After a quiet day on 14th
September, 'C' Squadron supported the infantry in an attempt to reinforce the
small bridgehead across the Escaut, on the 15th. Here they fire 170 rounds of
HE, but observation was nearly impossible and no claims were made. Opposition on
the far bank was heavy but the crossing of the two infantry companies were
covered by the Squadron. During the action one tank was hit by HE and badly
damaged, whilst supporting an abortive attempt later in the day. After a short
period in reserved 3rd/4th CLY returned to 4th Armoured Brigade on 20th
September 1944. While 3rd/4th CLY was off in the Antwerp area, the Scots Greys with 'C' Company, 2nd KRRC moved before last light on the 8th
September to take over Lokeren from one squadron of the Inniskilling Dragoon
Guards. At first light the rest of the Brigade crossed the wooden bridge at
Termonde, which was later classified as capable of carrying 9-ton loads after
considerable repair, let along a Sherman tank!. The Brigade was led by 44th RTR with 'B' Company 2nd
KRRC and no enemy
were met with 44th RTR entering St. Nicolas in triumph on 9th September 1944. Meanwhile, 1st
Bn Rifle Brigade from
22nd Armoured Brigade had come under the Brigades command and had relieved the
Scots Greys in Lokeren. The Scots Greys were then order to move to Beveren Waes, north-east of St
Nicolas and on the opposite bank of the Scheldt to Antwerp and the rest of 2nd KRRC
came up to take over St Nicolas before 44th RTR moved any further.
By this time St. Nicolas was a scene of wild and delirious rejoicing, with
the crowds thronging the square and blocking the streets. In the middle of all
this celebration the Scots Greys, met a German column coming in the
opposite direction, while
moving up the by-pass just east of the town. The German had first opened fire on a recce party of 4th
RHA and at the
same time further German columns tried to enter the town from the north and
north-east. The battle which followed had a sobering effect on the crowds for a
time, but by the middle of the afternoon the enemy had either been destroyed or
withdrawn northwards and calm had been restored. On 10th September the Scots Greys liberated Beveren
Waes and met the enemy holding a strong position at Calloo and Fort Sainte
Marie, on the bank of the Scheldt. The Brigades objective now was to prevent the
Germans using the
ferry further north at Lillo. It was obvious that a full scale attack would be necessary to capture Calloo,
but the approaches to the town were completely open over boggy ground intersected with
dykes. 1/7th Queens, from 131st Lorried Infantry Brigade, 7th Armoured Division,
were put under the Brigades command for ensuing operation and arrived during the
afternoon. Everything was laid on for an attack at last light, but it had to be
cancelled as the medium artillery regiment assigned to support the attack was not forthcoming and the plan was changed,
the Brigades area to be handed over to the 1st Polish Armoured Division. The hand over took
place on 12th September and the Brigade moved back to Termonde, with the tanks having to go all the
way round through Wetteren. Next day the Brigade moved on again to a concentration area around Boisschot, where
it expected to get a few days for maintenance which was badly needed and to
await the return of 3rd/4th CLY, from Antwerp.
Go to Top
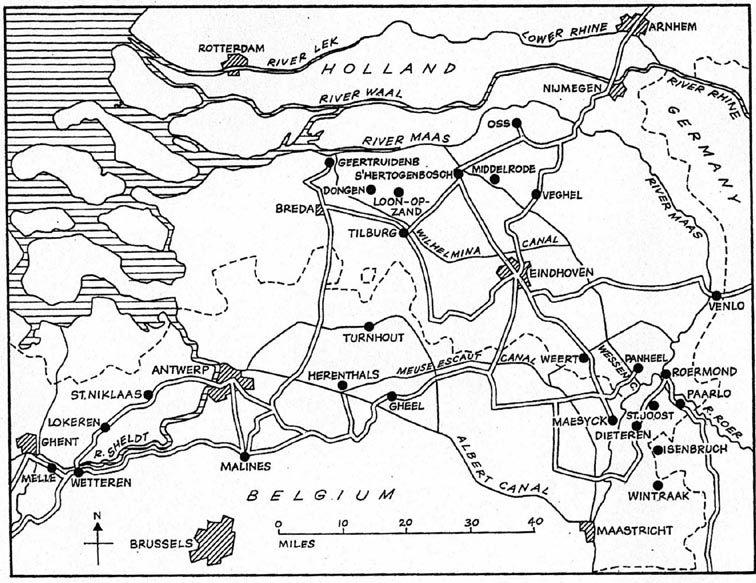
Operation Garden - Nijmegen:
On 17th September 1944, Operation Market-Garden (the airborne assaults on Eindhoven,
Nijmegen and Arnhem) commenced and 44th RTR moved to near Hechtel, coming under
command of 30 Corps. They were to link up with 101st US Airborne Division between
Son and Veghel on the road from Eindhoven to Nijmegen as part of Operation
Garden, the land based part of the whole operation. On the 18th the Brigade,
less 3rd/4th CLY and 44th RTR moved to 8 Corps and took over from
the Inns of Court Regt the line of the Junction Canal from Lanklaer to Bocholt,
on a front of 15 miles. Upon their return to the Brigade on 20th September,
3rd/4th CLY took over the
southern section of the front from 2nd KRRC and the 1st Belgian Brigade took over from Bree
northwards. By this time the Brigade had cleared all the enemy from the west bank of the
canal. The Arnhem operation
had started on 17th September and 44th RTR began to move forward on the 19th.
'C' Squadron made first contact with the enemy on the 20th and the rest of the
regiment joined the battle later the same morning. However, by later that day 44th
RTR had linked up with 101 US Airborne Division and there was then a strenuous fight to keep the
main road open. On 21st, 44th RTR advanced toward St Oeclenrode and continued a
fighting advance all that day, There was stiff opposition around Schinydel and
Veghel and by the 22nd the enemy succeeded in cutting the road north of Veghel.
However, 44th RTR successfully organised a counter-attack and the road
was open again early on the 24th. The Germans counter attacked again on the 25th
and the road was cut again south of Veghel, but again 44th RTR cleared it. The Germans never succeeded in reaching
the road again, after the regiment had managed to join up with the Guards
Armoured Div previously on 23rd September and forced the enemy to retire.
However, the Germans remained quite close to the road for a long time and the
44th RTR's anxieties were by no means over. The advance
continued with a lot of fighting until the 26th when the line was established
south of the Veghal to Boxtel railway. The regiment now withdrew for a rest and
refit to the village of Volkel. On 26th September, having handed over our front to the Royals, the Brigade took over from 8th
Infantry Brigade of 3rd British Division the area of Weert, a front of 12 miles along the
Bois le Duc and Wessem Canals. Here they were faced by German parachute troops whose
enterprising and aggressive patrols kept the Brigade busy every night. On 3rd October
the Scots Greys were relieved by 4th Bn. Grenadier Guards (Armoured) and moved up to Nijmegen coming under
command 30 Corps for the support of 101st US Airborne Division on an area know
as 'The Island', while 44th RTR concentrated at Volkel for a few days' sorely needed maintenance. On
the 6th October the Grenadiers left the Brigade without any relief, and this
left 3rd/4th CLY and 2nd KRRC to hold the entire front until we they relieved by
elements of 7th US Armoured Division on 8th October. The following day the brigade moved up to west of Nijmegen to join the
Scots Greys under command of 12 Corps, who had relieved 30 Corps. Next day
3rd/4th CLY crossed Nijmegen bridge to join 53rd (Welsh) Division and 44th RTR
moved up to join 50th (Northumberland) Division, while the Scots Greys remained with 101st US Airborne Division.
On 13th October, the Brigade also took over from 157th Infantry Brigade the area between the
Lower Rhine and the Maas, west of the Reichswald, with 61st Recce Regt and the Royal
Netherlands Brigade coming under its command. 2nd KRRC manned the south bank
of the Lower Rhine on the left flank of 101st US Airborne Division, who were on
the far side. This state of affairs lasted until the night of 17th October when
the whole brigade were relieved by 8th Armoured Brigade.
Go to Top
Clearing the Wilhelmina Canal and
Lower Rhine: On 18th October 1944, the Brigade moved to the area west of Eindhoven,
with The Royal Dragoons and the Royal
Netherlands Brigade also coming under its command. For the first 24 hours the
Brigade was under the 51st (Highland) Division command, but the following day it
reverted back to 12
Corps. On that day 2nd KRRC and 44th RTR took over the front north of
Poppel from a brigade of 49th Division. The Brigade was now on a front of twenty miles
from Eindhoven to where it linked up with the 1st Polish Armoured Division west
of Poppel. The Sharpshooters were supporting the Royal Netherlands Brigade and
the right squadron of The Royals, while the Scots Greys were supporting the rest of the front of
the Royals, with 4th RHA and the six guns of the Royal Netherlands Brigade supporting the
whole front. Between then and the 24th there was considerable activity in 2nd KRRC's area, but only patrols elsewhere. On
25th October, 15th (Scottish) Division on the Brigades right attacked westward
north of the Wilhelmina Canal and the 1st Polish Armoured Division on its left
attacked north-west towards Breda. In support of these assaults the Brigade
attacked towards Tilburg on two axes, with 3rd/4th CLY and the Royal Netherlands Brigade,
along with 'DD' Battery, 4 RHA, on the road from Hilvarenbeek, and 2nd
KRRC with 44th RTR, plus 'C' and 'F' Batteries, 4th RHA towards Goirle. Movement was severely hampered by mines, demolitions and boggy
state of ground and both groups were held up all day. As they advanced 3rd/4th
CLY encountered many enemy positions which were engaged and considerable
casualties inflicted, losing two Recce tanks in the process. However, by the 26th
the Brigade was moving into the outskirts of Tilburg
on the right and on the edge of Goirle on the left. During the night 44th
Brigade of 15th (Scottish) Division relieved our 3rd/4th CLY and the Royal Netherlands Brigade, which moved round to
Poppel. During the 27th, 2nd KRRC cleared Goirle finding more mines and demolitions
and the Royal Dragoons moved out on the left to fill the gap between them and the
Poles. To help finish building a bridge to the south of Goirle, HQ assigned
four Troops pf Royal Engineers to the area and just before last light, the Scots
Greys moved into the town after dark
with one squadron of The Royals. At first light on the 28th, with Tilburg having now
been entered by 15th (Scottish) Division, the Scots Greys and 2nd KRRC moved through the
western outskirts and west along the road to Breda. They regained contact with
the enemy south of Rijen about ten miles west of Tilburg and the rest of the day
was spent clearing Rijen, along with the woods to the south and south-west of
it. Meanwhile the Royal Netherlands Brigade and 3rd/4th CLY had moved up to take over the area
astride the main road and the Royals kept touch with the Poles in the area of
the aerodrome.
Next day, leaving The Royal Netherlands Brigade, the Scots Greys, 2nd KRRC and one
squadron of The Royals in the area of Rijen under command of 7th Armoured
Division, the rest of the Brigade, with the Royals less the squadron in Rijen, still
under command moved all the way back to their old sector of the front near Weert,
coming under command of 7th US Armoured Division in 8 Corps upon arrival. The
Brigade was joined there by the Scots Greys, 2nd KRRC and the remaining squadron of The
Royals next day.
Go to Top
Winter on the Maas: On 31st
October the Brigade came under command of 53rd (Welsh) Division who
also had been hurried to the Weert area to face the expected counter-attack which had
already begun further north. By 2nd November The Royal Dragoons had the our command
of the Brigade and
53rd (Welsh) Division had taken over the whole front, with 4th Armoured Brigade being in Divisional reserve
prepared to support all sectors, for the next ten days.
On 13th November 1944, 12 Corps' Operation "Mallard" began to clear the
enemy from west of the Maas. As part of the opening stages 44th RTR Tanks and the Vickers MGs of 2nd KRRC fired
a diversionary indirect shoot on the left flank before 3rd/4th CLY, supporting 160th Brigade, advanced by artificial moonlight at half past ten at
night to the banks of the Wessem Canal. The terrific display of fireworks
produced by 3rd/4th CLY and the flails of a Squadron of 2nd Dragoons, the Crocodiles
of a Squadron of Fife and Forfar Yeomanry (both from 79th Armoured Brigade),
plus a Squadron of Royal Engineers in AVRE, working with them
was so successful that no opposition was met on the canal itself at all. The
Class 40 bridge was not completed until half past seven on the evening of 14th
October and 44th RTR were first across to support 158th Brigade near Baexem,
followed by 4th RHA and 3rd/4th CLY, with the latter supporting 160th Brigade in
extending the bridgehead to either flank. The Scots Greys along with 71st Brigade crossed at
nine o'clock on the morning of the 15th and reached the outer defences of
Roermond, west of the river, before they met opposition, though mines were
plentiful. On 18th November, the Brigade then came under command of 49th (West
Riding) Division to support their attack to
clear the area beyond the Zig Canal up to Venlo. The brigade concentrated on the
19th on the road between Roggel and Meijel and on the 20th round Panningen. The
plan was for 44th RTR to support 146th Brigade on the right, with 3rd/4th CLY in reserve
ready to support 147th Brigade when they were used. The rest of the brigade
advanced on the left of 146th Brigade, passing through 49th Reconnaissance
Regiment RAC and taking
them under command. During the 21st progress was slow owing to a large number of
mines of all types, completely waterlogged ground and a few enemy SPs which could
not located. At first light on 22nd November, 2nd KRRC occupied Tongerloo, taking a few
prisoners, and 3rd/4th CLY and 44th RTR supported their respective
brigades up to the outer fringe of the western defences of Blerick, opposition
being more determined on the 44th RTR front, with problems with mines and bogs
not helping the situation. In this action 'C' Squadron, 3rd/4th CLY supported
2nd Bn. The Essex Regiment, from 56th Infantry Brigade as far as Korteheide
during morning and were relieved by half of 'A' Squadron at approx 12:00. 'C'
Squadron then remained at Korteheide , whilst the 'A' Squadrons tanks supported
2nd Essex up to an area North and South of Langeheide. The remainder of 'A'
Squadron joined 2nd Bn. South Wales Borders to the North of 2nd Essex, but there
was no contact with the enemy. Meanwhile, 'B' Squadron remained in Vosberg. The 49th
Reconnaissance Regiment now passed through 2nd KRRC, who remained concentrated where they were, as did
the Scots Greys. 4 RHA moved up to an area east of Sevenum and came under command CRA
49 Division. On 23rd November 3rd/4th CLY continued to support 56th Brigade,
with 'A' Squadron in support of 2nd Bn. South Wales Borders and although no
contact was made with the enemy, but there was occasional shelling. 'C' Squadron
protected 2nd Bn. The Gloucestershire Regiment left flank and when contact was
made with the enemy in woods nearby there was a brief engagement scattered the
enemy. 'B' Squadron then supported 2nd Glosters forward to their objective
encountering no opposition except for some heavy shelling at intervals. The
going was bad and impeded by mines with the RHQ Troop Leaders tank being damaged
by an Anti-tank mine, but without causing casualties. On the 25th the brigade left 49th
(West Riding) Division, except for 4th RHA and 3rd/4th CLY who remained to support them, and concentrated at rest south of
Someren, joined there by 3rd/4th CLY on the 25th. On 30th November 4th RHA moved
down to Hunsel, to support 53rd (Welsh) Division holding the line of the River Maas in
that area. At the end of November, those troops that could be spared were
allowed to take leave in Antwerp and Brussels. For the first two weeks of
December, more leave parties were sent out and the Brigade was able to undertake
essential maintenance work and training exercises. During this period Brigadier
Carver also inspected the Brigade. This situation continued until 17th December when the brigade came under command
11th Armoured Division in place of its 29th Armoured Brigade who had gone away to
re-equip. The armoured regiments stayed where they were, but with 2nd KRRC taking over the
line of the river from opposite Stevensweert to Wessem. The Inns of Court
regiment was also
under the Brigades command, holding the line south of them to Maeseyck, both supported by 4th
RHA. Main Brigade HQ now moved to Neeritter, leaving Rear HQ with the armoured
regiments south of Someren. For the rest of the month we continued this task, a
war of patrols, sniping and harassing, snow adding to the interests and hazards
of the job. On Christmas day the usual men's Christmas Dinner was consumed in the various
Squadron and Regimental canteens with due traditional ceremony, but as the
Brigade was at short notice, conviviality was restricted. On 28th December 1944,
'A' and 'C' Squadron, 3rd/4th CLY gave a children's party in the afternoon for
the benefit of the young of Asten. On the last day of the year, 44th RTR, with a battery of
63rd Anti-Tank Regiment under its command, relieved the Inns of Court regiment.
| Back | Main | Site Map | |
| Engagements in the Desert | Engagements 1942 | Engagements 1943 | Engagements 1945 |
| 4th Armoured Brigades Engagements Page | 4th Armoured Brigade Artefacts and other information | ||