Engagements - 1941
During 1941 the 7th Armoured Division was involved in the following battles and campaigns. These include
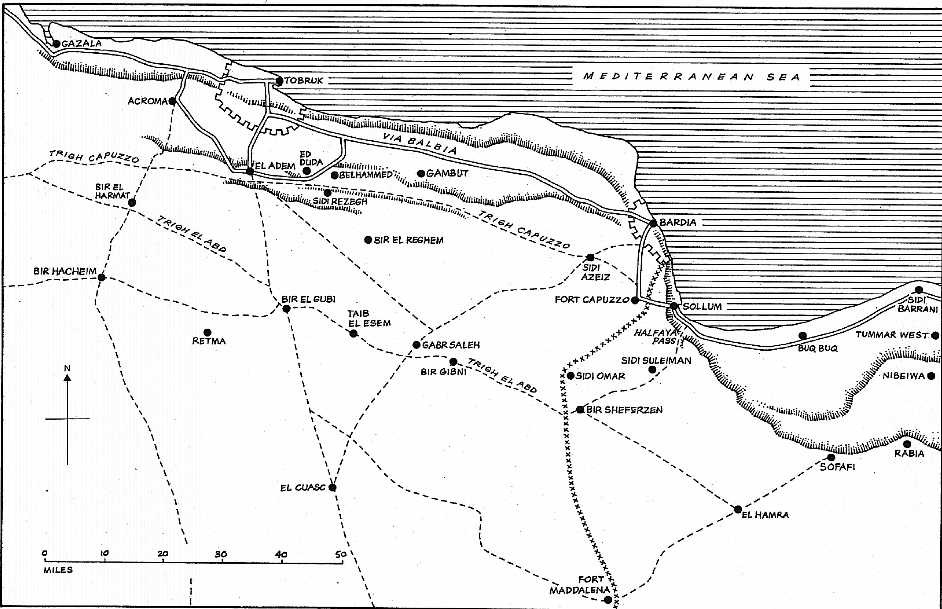
Bardia and Tobruk, Beda Fomm, Rommel's First Attack, Operation Brevity, Operation Battleaxe and Operation Crusader (including Sidi Rezegh, Rommel's Raid, The Axis Withdrawal and Clearing Cyrenaica).View map of North Africa (This is a large file and may take some time to download)
Bardia and Tobruk (January 1941)
On 1st January 1941, the Western Desert Force was renamed 13 Corps and the newly named Corps began the year by moving 7th Armoured upto block the coast road west of Bardia. To help with the cold of the desert 11,500 sleeveless jackets were rushed up the desert, as the weather at the time consisted of heavy rain, icy winds with sleet, fog and was very cold. On 3rd January the town was attacked by 6th Australian Division, supported by twenty-two Matilda tanks of 7th RTR. Over the previous nights the RAF had bombed the port while HMS Terror and Aphis had bombarded it from the sea, 4th Armoured Brigade supported by Combeforce patrolled the Western perimeter, while the Eastern Sector to Sollum was controlled by 7th Armoured Brigade.
The assault was preluded by a 120 gun barrage, mainly on a 800 yard front around Sidi Azeiz to the west and a feint attack from the south. At sea three Battleships and four Destroyers of the Royal Navy pounded the area to the north of Bardia. The town fell 2 days later, with the Australians fighting superbly, with excellent support from 7th RTR. To the north 6th RTR had also made an attack and one tank commander found himself in charge of 1,500 prisoners. In total 45,000 Italians were taken prisoner, with the loss of 130 Australians killed and 326 wounded. While the prisoners were counted 7th Armoured moved again to carry out a similar blocking action to isolate Tobruk, while with the loss of the Bardia and the garrison captured, along with all the guns, General Bergonzoli (who had escaped from Bardia on foot) regrouped at Tobruk.
Tobruk had a valuable harbour which was about double the size of Bardia, and the town was defended by a garrison of 25,000 seasoned men, under the command of an Italian Admiral. The town was protected by two perimeters of defence, with the outer perimeter being 30 miles in length, while the inner was some 19 miles and both consisted of wire, minefields and defence posts. The Italian Navy were also there and several large guns from the Cruiser San Giorgio had been brought ashore and like the garrison were well dug in.
The British plan was to use the formula of Australian Infantry and British Armour, but before the attack could start 7th Armoured Brigade, along with the Support Group encircled the town to the west while 4th Armoured Brigade pushed west from Trigh Capuzzo, through El Adem, to drive the Italians into the perimeter defences. Both Brigades had completed the work by 6th January and by the 7th the Australians and 7th RTR with their Matildas had arrived and were in place.
As in any desert campaign logistics and support play a key role and the Forward Supply Depots of 7th Armoured Division were upto 100 miles behind their present position and the facilities at Bardia had been well and truly put out of action by the combined efforts of the RAF and the Royal Navy. Fortunately, the small port of Sollum was available and the British 16th Infantry Brigade was able to set up a supply depot there. However, the Division's tanks were in need of maintenance as they done very high track mileage, but there was limited repair facilities. As a result of this on 18th January 1941, 6th RTR handed over 13 Light tanks, 11 Cruisers and 24 wheeled vehicles to 1st RTR, 2nd RTR, 4th RHA and 7th Hussars and then withdrew to Sidi Barrani, then onto Cairo. Shortly afterwards 8th Hussars also handed over what serviceable tanks they had and headed for Cairo, too.
Despite these problems the attack started on 21st January and was a repeat of Bardia, but this time against more determined opposition. While Division contained the outer perimeter, the Australians with the Matildas of 7th RTR in support, fought there way through the defences under heavy shellfire. Forts Pilastrino and Solaro did hold out for a while, but eventually the Port along with Admiral Vietina and 27,000 prisoners, 230 guns and some 200 vehicles, fell to the Australians on 22nd January. Alas once again General Bergonzoli managed to slip away again, however, some jetties in the port were usable, the Power Station was still operational. This meant that supplies could be landed and the two water distilleries, along with some sub-artesian wells could provide thousands of gallons of slightly brackish water. This all helped to reduce the supply problems for the British and Australians.
As the Australian and British pursued the retreating Italians a tank battle took place on 24th January near Mechili. By the end 2nd RTR had knocked out 9 Italian M-13s for the lost of one Cruiser and six Light Tanks of 7th Hussars. Now General O'Connor now moved the Australians towards the small port of Derna, some 100 miles west of Tobruk. To the east of the town lay Wadi Derna and the 19th Australian Brigade was held up here for four days by heavy shell fire. However, by 30th January the town's garrison has withdrawn to the Green Jebel Akhdar Mountains and the Australians entered the town.
This effectively bought to an end the 'Five Day Raid' that Operation Compass was originally planned to be. This was a marvellous achievement for a Corps of just two Divisions, one of which was new to the desert and the other which was seriously short of tanks, that decimated a force ten times its size. This success meant that General Wavell was able to occupy the airfields near the front line and garrison Tobruk, with a view to completing the rout of the Italian 10th Army, which was still in retreat through Cyrene and Barce, towards Benghazi and beyond.
Beda Fomm (5th to 7th February 1941)
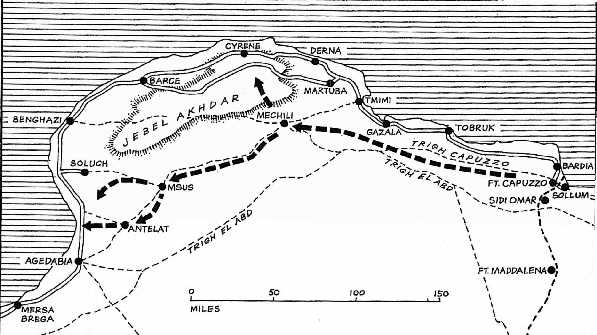
A look at a map of North Africa shows that Tobruk lies on the North Coast of Cyrenaica, while Benghazi is over 200 miles away, by road, on the Gulf of Sirte. Across the open desert the distance is only about 150 miles, so given the success of the Anglo-Australian armoured hook and infantry assault, sending a force across the desert to cut the coast road south of Benghazi was a viable option. This would then lead to a Australians chasing the Italians along the coast road through Barce and Benghazi, while 7th Armoured cut the road between Sidi Saleh and Beda Fomm. However, the desert south of Jebel Akhdar was unmapped, waterless and rough terrain, so as the Division moved south west through Msus and Antelat the tank regiments slowed down.
The Australians continued to push along the coast and Cyrene fell to them on 3rd February and later Barce was found to be empty. With now both 6th RTR and 8th Hussars returned to Cairo, 3rd Hussars were lent to the 4th Armoured Brigade, but the Division's tank strength was in a serious condition, with a total of 80 poorly armoured Light Tanks, which were no use as Main Battle Tanks and only 40 A9, A10 and A13 Cruiser tanks with their 2 pdr guns. So on 4th February the 4th Armoured Brigade, with 'A' and 'C' Squadrons of 11th Hussars in front had struck out across the desert. along with a squadron from King's Dragoon Guards (KDG). Behind them were 50 Cruisers and 95 Light Tanks, from the three tank regiments (3rd and 7th Hussars and 2nd RTR), followed by 2nd Rifle Brigade, 4th RHA and a battery of anti-tank guns from 106th RHA. By 1530 hrs, 11th Hussars had cleared the fort at Msus of the Italian rearguard, but it was realised that the tanks were moving too slowly. It was decided that the faster vehicles and the infantry of the Rifle Brigade, in Bren Gun Carriers, would join the 11th Hussars, who were now far ahead of the main force. The force was placed under the command of Lt-Colonel John Combe (11th Hussars) and was therefore called "Combeforce". Combeforce consisted of 11th Hussars, with a squadron of the King's Dragoon Guards (KDG) and No.2 RAF armoured car company (acting as the 'D' Squadron of 11th Hussars); the motorised 2nd Battalion The Rifle Brigade,
2-pdr Anti-tank guns from 'D' Battery of 3 RHA, plus 'C' Battery 4 RHA. This force of about 2,000 men hurried to cut the coast road south of Benghazi. Speed was essential, as the Italian's were already evacuating Benghazi, if the Italian army was to be cut off.
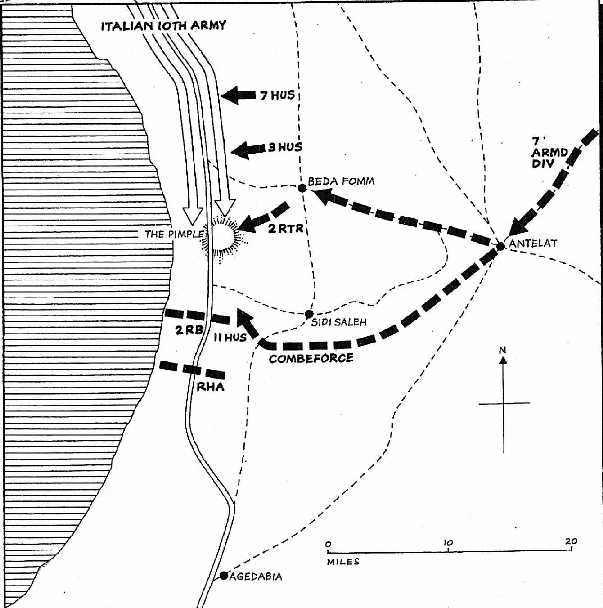
The march began on 5th February and Combeforce reached Msus, north east of Beda Fomm later that morning, hitting the coast road near Sidi Saleh about noon, 10 miles south of Beda Fomm. Within 2 hours a company of 2nd Rifle Brigade were in position across the road with two more companies screening the positions occupied by 4 RHA, who were commanded by Jock Campbell. With rifle and machine gun 'A' Company, the Rifle Brigade, soon brought the Italian column to halt, ably supported by 'C' Battery, 4 RHA and 'C' Squadron, 11th Hussars. As the traffic began to pile up, the Italian's began to fan out across the desert to the sea, to probe south, and thus they engaged more of Combeforce. They barely had time to take up position before a column of Italian lorries came down the road at about 14:30, only to find 'A' Company, the Rifle Brigade, blocking their way. The positions of 2nd Rifle Brigade were such that 'A' and 'B' Companies of the Rifle Brigade were astride the road, with 'S' Company stretched from the road to the sea and 'C' Company in reserve about 500 yards behind. Combeforce found itself in the path of an entire army in retreat. It was now that 7th Hussars, supported by 'A' Squadron, 2nd RTR, which had 6 of the faster A13 tanks were ordered by Brigade Caunter to attack the Italians on the road nearer to Beda Fomm. The Hussars destroyed a transport column and 'A' Squadron, 2nd RTR joined the action just before 1800 hrs when they attacked an Italian Infantry column. During this action a Trooper from 2nd RTR captured two Italian M-13's on foot, by jumping on each and, after opening the hatch, forced the crews to surrender at pistol point.
The fighting continued all day on either side of the road, but despite increasing pressure and a growing shortage of ammunition, the Rifle Brigade and 11th Hussars held out and continued to block the road, with sporadic fighting throughout the night of 5th/6th February. At about 10:45, in heavy rain, on the 6th some Bersaglieri units supported by a few L-3 Light Tanks attacked the roadblock defended by 11th Hussars and 2nd Rifle Brigade. The attack consisted of three columns, each with 300 vehicles. Two half-heated attacked were beaten off and Italians started to surrender after being engaged by anti-tank guns, but it took another hour to beat off the third more determined attack, which was supported by guns and tanks. The toll of prisoners was increasing into the thousands and to the south the KDG squadron was also becoming embarrassed by the number of prisoners they taken, too. During the battle a continual stream of prisoners came in, and all had to be hastily disarmed and sent off in the direction of the improvised "cage" guarded by a platoon of "C" Company, 2nd Rifle Brigade. On 6th February the rest of 4th Armoured Brigade arrived and struck the Italians in their left flank at Beda Fomm further north. With this the Italian rout was complete.
However, there was no quick collapse and the Italians continued to press home their attacks, with tenacity and increasing desperation, especially as they had advantage of numbers and a large supply of ammunition. Seven miles north of the roadblock were the only landmarks in the area, which were a white Mosque and two windmills, on a low ridge known as the Pimple. It was north of here that the Light Tanks from 3rd and 7th Hussars were harassing the extended flanks of the Italian column and engaged much of the Italian artillery. But it was 2nd RTR with its 19 Cruisers that did the most damage. The 3rd Hussars put 8 Light Tanks around the Pimple and broke up wave after wave of Italian tanks, which were coming down the road in batches of thirty, only to encounter cruisers tanks of 2nd RTR which were in hull down positions. 2nd RTR probably accounted for 100 tanks in total in the three day battle, but the Italian artillery managed to knock out four of its tanks. One of its tanks fired 112 rounds of 2-pdr ammunition and knocked out at least 10 M-13's in the process. At one time the ammunition actually run out, but the supply lorries arrived at 1300 hrs, by when 7th Hussars and 2nd RTR were down to ten operational cruisers.
During the fighting the Pimple changed hands many times and at the roadblock 2nd Rifle Brigade had to stop infiltration by the Italians through the sand dunes by the sea, but the support from the guns of 4th RHA was magnificent, with them knocking out about six Italian tanks. However, but the middle of the afternoon the key point in the battle was reached.
Although the Light Tanks of 3rd and 7th Hussars were very effective in breaking up the columns of advancing Italian Infantry, they were vulnerable to the fire from the Italian M-13 tanks. The ammunition for the tanks and the 25-drs was in short supply and the forward observation post for the artillery had been knocked out. It was now that after many requests for 1st RTR to be released from the Divisional reserves, that it finally was. 1st RTR arrived by one of the windmills on the Pimple as 7th Hussars and 2nd RTR were refueling and re-arming. The commander of Cruiser tanks from 1st RTR, surveyed the scene and saw for miles in each direction that the road was packed full of lorries, guns, cars, buses and tanks. 1st RTR fired everything they had and the column dispersed in every direction, thought some of the Italian guns were brought into action and did score hits on the tanks, inflicting no damage. 1st RTR's arrival had averted the crisis for 4th Armoured Brigade, as at midday only six tanks had been in action at 'The Pimple' as others had been knocked out, broken down or were replenishing. Elsewhere a Battery Commander (Major Burton) from 106th RHA having seen his last gun crew wiped out by Italian machine gun fire, drove the portee away to check the gun was still serviceable, which it was. Then he and his batman proceeded to destroy five M-13 tanks in return.
At 14:20 the British attacked an Italian column and about an hour later it was reported that Italian tanks were trying to escape to the Northeast. During the afternoon the battle remained evenly balanced as the British had no more tanks reserves and were greatly outnumbered by the Italians. But 7th Hussars had found the rear of the Italian column and were working their way down it with no one behind them, while at the other end 2nd RTR, who now had just seven Cruisers left (including two from RHQ), were facing a force of over twenty tanks with another thirty further back, supported by artillery. In the middle 1st RTR were pursuing about 20 Italian tanks to the Northwest and the three remaining tanks for 3rd Hussars were moving the contact the enemy retreating northwestwards, too.
As night fell 4th Armoured Brigade withdrew to leaguer, accompanied by 1st RTR, just north and south of Beda Fomm. Including the tanks from 1st RTR the brigade now had 39 undamaged tanks, 48 hit by gun fire, with 8 knocked out, one burn out and another 8 out of action for unknown reasons. This was a total of 101 tanks. To the north Support Group was pushing towards Ghemines to attack the Italians in the flank and the rear.
At about 21:00 the Italians attacked the Riflemen with three columns supported by tanks. After avoiding a small minefield they broke into the Rifle Brigades lines, mainly due to the loses in the anti-tank gun crews which limited the support they could provide. But the line did hold and 500 prisoners were rounded up and at about 22:00 two more guns from 106th RHA arrived to bolster the defences. More mines were laid and when the next attack started the lead vehicle was blown up and another 150 prisoners taken. At midnight a column moving across the front of the road block was broken up and at 04:00 on the 7th two M-13 tanks were captured by just two men from the Rifle Brigade. All over the battlefield there were knocked-out, ditched and abandoned tanks, burnt out vehicles and many Italians roving about trying to surrender.
During the night of 6th/7th December it was quiet in the Beda Fomm area and at dawn 7th Hussars sent patrols out to the north and northwest, while 2nd RTR was ordered to move south to assist Combeforce at the roadblock at Sidi Saleh, but arrived to late to take part in the final stages of the battle. The Support Group soon made contact with 7th Hussars. At 11:00 General Virginio, Chief of Staff on 10th Italian Army arrived at the Headquarters of 4th Armoured Brigade with the Army Staff.
Earlier to the south at the roadblock near Sidi Saleh, the Battalion HQ of 2nd Rifle Brigade had been heavily shelled at 06:30 and shortly afterwards two large columns with tank and artillery support attacked. The column on the road managed to penetrate into the reserve company area before it was stopped by accurate artillery fire and one tank even reached the Battalion HQ before it was knocked out. The lorries carrying the infantry were soon halted by the heavy small arms fire and the occupants started to surrender. With the attack halted white flags began to appear all along the Italian column. Italian General Tellera had been wounded and later died and Generals Bignani, Negroni, Bardini and Giuliano, along with dozens and dozens of Brigadiers and Colonels had all been captured, along General Bergonzoli, who had so long evaded the British. With General Bergonzoli's capture the battle was over and the 10th Italian Army ceased to exist. In total over 25,000 prisoners, 100 tanks, 216 guns, and 1,500 other vehicles were captured. For the next three days the British rounded up prisoners and captured transport, much of which had become stuck in soft sand while trying to avoid the fighting. Everywhere there was wine, chocolates, tins of fruit and much more. All the Division had clean Italian shirts to wear, the officers all found cars to drive and many a soldier found himself in possession of a motorcycle. Tools for the fitters were also liberated and the doctors found medial equipment of very high standards available.
Once the Italians surrendered at Beda Fomm, General O'Connor had send the Support Groups westwards. 'C' Squadron, 11th Hussars captured Agadabia and the barracks at El Aghelia. Benghazi fell on 9th February and the surrender was taken the Australians had taken Barce, El Abiar, Regima and Benina airport.
By now the port at Tobruk was open and the one at Benghazi soon would be, which would help the supply problems, but the remainder of the division was in no shape to follow as the tank strength was now down to twelve A13 Cruiser tanks and forty Mark VI Light tanks. Therefore, it was decided to withdraw the Division back to Egypt for re-equipping, with the 11th Hussars being relieved by the King's Dragoon Guards as the vanguard of the army, with 2nd Armoured Division replacing the 7th Armoured Division. Winston Churchill wrote;
" In two months the Army of the Nile had advances 500 miles, had destroyed an Italian Army of more than nine divisions and had captures 130,000 prisoners, 400 tanks and 1,290 guns. The conquest of Cyrenaica was complete."
With the need to put troops into Greece, General Wavell was not able to advance into Tripolitania and drive the Italians from North Africa. So men were taken from the desert to help out in Greece and Eritrea, where the Italians had been ordered draw some of Wavell's fire. The 6th Australian Division, along with the New Zealanders and 1st Armoured Brigade from 2nd Armoured Division were sent to Greece, which left the defence of Cyrenaica, to a one brigade and the support group of 2nd Armoured Division. At this time the 7th Armoured Division was in the Nile delta awaiting new equipment, but as a fighting force it had virtually disintegrated.
Of 7th Armoured Division Churchill wrote:
"At the end of February the 7th British Armoured Division had been withdrawn to Egypt to rest and refit. This famous unit had rendered the highest service . Its tanks had travelled far and were largely used up. Its numbers had shrunk by fighting and wear and tear. Still there was a core of the most experience hard-bitten, desert-worthy fighting men, the like of whom could not be found by us. It was a pity not to keep in being the nucleus of this unique organisation and rebuild it by drafts of officers and men arriving trained, fresh and keen from England and to send them the pick of whatever new tanks or spare parts that could be found. Thus the 7th Armoured Division would have preserved a continuity of life and been resuscitated in strength."
On 14th February, the 11th Hussars had met the new enemy in the desert, near El Agheila, in the shape of aircraft of the German Fleigerkorp X, which were only the first part of a new force, the Afrika Korps, which was coming ashore in Tripoli.
During the first attack the planes (ME 110s) were engaged by 4 Bty, 106 RHA Bty RHA’s Breda guns, small arms fire and the three Bofors guns. One plane was shot down and two others reported damaged. The plane shot down forced landed near a patrol of two cars from 'C' Squadron. They watched the plane on the ground and reported that the other planes machine gunned it on their way home. After this the patrol he proceeded to the plane to collect the crew, which consisted of a WO pilot, and a wireless operator L/Cpl, both of whom were unhurt. The pilot spoke some English and explained his desire to be taken to the Commandant. When one car commander went to investigate the plane and see if there was anyone else in it and to collect any documents there might be, the pilot showed considerable agitation at this move and by word and gesture intimated that the plane might explode. The plane was not badly damaged, except for a burst petrol tank on the near side and a Breda shell through the near side engine cowling which had severed some oil pipes. The Hussars recovered documents from the plane including one showing its route to North Africa and details of hotels in Naples.
ROMMEL'S FIRST ATTACK (March - April 1941)
General Erwin Rommel arrived in North Africa on 13th February 1941, bringing with him the Afrika Korps and the crack Italian "Ariete" armoured division. His forces were equipped with the Panzer MK III & MK IV tanks, which were superior to the tanks the British had available. He also brought with him the scourge of allied tank crews, the 88mm dual-purpose gun. Most of his force disembarked at Tripoli by 11th March and Rommel struck at the British on 31st March.After the success at Beda Fomm, the British felt that they could hold the new front line without further reinforcements and in fact they even considered an advance to Tripoli, thereby securing the Libyan shore, but the arrival of Rommel put a stop to the latter. General O'Connor had returned to Cairo, for a rest, handing 13 Corps over to General Philip Neame, VC. The British advance had halted at Mersa El Brega gap, between the desert and the coast, just east of El Aghelia and it was here that Rommel struck on 31st March, with the Italians supported by 120 MK III and MK IV tanks. With 7th Armoured refitting in the Nile delta, the forward positions were held by scattered elements of the 2nd Armoured. The Panzer III and IV's cut through the British armour like a knife through butter, assisted by the Luftwaffe.
With one of its two Armoured Brigades in Greece, the 2nd Armoured Division fell back on Antelat, having been forced out of Mersa El Brega, with Rommel's forces on their heals and by 3rd April the British were in full retreat. The 3rd Armoured Brigade, 2nd Armoured Division consisted of 3rd King's Own Hussars, 5th and 6th RTR, but 3rd Hussars were re-equipping with captured M-13's when the attack started, while 5th RTR was equipped with British Cruisers and 6th RTR with captured M-13's. With many of the tanks in the workshops, its total fighting strength was about 52 tanks, effectively the strength of one armoured regiment. Rommel took Benghazi on 3rd April and on 6th April a motor cycle patrol captured General O'Connor, General Neame and the newly promoted Brigadier John Combe formerly of the 11th Hussars. 6th RTR had communication problems as the refit of the captured M-13's was not complete and there was a shortage of Diesel fuel for them, as did 3rd Hussars and by 6th April many M-13's from both regiments had been abandoned and destroyed due to mechanical breakdowns, with some of 3rd Hussars tanks being handed over to 'C' Squadron, 6th RTR who at least had been trained on them, with both 'A' and 'B' Squadrons of 6th RTR being lorried mounted by 7th April. On 7th April the commander and most of the 2nd Armoured Division surrendered at Mechili, with the Australian 9th Division withdrawing to Tobruk on 9th April, along with parts of 3 RHA to provide anti-tank defence. What was left of 3rd Armoured Brigade was ordered to fall back on Tobruk, where 6th RTR were to collect 18 light tanks. By now its strength was 3rd Hussars; 14 officers and 124 ORs, 5th RTR; 9 officers and 100 ORs and 6th RTR; 9 officers and 150 ORs. By 1200 hrs on 8th April those units of 3rd Armoured Brigade which had concentrated in the staging camp, were moved by lorries to the underground magazines to the East of Tobruk. The Commanding Officer of 6th RTR was Officer in Charge (OC) of this Force, then proceeded to organise a 'mobile reserve of riflemen'. Four companies were formed in all, two by 5th RTR and one each by 3rd Hussars and 6th RTR. These troops were mounted in lorries and could be rushed to any locality where danger threatened. The Light Tanks that had been collected were organised into a small Force HQ.
By 12th April Bardia was captured, with Sollum and Fort Capuzzo falling the next day. In just 2 days Rommel had driven the British out of Libya, save the beleaguered fortress of Tobruk. As well as the 9th Australian Division, a Brigade group from 7th Australian Division, was rushed to Tobruk by sea escorted by the Royal Navy. With this force went 'B' and 'C' Squadrons of 1st RTR with twenty MK IVB Light Tanks and sixteen A9 and A10 Cruiser Tanks, plus four Matildas from 4th RTR. Also among the defenders of Tobruk were other units from 7th Armoured, which include 'A' Battery (Chestnut Troop), 1 RHA, which had just joined the refitting Division, 51st Field Regt RA, which was a Corps units just assigned to support the Division and some of 11th Hussars, too. The latter had been in Tobruk purely by chance as on 8th April two Marmon-Herrington Armoured Cars had bee taken the Ordnance depot in the town to have Breda AA MGs fitted. The work was incomplete when the siege started so the joined the 3rd Hussars Group providing AA support. After later protecting the airfield the armoured cars and crews were evacuated back to Alexandria a month later. On the afternoon of 14th April what was left of 3rd Armoured Brigade was evacuated by sea, by which time its strength was 72 officers and 1149 ORs.
Frantic measures were taken to get 7th Armoured fit to fight, but with the threat to Greece taking most of the new equipment arriving in the Middle East, this was not easy. The first units to leave to the fray were 1st Battalion KRRC on 29th March, with the 11th Hussars following on 5th April, now in Marmon-Harrington armoured cars, instead of their old Rolls Royce and Morris ones. The Hussars moved up to El Adem to patrol a fifty-mile front from Acroma, south to Bir Hacheim. The Hussars stayed in contact with the Germans until Tobruk had been surrounded, before withdrawing to the frontier wire, in good order. On 14th April command of the forward elements of 7th Armoured passed to Brigadier Gott.
The 11th Hussars set about training the 4th South African Armoured Car Regiment, in the art of reconnaissance and desert warfare and in August the South Africans were to relieve the 11th Hussars. Also while the Germans were starting to besiege Tobruk "Little Sister" Jock columns, consisting of a company of Rifle Brigade or KRRC, a troop of
25-pdr guns, plus a detachment of RE and Signals, raided between the lines attacking enemy convoys.On 30th April the 2nd Bn Rifle Brigade joined the mobile force and fortunately the Germans halted to bring up supplies and in during the last two weeks of April Rommel had brought more of his forces to besiege Tobruk. This gave the British a chance to regroup. By this time the Germans had taken Halfaya Pass, with the British holding the escarpment to the east, from which they planned to hit back and stall any further German advances into Egypt.
OPERATION BREVITY (15th - 27th May 1941)
By 28th April 1941, 300 new tanks and over 50 Hurricanes were on their way to the Nile Delta, so General Wavell decided that he would counter attack against the enemy positions at Sollum and Fort Capuzzo, with the aim of pushing Rommel back from the frontier and relieving Tobruk. This attack was codenamed Brevity and was launched on 14th May. At this time the British forces consisted of the Support Group of 7th Armoured, the 11th Hussars, the motorised 22nd Guards Brigade, along with some artillery, plus the 2nd RTR from the 7th Armoured Brigade (equipped with 29 reconditioned
A9 and A10 Cruiser tanks) and 4th RTR (equipped with 26 Matildas).The plan was for a three pronged offensives with 4th RTR and 22nd Guards Brigade were Halfaya Pass, while on the coast 2nd Rifle Brigade, with artillery support advanced on Sollum. Inland the Support Group were to act as screening force on the left flank.
The attack started on 15th May and the assault on Halfaya Pass, was the achieved completed surprise, only being held up by some Italian gunners, who knocked out seven tanks before being overrun. This attack alerted the Germans at Fort Capuzzo, who greeted 'A' Squadron, 4th RTR, with a hail of shellfire, but eventually by 17th May both the fort and Halfaya Pass were in British hands for the loss of 160 British casualties, 5 Matildas destroyed and another 13 damaged. 2nd RTR fought two engagements with German tanks and eventually had to withdraw to Sidi Suleiman, as its tanks were suffering mechanical problems. Elsewhere 1st Durham Light Infantry were pushed out of Fort Capuzzo to Musaid with heavy loses.
With more German tanks coming to engage the British, Brigadier Gott decided to halt his advance and pulled back to defend Halfaya Pass, above Sollum, which was defended by a squadron of 4th RTR and 3rd Bn Coldstream Guards. On 27th May, a force of 70 German Tanks in three battle groups attacked Halfaya Pass and two weeks after the Operation had started the force holding it was pushed it out, with the Coldstream Guards falling back with the loss of 100 men.
"Brevity" failed in achieving its aim of relieving Tobruk and destroying large amounts of enemy equipment, with the Germans recovering most of their own knocked out tanks. They also recovered many abandoned British ones, mainly due to the superior skills in tank recovery.
A map of the area of Operations Brevity and Battleaxe is below.
With the British back across the border wire, Rommel proceeded to fortify the Libyan frontier with thick belts of mines, covered by well dug-in 88mm guns. He then sat back to wait for the next British assault.
OPERATION BATTLEAXE (14th - 17th June 1941)
On 12th May 1941 a convoy codenamed "Tiger" arrived in Alexandria, bringing 135 Matildas, 82 of the new Crusader tanks (armed with 2-pdr guns) and 21 light tanks. Alas when SS Empire Song sunk after hitting a mine another 57 tanks had gone down with her . This was a total of 238 new tanks for the desert war. Wavell informed his staff and the High Command that due to difficulties in rebuilding 7th Armoured Division meant that the earliest date for moving forward from Mersa Matruh would be 7th June 1941. Thus all the Crusaders and the Light tanks were destined for 7th Armoured Brigade with the Crusaders being used to equip 6th RTR, while 2nd RTR was equipped with A9's, A10's and some A13's. The 4th Armoured Brigade (4th and 7th RTR) was given the Matildas, so they could support the 4th Indian Division, recently returned from its triumphs against the Italians in East Africa. 4th and 7th RTR were actually part of 1st Army Tank Brigade, but their Brigade HQ had not arrived and 4th Armoured Brigade was without any regiments. The Support Group consisted of 1st KRRC and 2nd Rifle Brigade, who were the Division's Motorised Infantry supporting the tanks, and 1st, 3rd, 4th and 106th RHA, as the Division's Artillery. At this time 3 RHA only consisted of 'D' Battery as 'J' and 'M' Batteries were part of the Tobruk Garrison. Alas both the Armoured Brigades lacked a third regiment and the regiments in each were not at full strength either. Additionally, having been without tanks for so long many of the crews still needed training. However, with this new equipment General Wavell planned his next offensive, "Operation Battleaxe". His aim was to destroy the Germans and a decisive victory on North Africa, if nothing else the action may relieve Tobruk.
The plan was to attack and retake the old border posts Sollum, Fort Capuzzo and the Halfaya Pass in the first attack, using the 4th Indian Division, with 4th Armoured Brigade in close support. Once the enemy line had been breached, 7th Armoured Division would then join 4th Armoured Brigade and break through to Tobruk. Once Tobruk had been relieved the garrison and 7th Armoured Division would push on to secure a line between Derna and Mechili. The German/Italian strength was estimated to be 13,000 men and 100 tanks near the wire and a further 25,000 men and 200 tanks around Tobruk. The German Afrika Korps had the advantage in anti-tank guns with a dozen 88mm used in an anti-tank role, which could knock out even the heavily armoured Matildas at nearly 2,000 yards. In total they had 143 anti-tank guns of which 54 were the long barrelled 50mm Pak 38, which had a better performance than the British 2-pdr at 1,000 yards. The British relied upon the field artillery with its 25-pdr guns to knock out the German and Italian anti-tank guns before they could do too much damage to the advancing tanks. Therefore, part of the plan was to defeat the frontier forces before reinforcements could arrive, from Tobruk 80 miles away. Click here to view the Divisional Order Of Battle at this time
The attack started on the night of 14th-15th June, with the British advancing in three columns, with the British having some 300 tanks to the Germans 200, of which only about 100 were Panzer III & IV's armed with guns. However, Rommel had prepared well and had placed almost all his anti-tank guns, including the 88's near the front line. As dawn broke the right hand column approached Halfaya Pass, over the top of the escarpment, but things started to go seriously wrong. 'C' Squadron, 4th RTR, supporting 2nd Cameron Highlanders came up against 88mm's entrenched in stone sangers, with only their muzzles visible. By 10:00 hrs 'C' Squadron was reduced to one Matilda and one Light tank, having been "torn apart by the 88mm's and the Camerons were forced to withdraw by infantry counter attacks, suffering great casualties in the process. The other two squadrons of 4th RTR along with 7th RTR supported 22nd Guards Brigade in their assaults on Sollum and Fort Capuzzo. The heavily defended Point 206 was bypassed, but by midday the centre column, led by 7th RTR, had captured Fort Capuzzo, with the loss of 5 tanks. Later counter attacks increased 7th RTR's tank losses by another nine. By the end of the 15th out of the 100 Matildas that had started the battle only 37 were operational, but by morning hard work by the fitters had increased this number by another 11. This engagement became known as the Battle of Halfaya Pass, which became known as "Hellfire Pass", by the British.
Meanwhile, the main force of 7th Armoured Division was preparing to hook round the German southern flank, led by 7th Armoured Brigade, equipped with the new Crusaders. To keep the Crusaders a surprise, the column was led by A9 and A10 Cruiser tanks from 2nd RTR. The first objective was Hafid Ridge, which was in fact three ridges. So on 15th June 2nd RTR attacked supported by an RHA Battery, but had to eventually withdraw from a isolated position having encountered a deep defensive line of enemy guns. On 2nd RTR's left flank 6th RTR now attacked Hafid Ridge with their 52 Crusader tanks, while infantry attacks were made on Halfaya Pass and Fort Capuzzo. There was a report that the Germans were withdrawing so 6th RTR's 'B' Squadron advanced over the first ridge, only to encountered a line of guns concealed behind dummy trucks, with only 2 tanks escaping the slaughter. The Germans counter attacked and this was met by 'C' Squadron 6th RTR which had orders to hold this force at all cost. The battle became long range duel, with the British 2-pdrs hopelessly outclassed by the German 50mm and 75mm guns and by nightfall only 15 tanks were left. By 20:20 this was back upto 20 serviceable tanks and by dawn on 16th June 6th RTR consisted of RHQ with 3 tanks, 'A' Squadron with 7 and 'C' Squadron with 11 tanks. 2nd RTR ended the day with just nineteen serviceable tanks.
The advance of 2nd and 6th RTR had only managed to secure the first of the Hafid ridges and German tanks and anti-tank guns were hurrying from Tobruk. The Crusader tanks of 6th RTR were engaged by Panzer III and IV's, with 17 being knocked out or simply breaking down. By the end of the first day 7th Armoured's tank strength was down to half, while most of the German forces were still intact and receiving the reinforcements from Tobruk.
On the second day of "Battleaxe" (16th June) the 7th Armoured Division advanced for another assault on Hafid Ridge, with the help of the Matilda tanks of 4th Armoured Brigade, having been recalled from supporting 4th Indian Division. The attack was to be supported by artillery, while the Support Group and 7th Armoured Brigade stood by to either reinforce the attack or fend of any attempt to outflank the 4th Armoured Brigade. Unfortunately, Rommel struck first and while the German 15th Panzer Division counter attacked at Fort Capuzzo, the German 5th Light Division made a hook around the British flank in a effort to reach Halfaya Pass and cut off 7th Armoured Division and 4th Indian Division from supply or escape back down the escarpment.
The German counter offensive forced the 4th Armoured Brigade to stay with 4th Indian Division and the attack on Hafid ridge was called off. The two German columns with some 80 tanks attacked in parallel and were met by a barrage of 25-pdr fire and anti-tank guns and the Matildas of 4th Armoured Brigade in hull-down positions. The British gunner and tank crews fought a very successful defensive battle and when the Germans withdraw they had lost about 50 tanks. While 4th Armoured Brigade was halting the advance at Capuzzo, the 7th Armoured Brigade heavily engaged by the German 5th Light Division. Initially the two RTR regiments had attacked and destroyed a large supply column, but the tanks of 5th Light Division (including MK IVs) had separated the two regiments, by some 6 miles. This meant that 2nd and 6th RTR being forced to fight separate engagements all day, with 6th RTR being attacked first and nightfall it only had nine Crusader tanks serviceable. The Germans then turned to attack 2nd RTR but nightfall curtailed their attack and both RTR regiments withdrew east of the wire to refuel. By nightfall 6th RTR only had nine Crusader tanks serviceable and the tank strength of 7th Armoured Brigade was reduced to just twenty-five tanks. By the end of the Operation only five of the original 52 Crusaders of 6th RTR had actually been present throughout all the battles it fought.
Rommel took the withdraw of the 2nd and 6th RTR as a sign that the British left flank was crumbling and on the night of 16th June, he concentrated both the German 15th Panzer and 5th Light Divisions and struck hard at the left flank on the 7th Armoured Division. The German attack started at 04:30 hrs with 75 tanks supported by artillery and smashed straight through the Division's lines, with the Germans heading for the crux of the battle at Halfaya Pass. The 4th Indian Division had been pushed out of Sollum and was ordered to withdraw along the coastal plain. At Fort Capuzzo 22nd Guards Brigade were nearly trapped by the advance and General Creagh ordered the surviving tanks of both 4th and 7th Armoured Brigades to fight a defensive battle. Ably supported by the 25 pdrs of the Support Group, the British tanks fought a six hour battle, which gave time for the 22nd Guards Brigade and the 4th Indian Division to withdraw successfully. When he found out that his trap had been unsuccessful Rommel was furious. Supported by RAF bombers XIII Corps was in retreat and 17th June 7th Armoured Division was back in Sofafi, where it had started from three days before.
Morale was not good, with nearly 1,000 casualties (122 killed, 588 wounded and 259 missing), and with 91 tanks (including 58 Matildas and 29 Cruisers) being lost, nearly 81% of the British tanks were out of action within three days of the offensive starting. The Germans had lost just twelve tanks, by comparison. The Royal Tank Regiment's history described the offensive bitterly as "Battleaxe became a byword for blundering."
The battle had shown that the British tanks, even the heavily armoured Matilda, were no match for the dreaded 88mm. With the Germans now receiving large numbers of a long barreled 50mm anti-tank gun (PAK 38) which was nearly as effective, British tank tactics needed reviewing, as the German anti-tank gun ruled the desert battlefield. Winston Churchill was disappointed with the failure of "Battleaxe" and replaced General Wavell (sending him to India) with General Sir Claude Auchinleck. It was to be five months before the British attacked again.
OPERATION CRUSADER - The battle for Sidi Rezegh (November - December 1941)
Between Operation Battleaxe (June 1941) and the next British offensive Operation Crusader in the November the same year both sides received considerable reinforcements. Both experienced supply problems, with Rommel's main supply route from Naples to Tripoli under constant attack form aircraft and submarines based in Malta, with the British convoys either running the gauntlet from Gibraltar to Alexandria or coming via South Africa. Despite the best efforts of the Royal Navy and RAF the German 90th Light Division had arrived in North Africa without tanks and with little transport and the DAK had increased its strength of the powerful 88mm anti-tank guns to thirty-five. The experienced 5th Leicht Division, had been re-equipped with new medium Mark III Panzer tanks and renamed 21st Panzer Division. Finally, with the arrival of three new Italian divisions the strength of the Axis forces up to three German and six Italian divisions. The British were able to increase their force better than the German's could and they received another three motorised infantry divisions and ten more armoured regiments. These reinforcements totaled 115,000 men, but none of them were trained in desert warfare and therefore not fit for immediate operations. Meanwhile. 7th Armoured and 4th Indian Divisions had withdrawn to Alexandria and Cairo, to re-equip and continue training. 7th Armoured also had a new GOC in Major-General 'Strafer' Gott, a dynamic, popular and brave leader, who was originally a gunner and GOC of an infantry division and he had little experience of armoured warfare. By this time the Desert Army had adopted its own dress code, best typified by "The Two Types" cartoon characters, of the day.
Along with the fresh troops came new tanks in the shape of the British Valentine and American General Stuart, nicknamed the
'Honey' by the British. The 4th Armoured Brigade (8th Hussars, 3rd and 5th RTR, plus 2 RHA and 2nd Scots Guards) was re-equipped with 166 'Honey' tanks. 3rd RTR had returned from Greece where they had served with 1st Armoured Brigade and 5th RTR were survivors of the ill fated 3rd Armoured Brigade, lost in Cyrenaica in April 1941. The inclusion of the Scots Guards meant that this was the first armoured brigade group ever to be formed. Meanwhile the 7th Armoured Brigade was brought upto strength with the addition of the 7th Hussars. The 7th Armoured Brigade was equipped with 129 Crusaders, but still retained some older A10's and A13's Cruiser tanks of 7th Hussars, 2nd and 6th RTR. Another addition to the Division was the inclusion of the 22nd Armoured Brigade (commanded by Brigadier Scott-Cockburn), with 3rd & 4th County of London Yeomanry (CLY) and 2nd Royal Gloucestershire Hussars (RGH), which were all equipped with the A15 Crusader Cruiser tank. The 22nd Armoured Brigade was actually part of 1st Armoured Division, but the rest of the Division had yet to arrived in the desert and become operational, so the brigade was under 13 Corps command, assigned to 7th Armoured Division, for Operation Crusader. Alas still none of the 2-pdr and 37mm guns fitted to the British tanks could fire HE, which was a serious disadvantage in the desert. The 11th Hussars were re-equipped with Humber Armoured cars and rejoined the Division, to provide a reconnaissance role in conjunction with the King's Dragoon Guards (KDG) and 4th South Africa Armoured Car Regiment (SAACR). This allowed one reconnaissance regiment to be attached to each of the three armoured brigades. During the period the 3.7" AA gun also arrived in the desert and had it been provided with anti-tank ammunition it could have been as effective the German 88mm, but although proposed the idea was not taken up.While 7th Armoured Division was re-equipping, 11th Hussars with the Division's Support Group, held the high ground between Buq buq and Sofafi. 11th Hussars watched a 25-mile front from Sheferzen in the south to the edge of the escarpment by Halfaya Pass.
In July 1941 the German Army Planning Staff produced 'Plan Orient' which was to gain supremacy in the Middle East. They had assumed that the Russian campaign, 'Operation Barbarossa', would he over in the autumn and as such the North African operation was not important to them. This meant that the DAK role in the summer and autumn of 1941 was to be purely defensive, except that Tobruk had still to be taken and the only reason German forces had only been sent to Greece and North Africa had been to stop the humiliating defeats of their Italian allies. To the German High Command the North Africa theatre of war was a minor campaign which meant that Rommel's requirements were only grudgingly met. During August 1941 a third of all the supplies to the DAK coming across the Mediterranean were lost and by October 1941 two-thirds were being lost, courtesy of the efforts of the Royal Navy and the Royal Air Force. This did stop Rommel making plans for his own offensive and for the capture of Tobruk.
With the Germans now invading Russia, Winston Churchill called for Auchinleck to attack, but he refused until his troops were ready, stating that they could not simply march off a troop ship into a desert battle. The plan for "Crusader" was for 13 Corps to attack and pin down the enemy along the frontier wire from Halfaya Pass to Sidi Omar, while 30 Corps, which contained the 7th Armoured Division and its nine armoured regiments as a cutting edge, would hook round the desert flank with the aim of seeking out and destroying the German armour. One particular task of the Division was to take the airfields art Sidi Rezegh and El Adem, which were 25 and 20 miles respectively south-west and south of Tobruk, on the escarpment above the besieged port. With the enemy fully engaged the Tobruk garrison would break out and join the rest of 8th Army to drive the German's and Italian's out of Tripolitania. The total British tank strength had built up to 774, with 455 in 7th Armoured Division, and 210 'I' Matildas supporting the infantry formations. British Intelligence had wrongly assessed the Axis tank strength at 388, which was in fact it at 558 of which two-thirds were German Panzers. At the start of "Crusader" the British tank force outnumbered the German and Italian tanks nine to four, but when only considering the gun armed Panzer III & IV's the ratio was four to one. Click here to view the Divisional Order Of Battle at this time.
Operation Crusader began on 18th November, with 4th Indian Division assaulting the wire north of Sidi Omar, with 7th Armoured Division hooked north west around the enemies southern flank, in three column toward Tobruk. The British attack had pre-empted an attack by the Germans and Italians (called Winter Battle) due for 23rd November and thus the German 15th Panzer and 90th Light Divisions were already in position for their own attack. This meant that they were well placed to thwart the British advance, which was made in heavy rain. On 19th November 22nd Armoured Brigade encountered the Italian Ariete Armoured Division around Bir El Gubi, losing 40
Crusaders to well dug in anti-tank guns.22nd Armoured Brigade had placed 3rd CLY to the right, 4th CLY to the left and 2nd RGH in the centre. The approach march of 80 miles had caused mechanical breakdowns among the 163 Crusaders that had set out. But by noon 2 RGH had penetrated the defence lines of the Italian Ariete Division holding Bir el Gubi. Despite unheeded warnings from the 11th Hussar screen, 4 CLY came up on the left in what one officer described as "the nearest thing to a cavalry charge seen during the war". 'C' Squadron 4 CLY had lost eight out of eleven Crusaders with twenty-one casualties (4 killed in action, 17 taken prisoner).
At 1500 the leading Troop of A Squadron, 3rd CLY reported five Italian M13 tanks and Lt Col R. K. Jago ordered 'A' Squadron to attack. Two tanks were sent up on the left to draw the enemy's fire and leading troop from the Squadron attacked from the right, while supporting fire was given by Squadron HQ at about 10:00 yards. The attack was completely successful with all five tanks being knocked out and then set on fire. 25 prisoners were taken from the tanks and sent back under scout car escort together with 22 infantry and artillery prisoners. During this action 'C' Squadron had been ordered to move up on the right of 'A' Squadron, and 'B' Squadron, consisting of five tanks to remain in a hull-down position 1,500 yards behind 'A' Squadron, to observe the left flank of the Regiment and to watch for 2nd RGH. From 15:00 wireless contact was lost with 'B' Squadron. This Squadron advanced from hull-down position to reconnoitre and was engaged by heavy anti-tank gunfire from the fort at Bir El Gubi. Almost at once the tank of the Squadron's commanding officer (Major Godson) was hit and the track blown off. The tank continued to fire for a while and was then hit on the turret and silenced, Major Godson and his operator both being wounded. Immediately after this another, which had gone further forward was hit on the turret at close range and all the occupants killed, except for the driver, who brought the tank out of action. In the meantime two of the other tanks were hit by anti-tank gunfire. The regiment had suffered heavily from a counter-attack by the Italian 132nd Tank Regiment and at 16:50 the Regiment received orders to encircle Gubi and accordingly rallied in preparation, but 'B' Squadron was still silent and did not come to the rallying point. The Regiment then advanced and deployed facing West, but by now visibility was becoming bad and at 17:50 orders were received to close leaguer for the night.
The heaviest losses on the 19th were suffered by 2nd RGH who started to advance continued at 07:00 with 11th Hussars as screen. Their 'H' Squadron was leading, 'F' Squadron on the right and 'G' Squadron the left. At 09:30, 4 enemy tanks (identified as 4 Italian M13s) Northwest of Pt181 were reported by 11th Hussars. These were dealt with by 'H' Squadron. 11th Hussars then reported 18 tanks with artillery to the North, and 'H' Squadron knocked out 6 of these, too. At 10:30 Regiment was ordered to advance towards Bir El Gubi and here a large amount of enemy transport and guns was encountered by the leading Squadron. There was no opposition and a considerable number of Italians gave themselves up. Shortly after this a force of M13s was encountered the regiments left flank and these were successfully dealt with by 'G' and 'H' Squadrons. At 13:00, 3rd CLY were ordered to assist 2 RGH on its right flank and at 13:30 the regiment had advanced 3 miles North of Bir El Gubi and two Squadrons became engaged with a very large force of enemy tanks estimated to number between 140 and 160, plus numerous concealed anti-tank positions. 'H' Squadron was held up by strong anti-tank and artillery positions on the left and did not join until late in the afternoon. Wireless communication with 22nd Armoured Brigade HQ broke down at 15:30hrs and was not restored until 16:30hrs. For at least 2½ hours heavy fighting ensued and at 16:30 2 RGH withdrew to reorganise two miles South of Bir El Gubi. While they were withdrawing through Gubi anti-tank fire was encountered from the Italian personnel who had previously surrendered but had now re-manned anti-tank guns mounted on lorries, engaged 2 RGH tanks from the rear. By 17:30 all 'runners' had been withdrawn and a close leaguer was formed for the night were the regiment replenished petrol and ammunition. At the start of the day the regiments tank strength had been 46 tanks, but by 15:30 this was reduced to just 16. By the morning of 19th November this had been increased to 19 battle worthy tanks, but this still mean the regiment as at less than half strength. By the evening of 19th November 1941, 22nd Armoured Brigade had lost half their tanks, with about fifty being lost to the Ariete Division and over thirty to mechanical faults and breakdowns. The Axis wireless communiqué that night claimed "the annihilation of the British 22nd Armoured Brigade". However the battered brigade was ordered east to join up with 4th Armoured Brigade on the 20th, but owever, due to petrol shortages it did not make contact with 4th Armoured Brigade until late that day.
Of the three armoured brigades that had sent out on 18th November, 7th Armoured Brigade had made the best progress as the central column of 129 mixed Cruisers of the attack. The brigade was led by the armoured cars of 4th SAACR. On the night of the 18th 7th Armoured Brigade leaguered 20 miles south of Sidi Rezegh where a motor track went down two escarpments towards the Tobruk perimeter, only 12 miles beyond Sidi Rezegh.
On 19th November, 'B' and 'C' Squadrons, 4th SAACR despite the difficult going, managed to get well forward, and at 13:48, the advance elements of ‘B’ Squadron reported that they had reached the escarpment and were looking down on the landing-ground with enemy aircraft on it. Following this report 7th Armoured Brigade in the centre started to overrun the airfield at Sidi Rezegh. 2nd RTR had started to lead the attack, but boggy ground following some heavy rainstorms meant that a detour west was needed. However, 6th RTR took the lead, accompanied by 'B' Squadron, 4th SAACR and at 15:00 soon over-ran the airfield 2 miles from Sidi Rezegh capturing a 19 German aircraft, although 3 others managed to take off and then make low level attacks on the tanks. Later 'C' Squadron, 2nd RTR were ordered to destroy the capture aircraft which the did by smashing everything they could with sledgehammers and pickaxes. By the time the Brigade moved up to the escarpment overlook Tobruk, enemy infantry and anti-tank guns blocked the only track down.
Like 22nd Armoured Brigade, the 4th Armoured Brigade had also had a hard battle. After passing through the frontier wire, a brief skirmish took place at Bir Sciafsciuf, but on 19th November 4th Armoured Brigade, with their 164 Stuarts, met up with 15th Panzer Division at Gabr Taieb el Essem, north-west of Scheferzen. 3rd RTR had moved north in the afternoon of the 19th in pursuit of a German Reconnaissance unit and were on the Trigh Capuzzo, when 8th Hussars were attacked by a German Panzer Battle Group (KampfeGroup Stephan) with over 100 tanks and infantry. This force was part of 21st Panzer Division and consisted of eighty-five MK III and MK IV tanks, plus thirty-five MK II tanks with a strong artillery group of 105mm howitzers and 88mm anti-tank guns. It had been sent at 11;45 hrs on the 19th to destroy the British forces north-east of Gabr Saleh and five hours later they encountered the Fifty Stuarts of 8th Hussars who were deploying to meet them. Having been lucky enough to find a gap in the armoured car screen, the German attack was preceded by dive-bombing and machine gun attacks, mainly on 8th Hussars RHQ. The German tanks opened fire at 1,500 yards, at which range they were immune to the guns of the British tanks. Later 5th RTR came to the aid of 8th Hussars and the battle continued until it was broken off at nightfall. By the end of the day 8th Hussars had lost 20 tanks. This was the first ' large' tank v's tank battle in the desert, with the Germans having firepower and numbers on their side, while the British had the speed and manoeuvrability of their Honeys. The Brigade did its best to overcome the disadvantages of armour and armament, but suffered heavily as a result, with both 3rd and 5th RTR were chased back 25 miles to the Trigh el Abd and 8th Hussars at Gabr Saleh. When the fighting resumed early on the 20th with the same Panzer Battle Group, it was more of a running fight across the Brigades front and resulted in the Germans moving away northwards and 4th Armoured Brigade being able to take up their position near Gabr Saleh again.
Later on the 20th, 15th and 21st Panzer Divisions appeared near to 4th Armoured Brigade and then halted to refuel and re-arm. The threat to 4th Armoured Brigade was now so great that orders were issued for 22nd Armoured Brigade to move to support them, but before this could happen about 100 tanks of 15th Panzer Division attacked. A fierce fight the took pace until nightfall and by this time 4th Armoured Brigade had been reduced to 98 tanks, which meant a total loss of 68 tanks since the start of the Operation. During the day 4th Armoured Brigade were extremely well supported by 3 RHA and their 2-pdr anti-tanks helped to hold off the German attack. 22nd Armoured Brigade had been delayed due to problems with re-fueling and only 3 CLY were engaged for a short time towards the end of the battle, attacking enemy transport.
During the 20th, 11th Hussars had one Squadron on an observation line in front of the defences at El Adem with the other two near el Gubi, but later 'B' Squadron covered 22nd Armoured Brigades move by acting as flank and rearguard. By the end of 20th November 4th and 22nd Armoured Brigades were spread out over the desert, along with enemy units in similar disarray, which made re-fuelling and re-arming difficult, with many false alarms being raised due to the movement of supply columns, during the night.
During the night of 19th/20th November the Germans had been busy and 20th November (Cambrai Day) the counter attack started at Sidi Rezegh. A hail of fire fell on 2nd RTR on the ridge behind the airfield and 6 RTR on the southern edge. A troop of 6th RTR and a troop of 2nd RTR moved out to try to knock out some of the enemy machine guns and anti-tank guns, but casualties forced both regiments to withdraw a short distance. The 7th Armoured Brigade, barely held onto the airfield until the Divisional Support Group arrived at 10:30 and took up positions around it. There were a large number of ant-tank guns at the western side of the airfield, making it obvious that the Axis were not going give it up without a fight. After some opposition 'D' Company, 1st KRRC were in position on the edge of the escarpment on the eastern end of the airfield, where 60th Field Regiment established an OP. 'C' Company spend the day 'digging in' in the hard ground to the south, while being shelled periodically. By the evening it was clear that the enemy was in position in strength to the North-East of 'D' Company and that an attack was likely, though patrols sent out that night had nothing to report.
By the end of 20th November all three of the Division's brigades were in action and widely dispersed. The German counter attack had effectively started and the enemy were now being reinforced by 21st Panzer Division. Also the codeword for the Tobruk garrison to breakout and join the battle had been given. All this meant that the great tank battle of Sidi Rezegh had already begun.
Sidi Rezegh (21st to 23rd November 1941)
By now Rommel had realised that a major British assault was in progress so delayed his assault on Tobruk and ordered 15th and 21st Panzer Divisions to concentrate their forces on the British positions in the Sidi Rezegh area. His overall aim was to drive a wedge between the two British Corps. The latter was only a short distance away to the north and north east of Gabr Saleh, having been engaged with 4th and 22nd Armoured Brigades. It set off at first light on 21st November followed by the two British Armoured Brigades, who made plans to attack the columns rear. However, the British needed to refuel as the Stuarts of 4th Armoured Brigade only had a short range and the Crusaders of 22nd Armoured Brigade had not made contact with their supply column the previous night.
At 08:30 on the 21st the men of 1st KRRC, along with 'A' Company of 2nd Rifle Brigade and 6th RTR (less 'A' squadron), supported by 4th RHA and 60th Field Regt RA attacked the escarpment to the north of the airfield. It was a classic rifle battalion attack with the motor platoon infantry following the carriers (with their infantry still onboard) on foot, while the artillery laid a barrage on the enemy positions, which along with the dust from the carriers helped to obscure the infantry from the defenders. In some areas the Axis defences were further away than expected and the carriers of 'D' Company on the right suffered with five out of the seven being hit. In the centre the carriers of 'A' Company, 1st KRRC also met heavy fire, but the moved off to the right, dismounted and then fought on foot, taking 30 prisoners before overwhelming the position. In the middle the defenders were still in position and their fire caused many losses among the motor platoons crossing about 2,000 yards of open ground which offered no real cover, even when the men were laying down. In the early stages of the attack the dust from the carriers and the barrage had provided some protection, but now as the infantry approached the north side of the airfield they came under heavy fire and the advance slowed. During this action Rifleman John Beeley of the KRRC was awarded a posthumous Victoria Cross for his actions on 21st November, when he ran forward with his Bren Gun attacked an anti-tank gun and two machine gun posts, wiping out the crews, before being killed himself.
The CO of 6th RTR had led his RHQ, plus 'B' and 'C' squadrons in an attack across the Trigh Capuzzo and in the valley north of the airfield where they ran into strong defensive positions and started to lose tanks. Despite this several tanks did reach the escarpment beyond Trigh Capuzzo, but as it was not possible to hold the position, they withdrew. Only 6 tanks from 6th RTR returned to the British lines and the losses were severe with the CO, the 2i/c, the two squadron commanders missing (later reported as killed), and four other officers, along with many tank crews, after the regiments 'Charge of the Light Brigade' in their attack north to meet the Tobruk force at El Duda. By the end of the day 6 RTR were reduced to only seventeen tanks under command of Captain Longworth, from 'A' Squadron. However, by noon the KRRC were on the ridge, with 700 prisoners being taken, and the British Artillery was able engage enemy transport along the Trigh Capuzzo, soon afterwards. Due to their losses the KRRC was unable to occupy all of the ridge, but concentrated it strength around the highest point, Point 167, where the occupied and re-organised captured trenches, while they Germans occupied the rest of the escarpment. The fight for the airfield would decide the battle as whoever held the ridge at Sidi Rezegh, dominated the plain before Tobruk and controlled Trigh Capuzzo. The KRRC and 60th Field Regiment Royal Artillery (with 25-pdrs) took up position just south of the airfield were in action most of the day.
While 6th RTR had suffered heavy losses, 7th Hussars had been overwhelmed in a fierce fight with 21st Panzer Division. At about 08:00 news had been received news of a pending attack by German armour from the south west, so after leaving 'A' Squadron of 6th RTR to support the infantry around the airfield the other two regiments of 7th Armoured Brigade turned to face the assault.
The CO (Lt-Col Byass) had taken the 7th Hussars south-east to intercept a German force of about fifty tanks which were accompanied and sometimes preceded by anti-tank guns mingled with captured British trucks and lorries. Both the tanks with rear links to Brigade HQ were knocked out and soon 'A' Squadron had been overwhelmed, with 'B' heavily engaged and suffering considerable casualties, with only two tanks left in action within a few minutes. Major Fosdick now took over command of 7th Hussars, after the CO had been killed, only to find his remaining 12 tanks were surrounded and cut off. However, 7th Hussars fought their way out under the cover of the smoke from burning tanks and the dust from artillery shells. By 1800 hrs 7th Hussars had only ten old veteran A10 tanks, serviceable and was leaguered at Bir Sidi Reghem el Gharbi. Sixteen Hussars had been killed, including the CO, about thirty wounded and another thirty missing. What was left of 7th Hussars were unable to rejoin the rest of 7th Armoured Brigade as they had run out of petrol and were only replenished thanks to the skill of the officer in charge of the petrol lorries.
Elsewhere, 2nd RTR (Lt-Col Chute) had attacked about 100 tanks of 15th Panzer Division, with 'B' and 'C' Squadrons being ordered to make a converging attacks from the right and left flanks respectively. However before the British tanks could close the range and open fire, the enemy sighted 2nd RTR and at once turned about and retired at high speed. Many of the enemy tanks were MK II's, though there were large numbers of MK III's and IV's in the rear. 'B' and 'C' Squadrons now gave chase and slowly closed the gap between the two forces, along with 'A' Squadron also joined in in the middle between 'C' Squadron on the left and 'B' Squadron on the right. Some excellent shooting was had by 2nd RTR and a total of fifteen enemy tanks were knocked out, with many of the crews being overrun and captured. The German fire was poor, and it was obvious to the men of 2nd RTR that they were not adept at firing on the move, because what return of fire there was, was extremely inaccurate. However, the chase covered about two miles and was called off when the Germans retired behind a screen of 88mm guns and other tanks in hull-down positions. This action, which was very successful, raised morale to a very high level, as only one of 2nd RTR's tanks had been hit and its crew escaped unhurt.
The tanks which had overrun 7th Hussars now attacked the defenders of the airfield, where they encountered Battalion HQ and 'S' Company of 2nd Rifle Brigade, the 25-pdrs of 60th Field Regt RA, the 40mm Bofors anti-aircraft guns of 2 Bty, 1st LAA Regt and some 2-pdr anti-tank guns of 3rd RHA, that were defending the rear of the Support Groups positions. The German tanks enemy advanced towards 'S' Company and sixteen tanks appeared over a ridge moving slowly westwards about 800 yards away into the valley to the north-east. The two 2-pounders on the ridge to the north opened fire on them and the 25-pounders of the 60th Field Regiment engaged them over open sights. Four of Panzers went up in flames and the remainder halted, dodged about and finding that they could make no headway against our fire but having had a good look at the British positions, withdrew just out of sight. However the Germans did return fire and the two anti-tank guns had been knocked out. It was quite clear that the enemy's retirement was only temporary. They had made their reconnaissance, not without loss. German tanks withdrew to the escarpment east of the airfield, where they rallied, re-fuelled and re-armed, ready for another attack, while being shelled by the British artillery. All knew the next attack might be by 60 rather than just 16 tanks next time.
Messages and Officers were sent to warn Brigade Headquarters of situation and to ask for assistance. These enemy tanks had appeared from an unexpected direction and the Brigade Major of 7th Armoured Brigade accused 2nd Rifle Brigade of firing on the 7th Hussars. To Battalion Headquarters and 'S' Company theirs was the only battle. But 'A' Company on the ridge beyond the aerodrome could already see signs of a counter-attack in preparation. 'B' Company from 2nd Rifle Brigade were moving fast towards the battle from the south and 'C' Company, which was protecting the 'B' echelon vehicles, found themselves threatened from the most unexpected directions When the Germans were ready their attack began. There were several attacks by dive-bombing Stukas, though these were well clear of the 2nd Rifle Brigades positions, although they were shelled. In the rocky ground the motor platoons had been able only to scrape inadequate trenches. They were pinned to their weapon pits as soon as the enemy tanks came in sight. Battalion Headquarters was in full view, three 8-cwt pick-ups with wireless masts, isolated on this bare ground. Realising these made good targets the men of 2nd Rifle Brigade Battalion HQ crouched behind what cover they could find and in no uncertain terms requested armoured support over the radio links. In response five Crusader tanks were sent over, but these were set on fire before they could get near enough to engage the enemy with their 2-pounders. Two of the vehicles of 2nd Rifle Brigades Battalion Headquarters were also set on fire.
The Germans tanks were again being engaged by the 25-pounders of 60th Field Regt RA along with 'C' Troop, 'DD' (Jerboa) Battery from 4th RHA which had moved up behind them in support. Apart from these there were three weapons other weapons capable of taking on the enemy tanks - two 2-pounders on unarmoured portees under Lt. Ward Gunn (3rd RHA) and one Bofors anti-aircraft gun commanded by Lt. Pat McSwiney. These three engaged the enemy as best they could, outranged and unarmoured as they were and knocked out German tanks one by one. The Germans fired back with tank guns and machine guns, plus from infantry and mortars and one 2-pdr and the Bofors were knocked out, with the crew of the remaining 2-pdr being killed. It was now that Lt Ward Gunn, along with Major Pinney (Battery Commander) and Battery NCO, Sergeant Grey, acting as his loaders took over the gun until he was killed and the gun put out of action. So Gunner Turner drove the portee out of action with the gun still in flames and the dead and wounded still on the back. The fire was put out and another 2-pdr fitted, before it returned to the action. For this action Lt Ward Gunn of 3rd RHA Regiment, received a Victoria Cross and after the war 'J' Battery, 3rd RHA was officially renamed Sidi Rezegh 'J' Battery, because of its role, as anti-tank unit in the battle. Alas Major Pinney was killed the next day.
Meanwhile, 60th Field Regt RA was still engaging the enemy despite suffering heavy casualties and the men of 2nd Rifle Brigade were pinned down in the swallow trenches. However, the attack was beaten off, but heavy shelling continued, which meant vehicles from the supply echelons had to keep moving about to avoid both the tanks and the shells. Between 15:00 and 16:00 the Germans attacked again, by which time 7th Armoured Brigade could only must forty serviceable tanks, mostly from 2nd RTR. General Gott had realised earlier that 7th Armoured Brigade had suffered too badly to be effective any more, so he ordered 4th and 22nd Armoured Brigades to move to support the defence of the airfield. The 4th Armoured Brigade was held up by an anti-tank screen and the need to refuel, which meant they would not arrive until the 22nd. After a delay caused by some confusion in the orders 22nd Armoured Brigade had passed through tail of Support Group at 14:00 and worked round to the left flank of the hard pressed 7th Armoured Brigade, where from just after 15:00, 2 RGH were lightly engaged at dusk without loss. 3rd CLY put in an attack North-eastwards, with 'A' Squadron on the left and 'C' Squadron on the right. Light was failing and at 17:50 3rd CLY leaguered for the night. Its 'C' Squadron had taken the brunt of the fighting, but seven enemy tanks were destroyed. 3rd CLY losses were one tank burnt out, six severely damaged but repairable. Action was finally broken off due to a torrential downpour and bad light. While 22nd Armoured Brigade took up position, the commander of 15th Panzer Division had been concerned about the threat to his left flank by 2nd RTR, so while his infantry attacked the escarpment he had sent 8th Panzer Regiment to attack 2nd RTR. 2nd RTR suffered heavy losses due to 88mm anti-tank fire and were driven south, with only 6 operational tanks by the end of the action.
In spite of determined attacks the Afrika Korps had not taken the airfield and the Support Group where still in position on the escarpments to the north and south of it and on the airfield itself. However By 7th Armoured Brigade had been badly hit, although it did hold on until the other Armoured Brigades arrived, but by nightfall it had only ten 7th Hussar 'runners', six of 2 RTR, one of 6 RTR and three of Brigade HQ - many of these had been hit several times. The brigade fitters worked through the night and had twenty-eight 'runners' by the dawn. Elsewhere the advance of 5th South African Brigade had been halted so that it did not become embroiled in the tank battles and 70th Division had not advanced far enough from Tobruk to be involved in the areas of action. But during the 21st and 22nd Rommel had reinforced the Sidi Rezegh area and the tide was turning the Germans favour, though in doing so he had weaken his front line. This allowed 4th Indian Division to surround Sidi Omar and 2nd New Zealand Division to take Bardia and cut of communications to Axis troops on the frontier.
When dawn broke on 22nd November the battered brigades of the 7th Armoured Division, where deployed as follows: the Support Group holding the airfield, with troops and some tanks of 6th RTR deployed to the north, east and west. Two miles to the south were the remaining 79 Crusader tanks of 22nd Armoured Brigade. The 4th Armoured Brigade, with 50 Honeys, was six miles further to the south east, near Bir El Reghem. All that was left of 7th Armoured Brigade were twelve tanks of 2nd RTR and nine tanks of 7th Hussars, which were now under the control of the Support Group on the airfield. All the units were very short of fuel and ammunition, but as ever the RASC came though.
During the night of 21st/22nd the German forces had withdrawn some distance to the north west to re-organise, re-fuel and re-arm, ready for another attack the next day. As the day dawned the 7th Armoured Division Support Group saw a large group of enemy vehicles, including 80 tanks, assembling 4,000 yards to the north. Brigadier 'Jock' Campbell was with 60th Field Regiment at this time as they were short of both officers and men he helped turn the trails of the guns to meet the new attack. The 25-pdrs of the 60th Field Regiment engaged the German tanks and the fire was such that they dispersed, but they soon recovered and fired back. At 09:00, the twelve remaining tanks of 2nd RTR made a spirited attack led by Brigadier 'Jock' Campbell in his staff car, with his blue scarf flying as flag, but the Germans wheeled into line and met this assault, causing the British to withdraw. Heavy fighting broke out all around the airfield, with German tanks coming from the west, engaging the Support Group, while German infantry attacked the escarpment. 60th Field Regiment suffered more loses in officers and men during this attack and at one time Brigadier Campbell was seen perched on the wing of derelict Italian aircraft directing the fire which was landing on the main road to the airfield. In return the German artillery did all they could to knock out the British artillery observation posts. Just after 13:00 the German tanks withdrew at high speed to the high ground to the west, before turning and attacking the flank and rear positions of 2nd Rifle Brigade. Any anti-tank weapons the Riflemen had were ineffective and soon 'B' Company, 2nd Rifle Brigade was involved in the fighting. As the attack continued 'A' and 'C' Companies, 1st KRRC were overrun, though one platoon did hold out until dusk. Again the gunners of 60th Field Regiment again did sterling work to try and fend of the attack, with Brigadier Campbell helping to turn the guns again. He was later seen loading and firing an anti-tank gun, with dead and wounded around him. 'D' Company, 1st KRRC, were initially further away from the German attack and had some tank support available to help them. Soon they found themselves in the middle of a tank v's tank battle. The Company commander rallied what men he could and moved to a position is a nearby wadi, but the had not seem a wave of half track mounted German infantry approaching and they were soon overwhelmed too. That night only a handful of officers and men rallied at Battalion HQ, but they did include some anti-tank guns and crews who Lt-Col de Salis (KRRC) had ordered back just before the end. This attack had taken the Support Group by surprise and it took strenuous effort to stave off the assault.
While the Germans were attacking the forward troops 22nd Armoured Brigade arrived and were assigned to keep the enemy away from the remaining transport and guns. Although out number, out ranged and out gunned the regiments of 22nd Armoured Brigade fought hard and managed to keep the Germans away from the support group and guns, moving through the Support Group artillery who were shelling enemy positions. At 13:00 the Brigade, with 3rd CLY on the right, 4th CLY leading and 2nd RGH on the left were ordered to advance due North before receiving further orders to advance due North again and to halt one mile South of the Rezegh escarpment and a force of some 70 enemy tanks (Mark III and Mark IV) were observed moving Eastwards along the high ground towards the aerodrome which had now been reached by 4th CLY, with 2nd RGH having halted facing Northwestwards in the depression beyond the escarpment about 1,000 yards in advance of the British artillery on escarpment with the enemy force about 2,000 yards to its front. At 14:00 a force of about 40 German Mk III tanks were observed moving Southeast from the Sidi Rezegh ridge and 4th CLY went into action, with 3rd CLY on the right flank engaging the enemy at 1,000 yards. As 4th CLY became engaged on the aerodrome, 2nd RGH began to move westwards attempting to move round the enemy's right flank and a long range tank v's tank duel ensued during which 2nd RGH being engaged by concealed anti-tank positions in the defended Sidi Rezegh area. 2nd RGH held this position for some time to cover the withdrawal of 3rd CLY and 4th CLY and eventually withdrew to high ground. At this juncture the 4th Armoured Brigade arrived.
As earlier Brigadier Campbell again appeared in his staff car, with Major R. A. Eden OC 'M' Battery, 3rd RHA, along with a portee from the battery on either side leading 4th Armoured Brigade into battle. 3rd and 5th RTR were soon closely engaged by the Germans and they found their light tanks no match for the German Armour, but on they fought with Brigadier Campbell on foot among them directing their fire and inspiring them by his wonderful example. Alas at 16:30 he was wounded and taken back to Support Group HQ on the back of a tank. For his gallantry and leadership at Sidi Rezegh, Brigadier Jock Campbell was later awarded his Victoria Cross.
The battle lasted until dusk and the enemy maintained his hold on the Sidi Rezegh ridge, but at 16:00 the infantry of the Support Group were seen to be putting in an attack on Sidi Rezegh on left flank of 2nd RGH. At 17:00, 2nd RGH withdrew into Support Group lines and as darkness fell took up a position with 4th CLY right as protection right to any attempt to engage Support Group at dawn by the enemy. By the end of the day 3rd CLY had only five tanks in battleworthy condition and 2nd RGH only 17. At 17:30hrs Lt-Col Carr (4th CLY) took command of 22 Armoured Brigade and formed a Composite Regiment of one Squadron, 2nd RGH, one Squadron, 3rd CLY (under Lt-Col Jago) and one Squadron 4th CLY (under Major Walker), with a total of 34 tanks.
The fight between the Support group and the tanks from 21st Panzer Division spread all over the airfield, with burning vehicles, destroyed aircraft and shattered guns littering the battlefield. The smoke of the battle concealed the action from 22nd Armoured Brigade and what remained of the 4th Armoured Brigade, who had been ordered to assist the Support Group at the airfield. While advancing they ran into an anti-tank screen and chaos reigned, with lone tanks and small groups of men roaming the battlefield, either trying to engage the enemy or locate their unit. In late afternoon some order had been restored with the remnants of the Division gradually withdrawing to ridge south of the airfield, which 22nd Armoured Brigade had occupied that morning. The 3rd & 5th RTR were ordered to return to the airfield about 17:00 to assist in removal of some 25-pdr guns and 2-pdr anti-tank guns which were under threat of being overrun by German infantry. Just before dusk on 22nd, Panzer Regiment 8 from 15th Panzer Division by sheer luck chanced on Brigade HQ of 4th Armoured. The Panzers put on their headlights, surrounding the British in leaguer and captured Brigadier Gatehouse's 2 i/c (Gatehouse was away), 17 officers and 150 other ranks. In addition an armoured command vehicle and no fewer than 35 tanks from 8th Hussars, plus armoured cars, guns and self-propelled guns, were captured. It was a humiliating blow. At about 22:30 some 5th RTR tanks trying to rescue Brigade HQ, but encountered other elements of Panzer Regiment 8. After some confused fighting a range of only 100 yards the Germans withdrew, after knocking some of 5th RTR's tanks. This left 8th Hussars with just eight 'Honeys' fit for battle. Also the loss of many HQ vehicles lead to communications within 4th Armoured Brigade and to 7th Armoured Divisional HQ being disrupted for many hours.
My midnight the remains of the Support Group were in position south of the airfield, with the well scattered 4th Armoured Brigade near them. 7th Armoured Brigade, with just 12 tanks were six miles to the south west protecting the Division's rear, while 22nd Armoured Brigade, now with forty tanks, were three miles west of 7th Armoured Brigade. A further two miles south were 5th South African Brigade, who had suffered heavy losses after encountering strong enemy forces.
While the 7th Armoured Division were engaged at Sidi Rezegh, the other units of the 8th Army had been busy too. The 70th Division had broken out of Tobruk, with the Black Watch attacking the German positions at bayonet point, loosing a great number of men in the process, and advancing on El Duda. However, the breakout by 70th British Division and 32nd Tank Brigade (with thirty-two Cruisers and sixty Matildas) was not entirely successful. Rommel himself had personally directed the battle alongside four 88mm anti-tank guns which he had rushed across from Gambut. The five German and Italian defence posts called 'Butch', 'Jill', 'Jack', 'Tiger' and 'Tugun' were protected by minefields, wire and anti-tank ditches and proved difficult to take or bypass. By mid-afternoon it was clear that El Duda would not be reached, that day. Elsewhere, 13 Corps was pushing west and during the night of 22nd/23rd November 1942 after an exhausting forced match 6th New Zealand Brigade with a Squadron of 'I' tanks, overran the Afrika Korps HQ, capturing most of the staff. This was just fifteen miles from Sidi Rezegh and the loss of the German HQ and communications was a great help to the British at this time.
By dawn on 23rd November, 7th Armoured Division was in considerable disarray. The 4th Armoured Brigade was scatted everywhere, the 7th Armoured Brigade had only 15 battle worthy tanks, with the 22nd Armoured Brigade reduced to 40 Crusaders. The Support Group was virtually non existent. If the Division was to survive these scattered and battle weary elements needed to be concentrated.
30 Corps attempted to reform behind the southern ridge at Sidi Rezegh, screened from the airfield by the 5th South African Brigade and what was left of 22nd Armoured Brigade, with 1st South African Brigade on the way to join them, but 23rd November was to be a day if hard confused and scattered fighting. The Germans and Italians were not planning to let 30 Corps regroup without a fight, so while 21st Panzer held the escarpment, the 15th Panzer (with the tank regiment from 21st Panzer Division under its command) and 'Ariete' Divisions, wheeled away to the south west so that they could attack the flank and rear of 30 Corps, from El Gubi. This forces aim was to drive 30 Corps, including what was left of 7th Armoured Division onto the rest of 21st Panzer Division. When the attack started confusion reigned as the Axis forces ran into the right rear of 7th Armoured Division, the rear of 5th South African Brigade transport withdrawing to the east along with the forward elements of 1st South African Brigade. Following the communications problems from the night before and with the Germans coming out of the morning mist, from an unexpected direction surprised the British, along with the Germans who thought they were to the south of the main British force. A patrol from 4th SAACR had earlier reported a strong enemy column, including 100 tanks, 2 miles South of Abiar en Nbeidat, but the British commanders had not accepted the accuracy of the report, even suggesting that either the column did not exist, or was friendly
The Germans fired at anything the came in range, with the battle taking part in the middle of the 'soft skinned' vehicles from many formations, which led to more confusion. The Support Group tried to withdraw southwards, but lost many vehicles and men, including the wounded and as they moved south the German column shadowed them, but did not attack. One person noted that as the column moved along the Support Group Command Vehicle resembled a London Bus, as it had a dozen officers and men from 22nd Armoured Brigade perched on the roof, who have been picked up during night after their tanks had been knocked out the previous day. The whole battlefield was covered by dozens of vehicles all moving at their best speed and during the withdrawal Brigadier Campbell, with the remains of the Support Group and 'C' Squadron, 11th Hussars along with twelve tanks from 7th Hussars roved the battlefield trying to bring the parts of different units back together again. Again Brigadier Campbell directed artillery fire when the Forward Observation Officer was wounded, while 7th Hussars were under almost continuous attack.
Meanwhile, the Germans pulled out of the melee amongst the transport vehicles and re-grouped to the South west. As a result of their attack 1st South African Brigade had been halted in its efforts to link up with 5th South African Brigade. Contact between the two South African Brigades was made even harder when the Italian 'Ariete' Division came into view from the west and assumed a observation role, without attacking. In mid afternoon the Germans effectively charged into the south flank of 5th South African Brigade and an intense battle ensued. Tanks from a squadron from 4th CLY attacked to try and hold the Germans back while a squadron from 2nd RGH under Lt-Col Carr, supported by artillery fire from 'C' Battery, 4th RHA and the South Africans, led what was described as "a glorious charge across the enemy's advance, every tank firing its hardest. At 1530 3rd CLY who were on the right flank preparing to receive an attack from the Southeast, were attacked by an estimated 60 enemy tanks and in the ensuing battle 3rd CLY engaged the enemy at 800 yards range and all but four of its tanks were destroyed. At 16:00 4th CLY were engaged to the East of "South African Camp" which was now being attacked by German Infantry from area Sidi Rezegh, while 2nd RGH was withdrawing South Eastward. By 16:30 the enemy was inside the South African leaguer and the composite regiment that was all that was left of 22nd Armoured Brigade rallied and charged into the German right flank, which was thrown into confusion. This action allowed the main part of the South Africans to make their escape and with equipment was on fire everywhere, tanks of 22nd Armoured Brigade withdrew into the centre of SA Camp at dusk.
The 5th South African Brigade and 22nd Armoured Brigade had borne the brunt of the enemy attack and by nightfall on the 23rd the 5th South African Brigade had been virtually annihilated and 22nd Armoured Brigade was down to its last twenty tanks, leaving at least ten on the battlefield. However, 30 to 40 enemy tanks had also been destroyed. As the days battle had raged the Technical Adjutant, from 4th CLY had been in the process of salvaging what tanks he could and he continued to do so as the battle raged. At the end of the battle he had remained on the field and salvaged 150 lorries for which he then found drivers before conducting them through the infantry lines to 1st South African Brigade. He then returned to try and recover more tanks!
Elsewhere, 3rd RHA had been fighting a running battle with the enemy armour and at about 15:00 a force of 60 or 80 tanks was seen approaching from 1,500 yards away, with artillery support and smokescreen. The enemy concentrated its fire on one Troop from 'D' Battery and one from 'J' Battery, and one by one the guns were knocked out, except for one from 'J' Battery which withdrew in flames. Again and again the guns rallied, but the enemy came on at them, so in the end all the regiments remaining guns, numbering just 4 from 'D' Battery, 4 from 'J' Battery and 6 from 'M' Battery (with the latter on the left), lined up hub cap to hub cap to present a defiant wall of guns. In this order the regiment then retired at about 2 mph engaging the enemy as they went and as a gun was hit the surviving crew would salvage as much ammunition as the could and jump on the next gun. At dusk the action was called off and the night sky was lit by burning tanks and vehicles, with the regiment claiming thirteen confirmed kills.
Despite the best efforts of the Division and its Brigades 5th South African Brigade had ceased to exist as a fighting formation with only about 2,300 men of its original 5,700 returning to British and Commonwealth lines. The bulk of its equipment had been lost, too. The remnants of 7th and 22nd Armoured Brigades were leaguered that night just south of the airfield at Sidi Rezegh, and 4th Armoured Brigade was to the South East of them, with the Support Group mustering itself at Gabr Saleh, but further reduced in strength. As petrol and other supplies were brought up by the RASC drivers, who were guided in by the aid of flares and wireless signals, five tanks from 3rd RTR and five from 5th RTR struggled back to the British lines. These tanks had run out of ammunition during the days fighting after being surrounded, so after making the tanks look like derelicts the crews hid until night, before making their escape under the cover of darkness. The Division had suffered heavy losses again this day, but they had also inflicted heavy losses on the enemy, particularly in officers. It had drawn the might of the Panzer Divisions onto it, suffering mainly from the technical problems with British armour and anti-tank guns, but it had survived. The Italians and Germans had lost 70 tanks on the 23rd which was to hamper their operations as the campaign went on. By now the New Zealanders was within 6 miles of Sidi Rezegh at Pt 175. The 4th New Zealand Brigade had captured the landing ground at Gambut, before advancing to Bir Chetla.
During the night of 23rd/24th both sides worked to repair and restore tanks left on the battlefield, but when daylight arrived on 24th victory seemed to lie with the Germans, as by now most of 30 Corps were withdrawing to the east as fast as possible, with the Germans hot on their heals. The first battle of Sidi Rezegh was over and what was to become know as "Rommel's Raid" or to some the "Echelon Stakes" had begun.
Rommel's Raid (24th November to 1st December 1941)
Despite the success of the German tanks against the British armour, Rommel's position on the morning of 24th November was not an easy one. Along the Trigh Capuzzo the axis were facing the advancing New Zealanders, while to the south was the bulk of the British tank force. The latter may have been battered but was capable of a re-grouping if left alone for a few days to refit. To the north was 70th Division which was trying to fight its way out of Tobruk towards the relieving troops. In the frontier zone the Germans and Italians were also being attacked by strong forces that might prove a serious menace. The Germans and Italians still had the strength to inflict at least a severe reverse against any one of these opponents, but it seems probable that Rommel was not aware of the extent of German tank losses on the previous day. Also that Rommel had mistakenly thought 30 Corps had been destroyed. Rommel now made a daring decision, which was not really wise considering the lack of Axis reserves. If Rommel had pressed home his attack on 24th November, the Division might have been wiped out, but the Germans and Italians would now risk making a dash for the Egyptian Frontier, past 13 Corps to drive through the 30 Corps area to the frontier and beyond, creating as much havoc as they could, with the intention of so damaging the Lines of Communication of the Eighth Army that the Army Commander would be forced to order a general retreat.
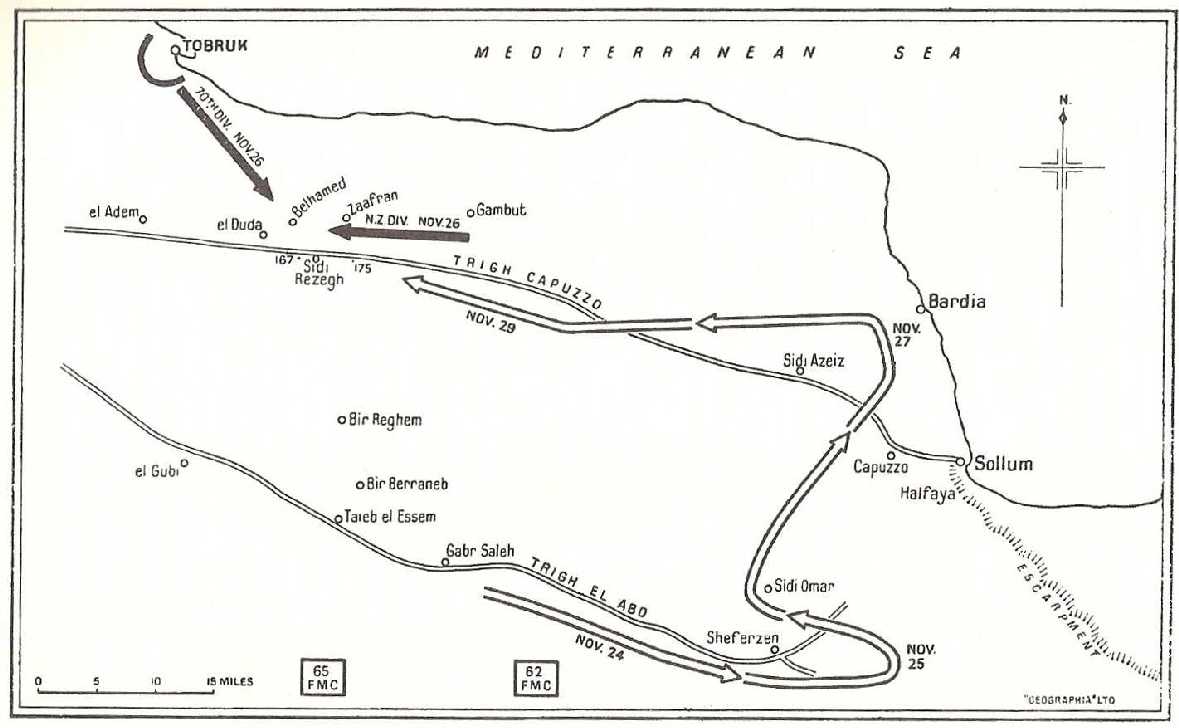
Moving down the Trigh el Abd in a number of columns of all arms, the Germans reached the frontier wire in the neighbourhood of Sheferzen by nightfall on the 24th. Fortunately for the British the secure air cover provided by the RAF and the skilful way they had been concealed, the enemy force was ignorant of the locations of the supply dumps. The advancing troops only missed them by narrow margins and had their positions been known it is inconceivable that they would have been passed by, for on them depended the survival of the greater part of the Eighth Army. The southernmost Germans actually passed through the water-point of one of the Forward Maintenance Centres.
By 25th November the leading elements of the Germans and Italians, had crossed the wire into Egypt for the first time, with 11th Hussars shadowing them. The advance into Egypt had left the 7th Armoured Division to the rear of the Germans and Italians, which allowed it to recover tanks abandoned at Sidi Rezegh and restore the three armoured brigades to some sort of order. The Germans and Italians were harried on the ground and from the air, and there was little the German air force could do to help them. On the 26th the whole force turned north for Bardia, and with stiffening resistance from the British, along with exhaustion of men and lack of supplies Rommel was forced to turn back on the next day and therefore swung west for Sidi Rezegh where they were badly needed. It was pure mischance the Germans and Italians had not discovered two British Field Maintenance Centres, which had all the food and fuel needed for them to continue their push into Egypt. Even so the advance into Egypt led to General Sir Alan Cunningham, being replaced by General Ritchie as head of the 8th Army.
On 24th November, 7th Armoured Division was mainly involved in shadowing the enemy columns and the 11th Hussars sent back a continuous stream of information until they ran out of wireless range. The 4th and 22nd Armoured Brigades, now reduced to only thirty-five and twenty-one tanks respectively, were ordered to concentrate in an area about five miles south of the New Zealanders at Point 175, and from 10:00 a large number of columns were reported moving south-east, south and south-west. Some of them turned out to be friendly but the whole situation was obscure. Two of the largest columns were composed of about fifty tanks and three hundred lorries each, and these continued to move south-east all day.
The northern of these columns was engaged by the Support Group and the southern one by the remains of the 7th Armoured Brigade under Brigadier Davy whose Headquarters had been attacked during the morning, who now had the four surviving tanks of the 8th Hussars, under his command. These two enemy columns were soon seen to be followed by other columns which included many tanks. 7th Armoured Brigade continued to shadow the southern column and a running fight took place which continued until dark by which time the enemy were at Sheferzen. Both the other Armoured Brigades also attacked and harried German columns. A column from the Support Group under Lt-Col Currie was ordered to move during the night to safeguard No. 62 F.M.C. and the rest of the Support Group closed with Brigadier Davy's small 7th Armoured Brigade force nearby.
During the day 3rd CLY had a large part of its 'B' Echelon captured, but the greater portion of the men escaped after two days in enemy hands. Elsewhere 2nd RGH was able to form a Composite Squadron consisting of 19 A13s from 2nd RTR and 5 Honeys from 5th RTR, while the rest of 22nd Armoured Brigade still only consisted of 20 tanks from 3rd CLY, 4th CLY and 2nd RGH.
On 25th November orders were received for 22nd Armoured Brigade to come under command of the XIII Corps, for the day, in order to assist the New Zealanders, and they were lightly engaged in the afternoon. During the day a German Mark IV was towed into the camp of 2nd RGH and various recovery was carried out by its patrols. The rest of the Division were ordered to concentrate in the neighbourhood of No. 62 F.M.C. while the three Armoured Gar Regiments were to operate on the general line Sheferzen to el Gubi from first light. The Division's armoured car regiments were deployed with the 4th South African Armoured Car Regiment (SAACR) on the right, the KDG in the centre and 11th Hussars on the left. All of these Regiments were extremely busy all day and sent back a torrent of valuable information, with that from the South Africans earning them special mention.
For the rest of the Division there were no major engagements or no heavy casualties. The 4th Armoured Brigade was sent during the morning to support the 1st South African Brigade at Taieb el Essem where the latter had just repulsed an attack by fifty tanks from the Italian Ariete Division, who were now being observed by 'B' Squadron 4th SAACR. The arrival of the Armoured Brigade deterred the enemy from renewing his efforts and caused them to retire to the north in the evening, but there could be no question of pursuit, as many of the drivers were falling asleep due to the fatigue within the tank crews. Elsewhere, columns from the Support Group spent the day harassing the enemy and in the evening they caused a good deal of damage to the troops withdrawing from the South African position where they had been repulsed. One of the most important of the day's activities was the collection of damaged or bogged tanks from various parts of the battlefield. The 11th Hussars record that no less than seventy were recovered in the southern part of the area on this one day, while 'B' squadron, who were operating with the 22nd Brigade south of Sidi Rezegh, were similarly occupied and competing with parties of Germans and Italians engaged on the same task. This valuable work meant that a number of dismounted crews could be sent into action again. Later in the war, the process of recovery became a well-organised and well-equipped feature of all operations. In the Desert where there was always a shortage of tanks and transport, so where the supply of new equipment was never easy, recovery was of vital importance.
To the north the New Zealand Division under General Freyberg was still battling forward and took Zaafran early on the 25th and Belhamed that night. To the east the RAF were hitting the Axis forces hard around Scheferzen and the determined German attacks on Sidi Omar were firmly held by the 4th Indian Division who had reduced the strength of the 21st Panzer Division to ten tanks. The German and Italian situation was, in fact, deteriorating, as in the west 30 Corps and the South Africans were consolidating their hold on the Trigh el Abd, and to the north-west the troops breaking out from Tobruk were a threat that Rommel could not ignore much longer.
During 26th November, 6th New Zealand Brigade, initially failed to capture Sidi Rezegh in a dawn attack, but did later capture it after a night assault. A battalion of the 4th New Zealand Brigade then moved forward to el Duda to link up with which 70th Division had taken el Duba that evening. The centre of interest now shifted from the Trigh el Abd to the Trigh Capuzzo, as in order to get his armour back to his own lines, Rommel now had to fight westwards and the New Zealanders were menaced by attack from the rear. The Armoured Gar Regiments advanced their line of patrols and when night fell the KDG's had reached the Trigh Capuzzo and made contact with the 22nd Armoured Brigade near Bir Reghem. On the left the 11th Hussars fought a successful action and knocked out three enemy tanks and eighteen lorries from a column near el Gubi. While 2nd RGH was still sending out patrols to try and recover tanks, 'B' Squadron from 4th CLY was in action attacking a column of German transport, destroying 2 lorries and taking some prisoners.
During the night of 25th/26th the 4th Armoured Brigade, now numbering forty tanks, had escorted the 1st South African Brigade to No. 65 F.M.C. After replenishing at midday they moved north to the area of Bir Berraneb and reached there as it was getting dark, having done some damage to the enemy on the way. At the F.M.C. they had been reinforced by thirty Light tanks, and nine anti-tank guns. The 22nd Brigade were also strengthened by the addition of ten Cruisers brought forward under Lieutenant-Colonel Shepherd of the 4th Hussars. The Support Group continued its task of harassing and in the evening returned to Gabr Saleh. By scouring the battlefield the tank recovery teams, no less than 70 broken down or lightly damaged tanks were brought back into action. This allowed the strength of 22nd Armoured Brigade to rise to fifty tanks.
On 27th November, the patrol line of the Armoured Cars was advanced further west and before the end of morning the King's Dragoon Guards (KDG) had reported a very large enemy column five miles long moving west. The 4th Armoured Brigade, now numbering sixty-five tanks, and the 22nd with fifty tanks, were ordered to move forward to the attack. A screen of tanks protected the enemy force which was moving in four columns totaling between 1,500 and 2,000 lorries. During the progress of this huge Axis force along the Trigh Capuzzo they narrowly missed overrunning the combined Headquarters of the two British Corps. It was only due to the efforts of some of "B" Squadron, 11th Hussars, ably assisted by some tanks from the 22nd Brigade, that this mass of Headquarter vehicles was able to get away unmolested.
At about 14:00 the 22nd Armoured Brigade attacked the head and the 4th Brigade the southern flank of this enemy force. Both Brigades immediately became heavily engaged with tanks, anti-tank guns and artillery. The composite Regiment from 22nd Armoured Brigade was ordered to take up battle position in area Pt. 187 and Pt. 192 to overlook Trigh Capuzzo along which Panzer troops were moving East to West. The 3rd CLY Squadron under command was on left and German tanks were engaged at about 1500 hours. The engagement was heavy and 3rd CLY Squadron lost 2 tanks set on fire, while 2 German tanks and one large gun were destroyed by 3rd CLY Squadron. By 17:00, 22nd Armoured Brigade engaged a force of fifty German tanks, with anti-tank and artillery support, but it had succeeded in holding up enemy movement westwards for that day in his obvious attempt to break through to Tobruk. Overall a fierce fight took place which lasted until dark by which time much damage had been done to the enemy and many casualties, both in men and in vehicles, inflicted. The Germans were brought to a halt and parties broke off to the east, north and north-west. Twice during the afternoon the RAF bombers came down and added to the confusion and damage. The R.H.A. from the Support Group were praised for their excellent shooting, and when the enemy were finally halted about 17:00 they had little ammunition left. However, the action by the two Armoured Brigades had prevented the Germans from attacking the New Zealand Division in the rear and as night fell, the two Armoured Brigades pulled back and leaguered just to the south of the battlefield. While this action was taking place the Support Group spent the day harassing enemy columns in the frontier area. On the 27th the remnants of the 7th Armoured Brigade and the 1st Battalion K.R.R.C. left the Division to return to Cairo for re-organisation, taking with them 300 prisoners. The 11th Hussars were withdrawn to No. 63 F.M.C. and their reconnaissance area being taken over temporarily by the 4th SAACR.
While the Division was successfully engaging the large enemy column on the Trigh Capuzzo, in the Sidi Rezegh area an enemy counter-attack broke through and separated the 70th Division from the 4th New Zealand Brigade, one of whose battalions had joined 70th Division. Ammunition and supplies started to run short, but after dark a column led by Colonel G. Clifton, the Chief Engineer of the 30 Corps, with an escort of the 8th Hussars, got through with fresh supplies. The 5th New Zealand Brigade, at Sidi Azeiz, were cut off from the remainder of their Division and with the bulk of the German armour separating them it seemed unlikely that they could move forward. The New Zealanders had had heavy losses and the only infantry available to reinforce them were the 1st South African Brigade. So it was decided that they would move forward the next day to Point 175, while 7th Armoured Division were to endeavour to hold off the German armour, and the New Zealanders and the 70th Division were to try to join hands again. During the night of 27th/28th November a patrol of the 11th Hussars discovered that the survivors of the huge enemy column had leaguered very close to the supply columns of the New Zealanders, but fortunately the latter were warned in time before the German tanks got on the move.
At 08:30 on 28th November, 1941, 22nd Armoured Brigade moved off Eastwards and 2nd RGH were engaged on its left flank by anti-tank guns and tanks in large numbers. 2nd RGH lost one tank through engine seizure which was later set on fire by the enemy. 22nd Armoured Brigade then withdrew South Eastwards and made contact with 4th Armoured Brigade on its right. The two brigades the formed a line facing North Westwards towards an enemy column which had been reported to consist of 70 enemy tanks and Mechanised Transport by 11th Hussars. By now 4th Armoured Brigade consisted of sixty tanks, and the 22nd Armoured Brigade, was composed of a composite Regiment of thirty tanks under Lt-Col Jago. These two brigades were continuously engaged with enemy column, during the morning. In the early afternoon they were covering the northward move of the 1st South African Brigade towards Sidi Rezegh. They were then heavily attacked by at least seventy tanks two main groups of about 35 tanks in each and fighting went on till sundown. A long tank v's tank battle ensued at a range between 1,000 and 1,200 yards on a wide front and 22nd and 4th Armoured Brigade were very active, but fortunately the enemy anti-tank gun fire was not as active as usual. Although they held their ground and cost the enemy dear, they themselves lost many tanks, with Lt-Col Jago being wounded and Major Kidston took over command. However, as well as they fought, they were consistently out-matched by the armour and guns of the Germans.
The Support Group sent out a column under Lt-Col Currie, which harassed the enemy along the Trigh Capuzzo. On their way out they had an engagement with a mixed force that included about forty tanks thought to be from the Italian Ariete Division. The tanks were repulsed and the column then operated on the Trigh with much success. The column were told to continue this good work next day and were given the 11th Hussars, less one squadron, to assist. However, the rear of the New Zealanders was still exposed and it seemed that the enemy's aim was to surround them and the 70th Division, which would enable them close the ring round Tobruk again, but at least 7th Armoured Division had prevented Rommel from attacking the New Zealanders with the bulk of his armour that day.
By noon on 29th November there were signs that the enemy were about to launch an attack on the New Zealanders at el Duda, so 7th Armoured Division was ordered to do all it could to prevent this. General Gott moved the Armoured Brigades forward, the 4th Armoured Brigade with sixty tanks for Point 175 and the 22nd Armoured Brigade with twenty-four tanks to cover the right flank of the 4th Armoured Brigade. On the way, however, the 4th Armoured Brigade were attacked on the left and from the rear by about thirty or forty tanks, and their movement was halted. With its task of covering the flank of the 4th Armoured Brigade, the 22nd Armoured Brigade were not able to remain in close protection of the South African Brigade, so their move, also, was forced to cease. A squadron from the Composite Regiment from 22nd Armoured Brigade went into action against Mechanised Transport in the valley, below the ridge overlooking the Mohhat Sidi Rezegh, but apart from this action the brigade was not heavily engaged. By the time this action was over it was clear that the tank losses of these two Armoured Brigades had been so heavy that they could no longer fight as separate formations, so they were amalgamated as the 4th Armoured Brigade under Brigadier Gatehouse. 22nd Armoured Brigade handed over its remaining tanks and withdrew to re-equip, leaving a Composite Regiment under 4th Armoured Brigade's command. Having started the Operation with three full Armoured Brigades, 7th Armoured Division was now reduced to one, which was not at full strength.
The Support Group was busily engaged all day harassing and driving north various parties of the enemy along the Trigh Capuzzo. During the night a squadron of the 8th Hussars under Major Phillips escorted a large supply column which had been assembled at Divisional Headquarters up to the New Zealanders, reaching them at dawn with no losses.
The main German tank force was prevented from attacking the New Zealanders on the 29th by the actions of the Division, but they had still been hard pressed, although they managed to beat off all the attacks and even gained ground and captured General Ravenstein, the commander of the 21st Panzer Division. The corridor to Tobruk was open once more and the Headquarters of 13 Corps had moved into the town. Both the 7th and the New Zealand Divisions were, however, appreciably weaker as a result of the day's fighting.
On 30th November the reformed 4th Armoured Brigade was assigned to keep a corridor open to the New Zealanders west and south-west of Point 175 and to covering the 1st South African Brigade. The latter were unable to reach their objective until dusk owing to enemy resistance. While the new 4th Armoured Brigade Headquarters was being organised, the Regiments moved north of Bir Reghem, to engage a portion of the Ariete Division. Here nineteen enemy tanks were destroyed and set on fire, with most of the damage was done by a squadron from 5th RTR who got round the enemy's flank, with their twenty-six Stuarts fell on an Italian tank group knocking out thirteen M-13s and five light tanks, without loss to themselves. The brigade also suffered no other casualties on the day either. While 4th Armoured Brigade were with the New Zealanders and South Africans the Support Group were again at work north and south of the Trigh Capuzzo and as far afield as Gambut, causing much damage to enemy infantry and transport. During the afternoon the New Zealanders were very heavily attacked and lost Sidi Rezegh, and other enemy attacks, which went on for most of the night, were made on el Duda, Belhamed and Zaafran. A special task was given to the 4th SAACR under Lieutenant-Colonel D. S. Newton-King. This was to raid the Gazala-Acroma area and to prevent the supply of petrol to the enemy. They returned from their raid on December 2nd, having destroyed a great deal of petrol and many vehicles, along with having had a widespread effect on the enemy's morale. They had unfortunately suffered many casualties from, heavy and sustained air attacks, but the destruction and disruption they had caused was to affect Rommel's plans in a few days' time.
By dawn on 1st December 1941, 4th Armoured Brigade had over a hundred tanks serviceable and were ordered to move to the New Zealand leaguer south-east of Belhamed. The Brigade crossed the Sidi Rezegh airfield under heavy fire and moved down the escarpment to the leaguer, where they were shelled and many vehicles were on fire. As the New Zealanders started to withdraw eastwards the tanks formed up to cover them, the shelling intensified and soon the enemy attacked with tanks from the south and south-west. Part of the Brigade took up a position on top of the escarpment and remained there until the infantry were clear and they were nearly surrounded, but managed to withdraw at top speed and get away. Although by then most of the 4th New Zealand Brigade had been over-run, the survivors of General Freyberg's 2nd New Zealand Division were protected from, further attack and enabled to re-group without an further attacks. At dusk 4th Armoured Brigade leaguered near Bir Reghem.
During the day the Support Group, which had three columns out, were watching the flanks of the South African Brigade, were engaged with many enemy parties. With the withdrawal of the New Zealand Division on 1st December 1941 ended the Second Battle of Sidi Rezegh. The New Zealanders had suffered severe losses, as had both 7th Armoured and 70th Infantry Divisions, but the determined resistance of the British and Commonwealth infantry had made Rommel's situation impossible. This along with his losses forced him to the decide that he could no longer carry on the siege of Tobruk. The actions in which the Division had been engaged can be summed up in the words of the Support Group War Diary written on 30th November 1941: "Thus the month ended. On more than one occasion it had seemed that the battle was lost, and fortune had visited both sides, but not to stay. This constant change of fortune was the chief feature of the whole battle. Indeed, even as the battle appeared, on the last day of November, to be favouring the Support Group, the New Zealand Division was being over-run on the littered, smoky field of Sidi Rezegh where the Support Group had experienced its most savage struggle of the war and had given as good as it got - as witness the German graves at the foot of "de Salis Ridge".
The Axis Withdrawal (2nd to 10th December 1941)
By now both sides were suffering from the gruelling effects of the fighting of the past fortnight. The British garrison of Tobruk was again cut off, but so were the German and Italian garrisons of Bardia and Halfaya. While British had suffered heavy losses, but so had the Germans and Italians. Everywhere the Desert the was covered by abandoned vehicles which both sides were striving to collect and repair, while supply columns were feverishly endeavouring to bring forward materials of all sorts to build up again the reserves without which the battle could not be continued. The 7th Armoured Division had been severely weakened, but it continued to send out 'Jock' Columns who never ceased harassing the enemy over the whole of this wide area, who inflicted tremendous damage on the enemy as captured documents later testified.
A good many of the guns that had been lost were also recovered, but as both sides moved about the battlefields, identification of both of men and of vehicles, had become even more difficult, as by now all uniforms had assumed a dull Desert colour. Vehicles were also hard to identify, as both sides were using ones captured from the other, along with captured weapons. This made the task of any small party of armoured cars or from a column in identifying any troops they might meet very hard.
The third phase of 'Operation Crusader' that lasted from 2nd to 10th December saw the withdrawal of the enemy from the perimeter of Tobruk, which left the Axis garrisons at Bardia and Halfaya isolated. The plan was for the British to attempt to cut the Axis forces by a thrust from el Gubi towards Acroma. For this operation the 30 Corps consisted of the 7th Armoured Division, which now only the 4th Armoured Brigade and a much reduced Support Group, 4th Indian Division and 1st South African Brigade, plus five Armoured Car Regiments. The first objective was el Adem, so while 13 Corps attacked with the 70th Division from the positions they had gained in their sortie, 30 Corps were to capture el Gubi with the Indians and then to advance north to seize the ridges north and south of the Trigh Capuzzo west of el Adem. The 7th Armoured Division role was to attack Rommel's tanks if they tried to interfere, while the Armoured cars were to raid German and Italian supply dumps and to attacks supply columns where and when possible.
On the first day, 2nd December, the only activity was from the armoured cars who kept continuous watch on the enemy and reported the preparation of defensive positions in several places, while 4th Armoured Brigade remained in the area of Bir Berraneb. During the day the 22nd Guards Brigade (Brigadier J. C. O. Marriott) and the 11th Indian Infantry Brigade were put under the Division's command. General Gott's intention was to secure the ground south of el Adem in order to bring the enemy armour to battle, but to do this he had first to make good the ground north-west of el Gubi. However, the launch of these operations had to await orders from Corps.
On 3rd December the plan was for 11th Indian Brigade supported by sixteen "I" tanks to capture the el Gubi position, with 4th Armoured Brigade was to be positioned to the north-east to hold off the enemy armour. Later on, 22nd Guards Brigade was to carry the attack on northwards. On 4th December there was heavy fighting all day, both at el Gubi and at el Duda, with the Indians in the south being unable to dislodge the Italian defenders, while in the north Rommel launched a series of attacks on the 70th Division. Fortunately, 70th Division were able to hold its positions. Also on the 4th, 'C' Squadron 6th SAACR (now attached to the Kings Dragoon Guards who had lost a third of its armoured cars), was operating North of Bir el Gubi, where it destroyed 20 vehicles, for the loss of one armoured car.
Another armoured car raid was made to the west and a large quantity of petrol, diesel oil, ammunition and food was destroyed in a dump fifteen miles north-west of el Gubi. To the North of el Gubi 4th Armoured Brigade, now with ninety-eight tanks, was engaged all day with enemy columns and while columns from the Support Group harassed the enemy along the Trigh Capuzzo.
Rommel's retreat began on 5th December and it was helped by the surprisingly stout defence of el Gubi. This was not a rout, but rather a well-conducted withdrawal with the German armour being handled with skill, generally behind a screen of anti-tank guns which the British armour could not penetrate. The Indian attacks on el Gubi continued but were not fully successful. By the end of the day it was realised that the chances of cutting off Rommel's retreat were diminishing, for as long as the enemy held el Gubi they constituted a menace to the communications that could not be ignored. All day there was a steady westward movement of German tanks and transport along the Trigh Capuzzo and in other areas and later the KDG reported large concentrations of troops south of el Adem. Meanwhile, on the 5th it was decided to re-equip 2nd RGH as an "American" Regiment, consisting of 52 American Stuart tanks
Soon after daylight on 6th December a large force of enemy tanks appeared to the north along the route that it had been intended that the 4th Indian Division were to advance along later in the day. To counter the threat 4th Armoured Brigade were sent to engage then, but whenever the brigade advanced, the enemy tanks retired behind a screen of anti-tank guns. Unfortunately, 4th Armoured Brigade did not have the resources to outflank them, nor the strength to attack frontally. Meanwhile, the Support Group columns had been ranging about the Trigh, and by midday they reported that the whole area east of Sidi Rezegh was clear of enemy. Soon afterwards they gained contact with the 70th Division. The column under Lt-Col Wilson had made for the New Zealand hospital which had been in enemy hands, and there they recovered eight hundred wounded British prisoners, two hundred of whom were stretcher cases. By the end of the day it was clear that the Germans and Italians were going to abandon the whole area and pull right back. The Axis frontier troops were lost, but the British had not the strength to outflank the German and Italian forces and cut off the main body's retreat. This was mainly due to the fact that there were not enough transport to lift the Indian Division forward, but there were not enough tanks to afford them protection on such a long move. Additionally, the Stuarts that formed the majority in the 4th Armoured Brigade had a limit of only forty miles on one tank of petrol, which meant that they had to stop and re-fuel every twenty miles, so they could to keep a reserve to manoeuvre in action. Any wide outflanking movement was therefore impossible, and a frontal attack was always met by a stronger force of anti-tank guns, against which the British tanks could do nothing. The superiority of the German tanks and guns still told.
At 08:00 on the morning of 7th December the lead Regiment of 4th Armoured Brigade engaged a force of about forty tanks with the usual artillery support in which 250 rounds per gun were fired. The engagement went on all day, with a good deal of transport being destroyed and a number of enemy tanks disabled. Again, the Support Group operated in the northern part of the area, and they made further contacts with the Tobruk garrison. During these actions many more German prisoners were taken and the Support Group also 'recaptured' about two hundred New Zealanders in the afternoon.
The next day, 8th December, 4th Armoured Brigade pushed on in a north-westerly direction, as their opponents from the previous day had withdrawn during the night. Before long they ran up against an extensive enemy position along a ridge on the Trigh el Abd about ten miles from el Gubi. Efforts to outflank it from south or north, or to advance frontally were all repulsed and in the evening the Germans launched a counter-attack, which was halted by artillery fire. The Support Group were engaged with tanks as well as the usual parties of infantry. About 10:15 the Headquarters of the Support Group came under intensive air attacks, with some aircraft coming as low as twenty feet to machine-gun individual vehicles. Although its armour kept out the bullets, the Command vehicle had all its tyres punctured and a spare can of petrol that was on the back was set on fire.
During the night of 8th/9th December the enemy withdrew again and on the morning of the 9th, 4th Armoured Brigade moved of in pursuit. By noon they were in contact with a defensive position a few miles south and south-east of Knightsbridge which was a large track junction twenty miles west of el Adem. The Brigade attacked at 14:30 and gained some valuable ground at the north end of this position and by 16:00 it was on high ground overlooking el Adem. Soon afterwards, Lt-Col Wilson's column from the Support Group came up, and an attack was made on twenty German tanks that appeared to be forming up to attack 4th Indian Division on its advance. The fighting continued until dark and but the enemy were halted. On 10th December the columns from the Support Group, along with the Armoured Car Regiments, ranged over a wide area, as the Germans and Italians had withdrawn to the Gazala line. The Support Group was reinforced by 14 tanks of 'H' Squadron, 2nd RGH were put on transporters on the 10th and ordered to join "Currie" Column from the Support Group the next morning. By sundown on the 11th the Indians had reached Acroma, and patrols were fifteen miles west of there and nine miles west of Knightsbridge. On the south flank of the Division the Royals had relieved the KDG.
Clearing Cyrenaica (11th to 27th December 1941)
This final phase of the 'Operation Crusader' saw the clearance of the enemy from Cyrenaica and returned 7th Armoured Division back to the scene of their triumph in February 1941. Until 16th December Rommel held a defensive position stretching roughly south from Gazala. All the British troops who could be maintained forward were placed under command of 13 Corps, which now consisted of 4th Indian Division, a New Zealand Brigade, a Polish Brigade, 22nd Guards Brigade and 7th Armoured Division, who had only the much reduced Support Group and one Armoured Brigade. The latter was initially commanded by the Headquarters of the 4th Brigade, then by the Headquarters of the 22nd Brigade.
Between 11th and 14th December columns from Support Group under Lt-Col Currie and Lt-Col Wilson and Major Lord Garmoyle carried out a number of operations, discovering the extent of the German position, putting in probing attacks and harassing generally. At this time the Support Group consisted of 4 columns of all arms and its role was to harass as many enemy positions as possible in the area Gazala - Tminni while 2nd New Zealand and 4th Indian Divisions came in from the Northeast. The columns were disposed as follows:-
'Currie' Column left ( with 'H' Squadron 2nd RGH) directed on road West of Gazala .
'Hugo' Column centre directed on Gazala.
'Wilson' Column right directed East of Gazala.
'Mayfield' Column 'holding' column held in reserve.
The role of 2 RGH was never clearly defined, but we were a force that Brigadier Campbell "had up his sleeve" should any suitable target present itself, and particularly in the case of lurking enemy armoured formations believed to be in this area. During the period from 1st to 14th December 4th CLY had been re-fitting with tanks which gradually came from various workshops, most of which were in a fairly bad state and ill-equipped. Bit by bit kit was collected and finally by 13th December 4th CLY had collected 32 semi-serviceable tanks and 3rd CLY had about the same. On the 6th December 4th CLY had managed to send a composite Squadron under Major Lord Cranley to join 4th Armoured Brigade. On 14th December 4th CLY moved of with 32 tanks for Bir Lefa, with four tanks dropping out on the way due to mechanical problems. During the 15th to 17th, 4th CLY remained at Bir Lefa collecting more tanks, where it was rejoined by 'B' Squadron, with 12 more tanks.
On 12th December, 2nd RGH moved out at 06:30 westward 12 miles to an area know as "Double blue", where the enemy appeared to be holding a fairly strong position. At 11:30, 2 RGH (less 'H' Squadron) was ordered to do what amounted to a 'demonstration in force' South of the enemy position in the area Mtgatatt El Adam during which the tanks from the 'F' and 'G' Squadrons and RHQ were subjected to sustained and fairly accurate shellfire from un-located enemy gun positions to their north. At 15:00, after proceeding about 12 miles west, 2nd RGH returned whence they came encountering shellfire as on the outward journey. Although 2nd RGH were shelled for the best part of 2½ hours no casualties to personnel or tanks were received bar a few small items such as wireless masts blown away and surface kit such as water cans and bedding damaged. At 19:00, 'H' Squadron rejoined 2nd RGH.
On 13th December, while static at 'Double Blue' 2nd RGH's role was the protection of the 5th Indian Division advancing Westwards to its North, but at 11:00 its was ordered by Brigadier Campbell to perform same task as yesterday, but with the added intention of cutting the track previously mentioned. This would mean working its way round into the rear of enemy position while Support Group column and 4th Indian Division pushed in from the East. By 15:30 time 2nd RGH had advanced 4 miles North on final leg of the route with 'G' Squadron in the centre, 'F' Squadron on the left and 'H' Squadron on the right and at this time 'G' Squadron suddenly met up with a large amount of enemy transport with some anti-tank guns and artillery. 'G' Squadron was considerably engaged by the anti-tank guns in rather an unpleasant valley, before 'F' and 'G' Squadrons succeeded in making a large mass of 60 to 100 transport move westward in disorder. It was difficult to estimate the damage caused as the range was about 800 yards and the anti-tank guns to the right flank were only about 200 yards away behind a ridge. 'H' Squadron had a fairly successful shoot as far as disorganisation of the enemy was concerned, but it is difficult to state actual damage done and casualties inflicted. The whole action was 'short', very sharp and rather costly with 2nd RGH heavily shelled and then later at 16:20 while at Dermeriem they were dive bombed by Stukas while reorganising after engagement. Controlling the regiment was difficult for Lt Col N. A. Birley (OC 2nd RGH) owing to many of the American wireless sets breaking down. At the end of the action 2nd RGH counted 9 tanks lost and left on battlefield.
On 14th December, 'H' Squadron (with 14 tanks) were once more to be detached from the 2nd RGH and sent to join 22nd Guard Brigade at 'Clapham'. The intention was for 'an offensive sweep Westwards' at a later date. During the move H' Squadron was again put on transporters. By 10:00 'G' and 'F' Squadrons, plus RHQ consisted of 17 runners and another 6 under field repair. The Regiment less 'H' Squadron moved 8 miles to area around Gabr El Abidi to join 4th Armoured Brigade. At 14:30 4th Armoured Brigade moved off with 3rd RTR leading, 5th RTR on the right, 2nd RGH on the left, with 2nd RHA and 102nd RHA Anti-tank Regt (Northumberland Hussars) moving with 4th Armoured Brigade HQ. Its intentions was to advance 21 miles south to Zeidan, then 30 miles West and 30 miles North to Hafget El Haleiba (Position Boston). This would mean going right round rear of enemy positions which was the main rearguard of his army, while 4th Indian Division and the Support Group attacked again from the East driving enemy on to 4th Armoured Brigade at 'Boston'.
By 16:30 on the 15th, 4th Armoured Brigade reached its objective without encountering any opposition and at 18:00 it encountered odd parties of enemy transport. On 16th December with 4th Armoured Brigade B Echelon being unable to get up to the present position of the Brigade, it was decided to withdraw 18 miles South and meet the Echelon and re-supply. This was accomplished by 07:00 and the advance continued and at 15:30 4th Armoured Brigade reached Guiret El Abd with 5th RTR left, 3rd RTR centre, 2 RGH right. At 16:00 3rd RTR contacted some isolated enemy guns along with 4 German tanks and within 30 minutes the brigade artillery was shelling the scattered enemy gun positions on track running East to West. On 17th December the enemy was reported to be in full retreat in the direction of Timimi so the Brigade's mobile columns moved up fast in an attempt to harass his retreat picking up numerous enemy stragglers were picked as the advanced. While this main part of the Brigade advanced One squadron attacked the Headquarters of the 15th Panzer Division and knocked out four tanks for the loss of one of their own. On the same day the Guards Brigade drove the enemy from a defended position about six miles south of their main system, but that evening a strong counter-attack was delivered by 15th Panzer Division against the Indian Division north-west of Alam Hamza and they were forced back with considerable loss.
All the time, the armoured cars of the KDG, Royals and 11th Hussars operated far and wide in their usual tasks of collecting information and attacking such enemy as they could find.
The period between 17th and 27th December was frustrating, as pursuit was difficult owing to the bad going for there had been heavy rain in places and even some flooding. This meant that any attempts to cutting off the enemy as they retreated from Benghazi were therefore doomed to failure. By now there were four Armoured Car Regiments in the Division. The 12th Lancers were retained under Divisional control, while the Royals were put under the 4th Armoured Brigade, the KDGs and 'C' Squadron 6th SAACR under the Support Group and the 11th Hussars were with 22nd Guards Brigade, which was temporarily in the Division. On the 19th two patrols from 'C' Squadron 4th SAACR, came under heavy enemy shellfire, but they withdrew and in doing so managed to lure 15 enemy tanks within range of a squadron of British Cruiser tanks in a hull-down position behind a ridge. The Cruisers then proceeded to knock out 5 tanks and scored direct hits on six more
During this time the re-formed 22nd Armoured Brigade (now part of 1st Armoured Division again) moved up, consisting of 3rd and 4th CLY, until 2nd RGH rejoined it on 20th December, 1941. It took over from 4th Armoured Brigade, which then withdrew to re-equip and rest. The administrative situation, was an anxious one as it was possible for that the whole Division could be maintained up to 100 miles from any Forward Maintenance Centre that was established, which, of course, took time. Alternatively, the Support Group and two armoured regiments, only, could be maintained as far as the Benghazi-Agedabia road, but only if the 22nd Armoured Brigade Headquarters and the rest of the armour did not move from Mechili, which had fallen on the 18th, and provided that an F.M.C. was set up there by the 21st.
This Axis retreat of the December 1941 was no rout such as had characterised the Italian retreat in the earlier months of the year. Throughout their withdrawal the Germans and Italians were never run off their feet and always managed to retain rearguards strong enough to hit back hard. As they pulled out of Benghazi a left flank guard was put out in sufficient force to prevent interference with the main body. Columns from the Support Group met resistance from flank and rear guards wherever they advanced. During the night march on the 19th/20th the Support Group recorded that the was the worst in anyone's memory, and that on the next night it was pitch dark, bitterly cold and the hills and wadis so steep and numerous as to raise petrol consumption to a dangerously high level. The fuel shortage was now so critical that at 13:30 on 22nd December the Support Group were brought to a halt and unable to go on until they received 12,000 gallons of petrol, while not far away from them some of the armoured cars of the Royals had actually run out of petrol while in contact with the enemy. A small force was organised to continue the advance with consisted of a squadron of the Royals, a company of the Rifle Brigade and a Troop of the 3rd RHA plus a detachment of the Royal Engineers all under command of Major A. H. Pepys of the Royals. They reached Benina and found a hundred enemy aircraft abandoned on the airfield and in spite of many difficulties the group covered over a hundred miles on the 22nd. The Guards Brigade, who had now left Divisional command, reached Antelat on the 22nd, and after some sharp fighting advanced to Agedabia which they attacked on Christmas Day. Unfortunately there was no armour support available for them and exploit their success owing to petrol shortage.
On 23rd December 22nd Armoured Brigade moved one up, with 2nd RGH leading with 30 Honeys ('F', 'G' & HQ Squadrons), 4th CLY on the left (30 MK VI Crusaders), 3rd CLY on the right (30 - 40 MK VI Crusaders). Its intentions was establish a position at Saunnu by 24th December and to await supplies from coast road communications at this point, which it was hoped would be clear of enemy by this time. On this day 3rd RTR had engaged remains of Italian Ariete and 21st Panzer Division at Antelat and Beda Fomm. On the 24th the Support Group were ordered to contain Benghazi and the enemy force had withdrawn Southwest in the direction of Agedabia. Elsewhere 22nd Armoured Brigade were awaiting supplies and for the Forward Supply Depot to be established at MSUS.
Having been liberated on 14th December by a squadron of the Royals, Benghazi was entered on the 26th by 4th Indian Division who took over its control, where on 25th December 'C' Squadron 6th SAACR had eaten their Christmas lunch, recording in their War Diary that there was "alas no Xmas Pudding!". On the same day arrangements were made for Divisional Headquarters and the Support Group to return to the Delta, starting next day. By now the latter were a mere skeleton of what they had been. The 1st K.R.R.C. had already been sent back to Egypt the and Rifle Brigade had only a small proportion of their establishment left, two companies had had to be amalgamated and fifty per cent of the officers had become casualties; the 60th Field Regiment had already left to be re-formed, and the 3rd and 4th RHA. had lost many experienced officers, N.C.O.s and men. But an even greater handicap, and one that increased every day, was the heavy loss of vehicles and equipment. Now there were only twelve carriers where there had been forty-four, guns were being towed by lorries and, worst of all, there was a serious shortage of wireless trucks. As the Support Groups withdrew Brigadier 'Jock' Campbell sent out a message which ended, "Remember our motto - first in and last out and ever ready to go on." The 3rd RTR handed over their tanks at Msus for the use of the 22nd Armoured Brigade, and then to followed the rest of the Division back to Egypt. The 11th Hussars remained under the command of the 22nd Guards Brigade and continued on operations until February 1942. After an uneventful journey Divisional Headquarters entered Cairo on 3rd January, 1942.
It had been a close fought battle, but the Germans and Italians had been forced back as far west as Agadabia and the siege of Tobruk lifted. By constant fighting the 8th Army was able to claim a "points victory" over the enemy. The enemy losses in Operation "Crusader" amounted to 13,000 Germans, 20,000 Italians and 300 tanks. The British and Commonwealth casualties were 2,908 killed, 7,300 wounded and 7,400 missing (a total of 17,700) and 270 tanks. Ninety percent of the British casualty list came from the first month of the offensive.
The British tank tactics still needed to be re-thought as terrible losses had been sustained by the "piecemeal" use of the tanks on the battlefield, rather that the mass attacks favoured by the Germans. At one point during the battle Rommel commented to a captured British Officer; "What difference does it make to me if you have two tanks to my one, if you send them out and let me smash them in detail. You presented me with three brigades in succession."
Engagements 1940 Engagements 1942 Engagements 1943 Engagements 1944 Engagements 1945