Engagements - 1942
During 1942 the 7th Armoured Division was involved in the following battles and campaigns. These include
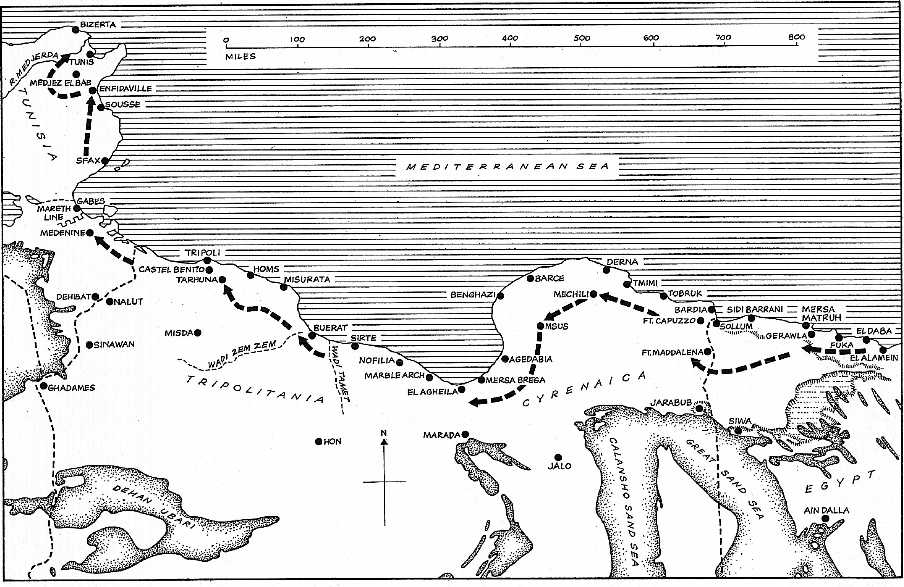
Gazala and the Cauldron, First Alamein, Alam Halfa, Battle of El Alamein (Second Alamein) and the drive to TripoliView map of North Africa (This is a large file and may take some time to download)
AXIS COUNTER OFFENSIVE (January-February 1942)
Following the "Crusader" battles, both sides settled into defensive positions, where they "licked their wounds", but having received some reinforcements on 5th January, the Germans counter-attacked on 21st January 1942. The renewed German offensive took the British by surprise and it stuck the newly arrived British 1st Armoured Division.
The 1st Armoured Division had repeated the old error of dispersing its units over the desert, rather than focusing its strength in one area. The Germans stuck these scattered units in force and on 23rd January the German armour engaged the 2nd Armoured Brigade, with its three regiments coming into action separately, only to be individually defeated, loosing over half their tanks, in the process. The Germans then burst through the 201st Guards Brigade to take Msus and on 28th January Benghazi fell. Here the Germans and Italians captured a huge stock of petrol and ammunition that the British were preparing for their own offensive - Operation Acrobat - scheduled for mid February. By 4th February the British were back to the Gazala line, with many units still in retreat, although the Axis had already stopped their advance.
During this time most of the 7th Armoured Division were in the Nile Delta resting and refitting. The Support Group (soon to be renamed 7th Motor Brigade) held a Memorial Service in Cairo Cathedral, which was preceded by the presentation of Brigadier Jock Campbell's Victoria Cross, for his leadership at Sidi Rezegh. He had recently been promoted to General and took over the command of the Division when General Gott took over 13 Corps. Unfortunately, he was killed in car crash a few weeks later, which has a great loss to the Division and the 8th Army. Also during this period the 11th Hussars were sent east to Mosul and Iraq and, therefore, were not with the division when the Germans advanced again.
In April 1942, the Division returned to the desert, without the 11th Hussars, and as usual sent out "Jock" columns into no-mans land, while the British prepared for an Axis advance.
BATTLE OF GAZALA AND THE CAULDRON (May-June 1942)
Between late January and May, following their withdraw from the German front at Agedabia, the British had been busy creating what was to be called the "Gazala Line". This was a series of defended "Boxes", rather than the tradition line of 1914-18 vintage, running from Gazala on the eastern side of Jebel south into the desert. A full brigade, behind belts of barber wire and mines manned each; they were too widely separated to provide mutual support. Instead the desert between them was patrolled and hopefully controlled by roving armoured units. The most important of these "Boxes" was Bir Hacheim, which would be the pivot point of any armoured flank attack for either side. This box was manned by the 1st Free French Brigade consisting mainly of French Legionnaires, Commanded by General Koenig. Sixteen miles to their right lay another box manned by the 150th Infantry Brigade and further North still was the "Knightsbridge Box", held by 201st Guards Brigade. (This was the old 22nd Guards Brigade that had been renamed to avoid confusion with the 22nd Armoured Brigade). Other boxes manned by British or South Africans, then reached to the sea.
The British still outnumbered the Germans and Italians 2 to 1 in tanks, as the Axis had seven German and three Italian regiments to the British fourteen armoured regiments. The British had also received some of the new American Grants with thicker armour and a 75mm gun and if fact had 700 tanks in service with another 400 in reserve or in the Nile delta. By now each armoured regiment of the 7th Armoured Division had 24
Grants and 20 Honeys and the crews were anxious to see the effect of the Grants on the German armour, feeling it was at last a worthy battle tank. In addition to the changes in armour the motorised infantry battalions had received more Vickers MMGs and their support companies now had anti-tank guns. Most of these were 2-pdrs, but the new 6-pdr was coming into service. Click here to view the Divisional Order Of Battle at this time.The Gazala Line boxes were held by 13 Corps, while 30 Corps was deployed in the desert to the south, with two armoured divisions the 1st and 7th. The 7th Armoured Division was deployed to cover the open flank, while the 1st Armoured Division was some miles further north lay to support the French at Bir Hacheim. The German tactics, as would have been the British's, was to a frontal assault in the north and then to send the tanks round the southern flank. The Germans advance on the evening of 26th May with a hook east and north towards Sidi Rezegh, was immediately successful.
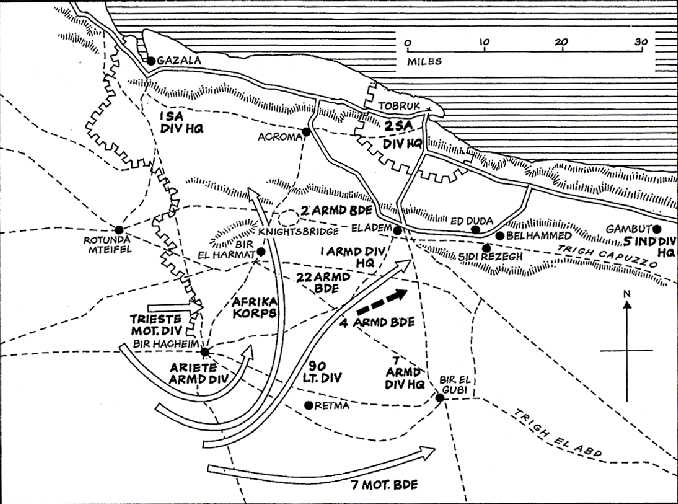
Although first spotted by the 4th South African Armoured Car Regiment, at first light on 27th May, the speed of the German advance was so swift that at about 8:30 am on the morning of 27th May they overran the 7th Armoured Division HQ. This scattered the 7th Motor Brigade, capturing General Messervy, then commanding. He escaped later the next day. The 7th Motor Brigade withdrew to the Retma Box, fifteen miles east of Bir Hacheim, while 4th Armoured Brigade fought all day to stem the attackers, but the 8th Hussars and 3rd RTR were caught before they could move and suffered accordingly. The latter was reduced to just five
Grants and eight Honeys. The 4th Armoured Brigades 'B' Echelon was then overrun with the loss of most of the ammunition and petrol was lost and the 1st KRRC had to withdraw to the Retma Box and then on to El Duda. On the same day the 3rd (Indian) Motor Brigade, which was under the control of the Division was also overwhelmed and did not reform for some days. By the afternoon of the 27th the German attack had shattered the 7th Armoured Division and they were in position to assault the 201st Guards Brigade in the Knightsbridge Box. Once again the British armour had been committed piecemeal, although in this case there was little other choice.The Germans now attacked the Box at Retma, which was garrisoned by 9th KRRC, 2nd Rifle Brigade, 'C' Bty 4 RHA and a Rhodesian anti-tank unit. Accompanied by heavy artillery fire the Panzers swarmed in, swiftly overrunning the 9th KRRC, with the rest of the garrison then moving back to east of Bir El Gubi.
The Germans now pushed their Panzers on to the north, moving behind the Gazala Boxes, but British resistance now stiffened. Thus unable to maintain their supply route round the south flank, the Germans cleared two paths through the minefield either side of the 150th Infantry Brigade Box and very heavy fighting took place in this area which was to become known as "The Cauldron". On 28th May, 4th Armoured Brigade attacked a battle group of the 90th Light Division, where the 3rd and 5th RTR did particularly well. Meanwhile, the 7th Armoured Brigade harried enemy positions near Bir El Gubi. A map of the Cauldron is below;
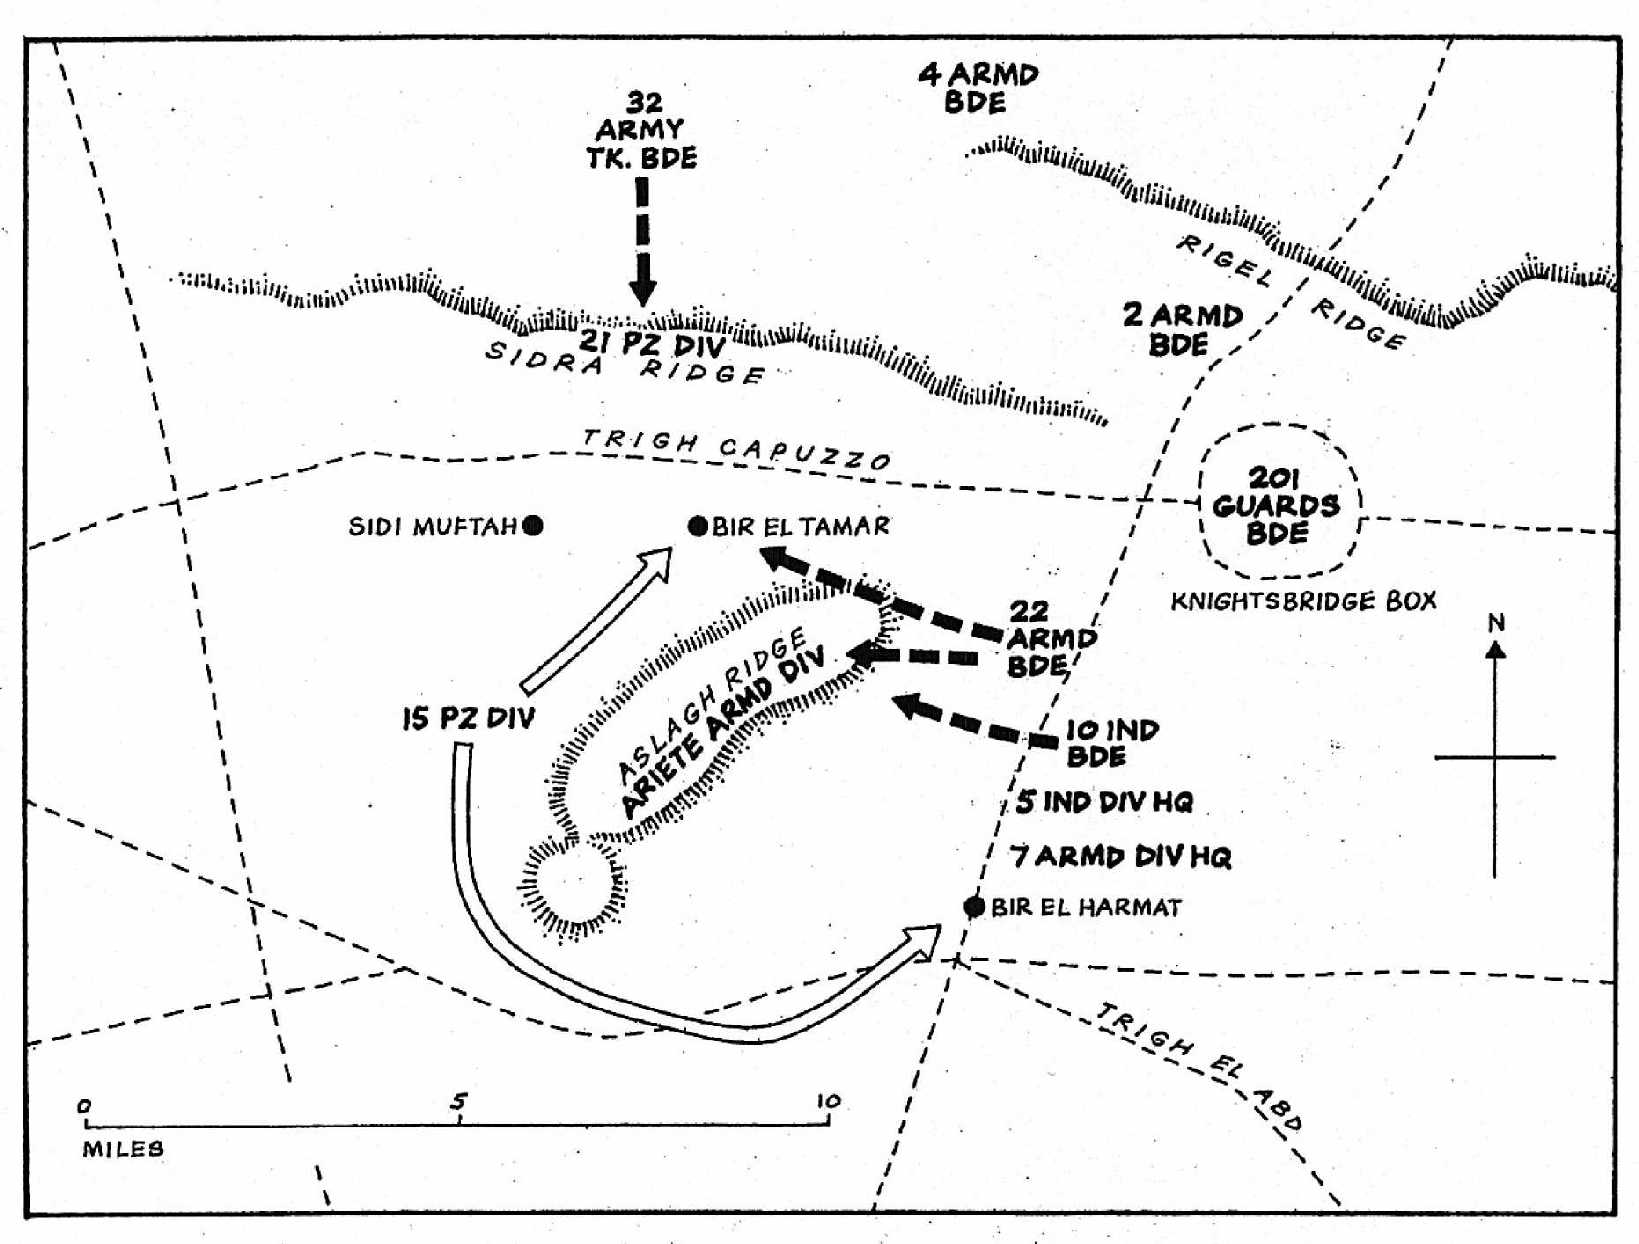
The 15th Panzer Division came to halt near the Knightsbridge Box, being seriously low on fuel and ammunition and by 29th May the German advance had stopped. The Germans started to open lanes through the British minefield, but they were engaged by artillery from Knightsbridge and the Guard. The Axis awaited the British counter attack in the open desert, east of Knightsbridge, with the British minefields and the Guards box still at their rear. The German plan was for the British tanks to waste themselves against a well dug-in anti-tank screen, but a sandstorm blew up and the British attack did not really develop, with the 4th Armoured Brigade not attacking until the evening to engage the 90th Light Division again, near Bir Harnet. On 30th May Rommel had been forced to concentrate his forces in a defensive position near the 150th Brigade Box, as his original position was not tenable and various attacks took place all day. 31st May the 8th Hussars and 3rd RTR, which had been in battle for 5 days were combined into one regiment with only 9
Grants and 24 Honeys, while the 4th Armoured Brigade HQ only had 3 of each, with 5th RTR having only 16 Grants and 12 Honeys. This gave the 4th Armoured Brigade a total of 29 Grants and 39 Honeys, with the rest out in the desert. But the British tank and recovery crews were nowhere near as efficient as those of the Germans, who had crews moving about the battlefield patching up their own tanks and destroying or recovering British ones. At this time the British thought they had Rommel cornered and he himself contemplated surrender, but the Italian 'Trieste' Division managed to open a route through the minefield and get a supply column to him.As the British had not attacked in any real form, the Axis took the offensive again with a fierce assault on the 150 Brigade Box, supported by Stukas, along with attacks on the French in the Bir Hacheim Box. The 150th Brigade Box fell at noon on 1st June, with the fighting now opening up between the Guards and the Bir Hacheim Boxes. The 7th Motor Brigade continued operate in "Jock" columns in no-mans land, shooting up enemy positions and transport.
Rommel now struck out of his defensive positions in the Cauldron, with the British putting in attack after attack. At this time Major- General Lumsden commanding 1st Armoured Division attempted to a combine forces with what was left of 7th Armoured Division, but unfortunately this was not possible and a valuable chance to mount a coordinated counter-attack by both Armoured Divisions was lost, so when General Ritchie counter-attacked on 2nd June the whole British attack was not coordinated, with many units attacking on their own and suffering heavy casualties as a result, particularly against the ant-tank screen. A typical example of this was how the Axis would wait until the British tanks emerged from a protective smokescreen and then opened fire with anti-tanks, including 88mm's. Over the next few days most of the conflict centred around the Cauldron Area. On 2nd June an attack by 5th RTR and 'B' Bty 1 RHA, was hit by a sandstorm and in the ensuing chaos the guns were overrun with the 5th RTR being reduced to just one
Grant and two Honeys. This left 3rd RTR as the only effective tank unit of 4th Armoured Brigade. The various columns of 7th Motor Brigade were then ordered to help hurry and help the defenders at Bir Hacheim. On 3rd June the 22nd Armoured Brigade was attached to strengthen the tank force of the Division. On 5th and 6th June a whirling tank and anti-tank battle took place around the Cauldron, but by the evening of 6th June the British tank strength was reduced to 170 and when the Axis attacked again they scattered the 7th Armoured Division for the second time in ten days. On 7th June the Division strength was 54 Grants and 34 Honeys, all manned by very tired crews.By now the British forces were in some disarray, but somehow they resisted his fierce attacks on Bir Hacheim Box on 7th and 8th June. On 9th June, the remainder of 4th Armoured Brigade left the Knightsbridge Box and advance south to attempt to relieve the French at Bir Hacheim, but this attack faltered under the fire from 88mm guns. On the evening of 10th June the Germans finally broke into the Bir Hacheim Box and during that night the Free French withdrew, but leaving much of their equipment behind. 2nd KRRC and the Rifle Brigade aided the withdrawal of the French and 550 Company RASC, who took lorries and ambulances in to lift out the weary French and their wounded. Although some 1,000 men fell prisoner, over 3,000 escaped to fight again. This left the Axis free to concentrate their attention on the other boxes of the Gazala Line.
On 12th June the 22nd and 4th Armoured Brigades with caught between the 15th and 21st Panzer Division and suffered badly and on 13th June the Knightsbridge Box was cut off. However, the German and Italian forces were tired, but they did overrun the Scots Guards before the 4th & 22nd Armoured Brigades could counter attack. They did attack in the afternoon, and lost 22 tanks and that night the Guards were able to withdraw from the Knightsbridge Box, in good order. This left the Gazala battlefield to the Axis, watched over by the vigilant 4th South Africans and the 11th Hussars.
This left the 50th British and 1st South Africa Divisions stuck in boxes to the north of Knightsbridge, cut of by the Axis, who were swarming towards Tobruk. These divisions were order to break out east while the 15th and 21st Panzer tried to cut them of. Weary units of 7th Armoured managed to delay the German armour allowing most of the 50th Division to escape and the 1st South Africa Division, withdrawing along the coast road lost only its rearguard. By now most of the 8th Army was in retreat to the El Alamein line.
By the evening of 15th June, the 4th Armoured Brigade was reduced to 24 Honeys and 12 Grants and they followed the South Africans east and at dawn on 16th they were back at Sidi Rezegh and El Adem. On 17th June the 4th Armoured Brigade, along with the 9th Lancers and 4th CLY attacked a force of 100 enemy tanks and after a fierce battle withdrew to the Egyptian border. In the meantime the Axis went on to capture Tobruk on 20th June 1942, to complete the British defeat.
At the end of the Cauldron battles the Germans were reduced to about 44 tanks and with only 2,500 infantry still on their feet. The two Italian Divisions (Ariete and Trieste) had about the same number of infantry and just 14 tanks. Most of the Axis infantry and support troops were using capture British trucks as their own was worn out. General Auchinleck, took direct command of the 8th Army from General Ritchie, reversing the earlier decision to stand a Mersa Matruh and ordered a withdraw to the secure line between the Qattara Depression ad El Alamein. Meanwhile, even in their depleted state the Germans and Italians still were advancing and on 26th he launched another attack on the British rear. On 27th June Mersa Matruh fell. By now the Western Desert was a full of mixed up units all heading east, and with both sides using east others transport it was difficult for both air forces to know who to attack and mistakes were made by both sides.
This retreat became known as the 'Gazala Gallop' and during this time the 7th Armoured was frequently in action, though shortly after the fall of Mersa Matruh the 4th Armoured and 7th Motor Brigades came under the command of the 1st Armoured Division, holding the desert flank of the 2nd New Zealand Division. The King's Dragoon Guards continues to patrol towards Bir El Gubi, only falling back as the Germans advanced, while the 7th Motor Brigade units, notable the 9th KRRC operated around Sidi Rezegh before withdrawing to the Alamein line. By 1st July 1942 all the units of the Division were on or behind the Alamein Line.
Following the fall of Tobruk, British morale was very low, especially as the town had held out for so long during the siege in 1941, but it now provide a forward port for the Axis and therefore shortened their supply lines. Despite being weakened by the battles at Gazala and the Cauldron, the Axis were determined to attack the new British line at Alamein as soon as possible. Their plan was to attack between the defences of the 1st South African Division and those of the 18th Indian Division in the north.
The attack began on 1st July and without the support of the Italian Ariete and Trieste Divisions, the German 90th Light and 15th Panzer Divisions became pinned between the two boxes held by the South Africans and Indians. Meanwhile the 21st Panzer Division became involved for the battle for the box at Dier-el-Shein held by the 18th Indian Brigade, which held on until dusk. This put the whole German attack out of sync and then the British Armour, which had left behind during the retreat from Gazala, arrived from the west. On 2nd July, the 4th Armoured Brigade attacked the flank of 15th Panzer, losing a number of tanks to 88mm guns, while the main thrust of the German attack, along the Ruweisat Ridge, south of Dier-el-Shein, was hindered by the appearance of 22nd Armoured Brigade, with 50 tanks. As the German advance had not started until the afternoon, they halted and leaguered for the night.
On 3rd July, the Germans could only muster 26 serviceable tanks, but despite this they knocked out 39 tanks of the 1st Armoured Division, before stopping. Now surrounded by British forces, with his men exhausted and virtually all of his tanks gone Rommel and the Afrika Korps were in real trouble. At last the British had a chance to eliminate the DAK for once and for all. General Auchinleck's plan was to pin the Germans down with 30 Corps and cut across their rear with 13 Corps, which included what was left of 7th Armoured Division. The Division then consisted of the 7th Motor Brigade, the KDG and the 4th South African Armoured Car Regiment, with the bulk of the armour and all reserves having been sent to 30 Corps. The advance of 13th Corps was met by 21st Panzer and neither of the two British Corps was able to fully press home their attacks. Even with 15th Panzer now down to 15 tanks and 200 men, the Germans were then able to disengage and withdraw west.
For the next two days there was a lull in the fighting while both sides brought up supplies and reinforcements, while trying frantically to repair tanks. The Germans were too exhausted and the British too disorganised to renew the battle at this stage, but on 8th July the Germans launched an attack with 200 tanks and 2,000 infantry. Fighting continued around the Alamein line for most of the month, but it was sporadic and with no co-ordination.
The rest of July was relatively quiet for the Division, with it re-gaining the 4th Light Armoured Brigade (the new title of the old 4th Armoured Brigade) and the 7th Motor Brigade. The 4th South African Armoured Car Regiment returned to the Nile delta for re-fitting and the 11th Hussars returned from Iraq. The 7th Motor Brigade saw action for most of the month with the Rifle battalions in constant contact with the enemy.
The critical situation at Alamein and the success of the Germans and Italians had brought them within 60 miles of Cairo, and this brought Winston Churchill out to the desert, where he found the troops, "brave, but bewildered, but still cheerful, confident and proud of themselves." Despite his success at First Alamein, General Auchinleck was not well thought of by Churchill and General Gott of 13 Corps took over the direct command of the 8th Army. However, he was killed after returning to his plane which had been shot down by German fighters, to rescue the men trapped inside, having initially escaped himself. Like the loss of Jock Campbell, before him, it was a great loss to the 8th Army and not least the men of the 7th Armoured Division. However, his loss was to bring Lt-General Bernard Law Montgomery, out to the desert and "Monty" took over command of the 8th Army on 13th August 1942. With him came Lt-General Sir Oliver Leese to take over 30 Corps and Lt-General Brian Horrocks who took of 13 Corps.
BATTLE OF ALAM HALFA (30th August- 2nd September 1942)
Unlike all the other positions in North Africa the Alamein Line was unique in that it did not have an open southern flank. The north end was at the sea and the southern end rested on the quaking sands and salt flats of the Qattara Depression. Their were only a few track across this great sand sea, suitable only for the Jeep Patrols of the Long Range Desert Group, but they could not support heavy traffic, so this meant that the British flanks were secure for the first time. Therefore, General Montgomery settled into his defensive position and started to build up his forces for his offensive, which was to become known as the Battle of El Alamein, but Rommel decided to attack in the south with a thrust towards Alam Halfa at the end of August.
During August the British re-organised, was reinforced and trained behind the Alamein Line, which by the middle of the month had become a true defensive line, with all the boxes held by full divisions. From north to south the positions were held by; the tough and experienced 9th Australian Division, the newly arrived 51st (Highland) Division, who had a score to settle with Rommel for St Valery in France, the 2nd New Zealand Division (regarded by many as the finest infantry in the desert). Then came the 1st South Africans, the 4th Indian Division, then a Greek Brigade and finally the 50th (Northumbrian) Division and the 44th (Home Counties) Division. The latter occupied a ridge ten miles behind the front line at a place called Alam Halfa. Not all the divisions were in place when Rommel ordered his attack, but the southern end of the line was covered by minefield and patrolled by elements of the 7th Armoured Division. South of Ruweisat Ridge and ready to attack the flank of any assault trying to hook round Alam Halfa were the New Zealanders, the re-equipped 7th Armoured, along with the Free French of Bir Hacheim fame.
Montgomery decided to shake up the 8th Army and ordered that the divisions of would fight as divisions and not go "swanning about in the blue" (the nickname for the desert). He also formed a real armoured Corp using the 1st and 10th Armoured Divisions. No more would the 8th Army fight in columns or ad hoc formations. This did cause some resentment from many of the old desert hands, with one commander being 'sacked' for not briefing his officers of the new rules.
On the Axis side the Afrika Korps now consisted of the 15th and 21st Panzer Divisions along with the 90th Light and a brigade of Parachute infantry. The Italians had the XX Corps in the field consisting of the Ariete and Littorio Armoured Divisions, the Trieste Motorised Division, plus the Trento, Bolonga and Brescia infantry Divisions, plus the Folgore Parachute Division, which had arrived without transport and was virtually immobile. The three infantry divisions, with the German Parachute Brigade held the front line. Although he had the men and machines for a thrust to Alam Halfa, he lacked petrol, which the Italian High Command could not supply in enough quantity, partially due to the continued intervention from the forces on Malta. Additionally, Rommel was ill, suffering from jaundice, along stomach ailments and circulation problems that led to fainting fits. After two years of constant strain and combat he and many of his senior officers were worn out. The Axis only had 200 front line tanks, to the Allies 800+, but half of the Panzers were now the MK III with the long 50mm gun of the MK IV with the new longer barrelled 75mm gun. To counter this he only had about 24 88mm guns and the 50mm PAK 38, was no longer really effective against the newer British
Sherman, Grant and Valentine tanks.
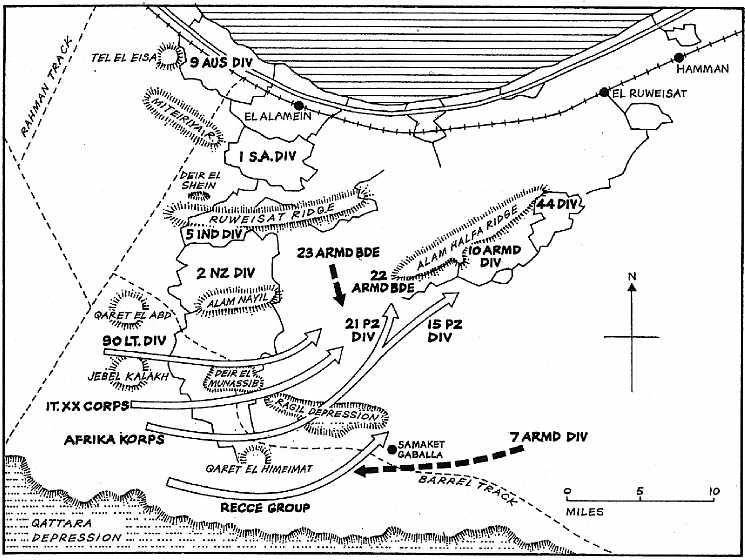
On the night of 30th/31st August the Panzers attacked, but found the southern minefield more of an obstacle than expected and while they were held up the New Zealanders and 7th Armoured shelled them, having been spotted by armoured car patrols. By dawn on the 31st the Germans has advanced only eight mile past the mines and came under fire from artillery and the 22nd Armoured Brigade, which was now an experienced unit consisting of 4th CLY, the Scots Greys and the 1st/5th RTR. Although still part of the 10th Armoured Division as this point it was later to join the 7th Armoured for the rest of the war. Before long the Panzer MK IV's were taking a heavy toll of the Grants and it was only the prompt arrival of the Scots Greys that stopped them breaking through. The Greys rushed down the ridge in typical cavalry charge and by dusk the Greys and 4th CLY had stopped the German advance. Under the light of flares the RAF bombed the Germans all night, as they gradually withdrew.
The Desert Air Force played a major role in halting the German advance, but the major problem for Rommel was lack of petrol, which reduced the attack on Alam Halfa ridge on 1st September to a small-scale affair. This led to the attack by the 15th Panzer at 06:30 was driven off by 08:30. With fuel stocks very low the Germans started to withdraw in good order on 2nd September. Although not a rout, it was a welcome sight for the 8th Army.
During the battle, 7th Armoured was ordered to harry the German advance and the
6-pdr anti-tank guns of the Rifle Brigade did just this near Himeimat, knocking out a dozen tanks during their advance. The Rifle Brigade then harried the Germans all the way back through the minefields.After Alam Halfa and before the Battle of El Alamein, there were many changes throughout the 8th Army and the Division. The 7th Motor Brigade, including 2nd Rifle Brigade and 4th RHA (which had served with the Division days of the old Support Group), left to join the 1st Armoured Division. On 7th September the 22nd Armoured Brigade became a permanent part of the division. The Division also had new commander in General (later Field Marshal) A. F. Harding.
In the five weeks after Alam Halfa the 8th Army trained relentlessly, by day and by night. Its strength rose to 1,350 tanks, with over 1,000 of these being with the forward units. The artillery was also strengthened so that 832 guns were available for the coming battle. During this time the Desert Air Force attacked the German and Italian supply bases and routes, but the enemy tank strength still increased by 20-25 per day.
Montgomery favoured a night assault but with all the training needed he was not ready for the full moon in September, so the attack was postponed until next suitable period on the night of 24th October. To take full advantage of this Montgomery opted for the night of 23rd October to begin his assault. This date would also provide a good diversion for the planned landings in Tunisia (Operation Torch) scheduled for 8th November.
Montgomery' plan was to strike in the north, with the 9th Australian and 51st Divisions were to force a gap through which the tanks of 10 Corps could pass. A diversionary attack in the south, by the 7th Armoured and the 44th Divisions of 13 Corps would also take place, just north of Himeimat ridge. Montgomery knew the enemy positions would not be easily overcome, so he planned for "crumbling phase" lasting days or weeks, to erode the enemy strength, followed by a "breakthrough". Meanwhile, the Germans and Italians were preparing for the attack, by digging in, laying mines and building up their tank strength. Rommel and several of his senior commanders were now very ill and he was taken back to Germany for treatment, leaving General Stumme in charge.
General Horrocks' assault plan for 13 Corps was to make four gaps in the British minefields the night before the battle was due to start. Through this the advance guard would move up to the German minefields, codenamed 'January' and 'February' which formed two protective belts of mines one behind the other. There the Sappers would make for gaps corresponding to those made in the British minefields. The plan then was for 1/7th Queen's to breach 'January', keeping level with 7th Armoured Division on its left. The other battalions of 131st (Queen's) Brigade would move forward to the 'February' minefield and take control of them from 1st Rifle Brigade. The Rifle Brigade would then take the lead for 7th Armoured Division, along with 44th Reconnaissance Regiment and once through the minefields 44th (Home Counties) Division would take over the defence of them and the bridgehead to the west of 7th Armoured Division position. In order for this to happen 44th Division would have to help the armour get through the minefields. At this stage of the battle the role of the 7th Armoured was to contain the 21st Panzer Division in the south, during the early days of the battle. If all went to plan, the Division would pass through the two minefields to there front and then swing north towards Daba, with the aim of capturing Himeimat Hill and the escarpment to the west. The 44th Reconnaissance Regiment had been trained in mine lifting for this specific reason would
clear the path through the minefield, while the Free French, under the command of the Division, would retake Himeimat. Click here to view the Divisional Order Of Battle at this time. Once this had been achieved the 22nd and 4th Armoured Brigades were to pass through the minefields and establish bridgeheads, which the 44th Division would then occupy. The main task was not to get embroiled in any engagements that would reduce the effectiveness of the Division as a whole.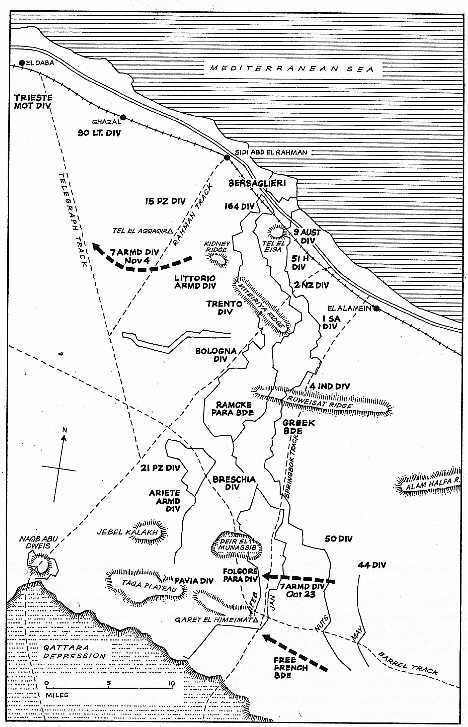
At 18:45 hours 22nd Armoured Brigade, supported by the Scots Greys, on loan from 4th Light Armoured Brigade, advanced and by 21:00 it was in no man's land between the minefields. The main barrage at El Alamein began at 21:40 on 23rd October 1942 and the night was torn apart as a thundering and crashing barrage of almost 1,000 guns rained down on the enemy positions. This was the first major artillery barrage of the war, with echoes of those from the Western Front during the First World War.
At 23:00 the Brigade with the help of 44th Reconnaissance Regiment and the Sappers was in the process of locating the edge of the 'January' minefield, but they unfortunately located a rogue mine some 800 yards from the real minefield. Here the Scorpions starting flailing, resulting in delay which was to have repercussions later on. With little cover and under heavy fire the lead units started to suffer casualties and on the right 1/7th Queen's became disorganised in the swirling dust and smoke, which has reduced the visibility to only 10 yards in places. However, Engineers attached to the Battalion cleared No. 1 gap and 5th RTR was able to get through. The cost of this part of the action was high with 1/7th Queen's loosing 10 officers (including their commanding officer) and 178 men killed, wounded or missing. The delays meant that there was not enough time or equipment to clear the 'February' minefield and as such 1/5th and 1/6th Queen's could not be brought forward.
Further to the south 1st Rifle Brigade had to not only protect the Sappers as they worked but also command and control all the troops in their immediate area in the initial stages, of the assault. It was therefore, for this reason, equipped with a large number of radio sets. Behind them the Signalers were laying line cables for easier communications back to the rear areas. During this work the gaps in the minefields became heavily congested and the defenders concentrated every available weapon, especially machine guns, anti-tank guns and artillery. The Scorpions proved of limited usefulness and the quickly became overheated. Their petrol evaporated in only 200 yards and with most of the minefields being deeper than this, this caused great problems. Also their air filters suffered badly from all the dust thrown up by the flails. This all meant that a number of them broke down while clearing the minefields and needed to be repaired on the battlefield, under fire.
No. 3 gap was reported as impassable because of soft sand, but shortly after this No. 2 gap was secured after a troublesome Italian anti-tank gun was engaged by a platoon of Vickers machine guns and the motor infantry began to try and clear the western ends of No.3 and 4 gaps. However, it was becoming apparent that the second minefield was not going to be breached that night and the lead units were ordered to gain as much ground as possible before dawn, but they were still some 3,000 yards short of Himeimat. At this point in the battle the anti-tank gun that has caused so much trouble in No. 2 gap was found abandoned, with many dead around it. It was then turned around and fired at another strongpoint with considerable effect until all its ammunition expended. 1st Bn. Rifle Brigade took over 300 prisoners that night, but losses to the two lead companies were so great that they had to be amalgamated.
At the southernmost end of the line, the Fighting French were divided into two groups. Soft ground and deep wadis slowed them down, but they reached their forming up points to the south-east of Himeimat in plenty of time. At 02:30 supported by what little artillery had managed to move forward and protected by a smokescreen they advanced against strong opposition. Eventually, the Free French reported that they were in control of the eastern part of their objective, the hill at Himeimat, which overlooked the whole of the division's front. It was essential that this was still in Allied hand at daybreak. Unfortunately the group on the left was counter-attacked by eight captured Honey tanks and lacking any anti-tanks guns they were forced to withdraw.
(NB. It was quite common practice in the Desert War for each side to use captured enemy tanks in this way, by just changing the markings on them. In fact at one time earlier in the war an armoured unit supporting an Australian Division was entirely equipped with captured Italian tanks!)With the attempt to breach the second minefield having failed and with the French having been driven back from Himeimat, it was decided to dig in for the day and wait until night to renew the attack. Although enemy artillery fired on the armoured bridgeheads, no real damage was done and plans for an attack by 131st Brigade were finalised.
The attack by the 131st Brigade, on the night of 24th/25th October, quickly secured a bridgehead west of the second enemy minefield, but they were pinned down, while efforts to clear paths for the tanks to follow proved slow and costly. Once the paths were cleared 4th CLY and 1st RTR moved forward and both lost tanks to either rogue mines or anti-tank fire. 4th CLY lost 14 tanks out of the only Squadron to get through the minefields. With dawn approaching and with the aim of keeping the division in one piece, no more armour went into the bridgehead that night. The next day 25th, October, the attack was called of and over the night of 25th/26th the 44th Division took over the bridgeheads, along with the now detached 4th Light Armoured Brigade, while the rest of 7th Armoured Division went into reserve. During afternoon of 25th the 4th/8th Hussars had also supported the 50th Division, but when they run into minefield and anti-tank fire they did not go any further. Montgomery wanted his armoured divisions in one piece for later in the battle. The Division was to be moved north so that they and the 1st Armoured could pursue Rommel, after the breakout.
On the night of 29th/30th October the Division staged a mock attacked to divert the enemy and on the 30th began plans to move north, on the 31st, in daylight without any enemy air attack. Also on 31st October, the 131st (Queen's) Infantry Brigade from the 44th Division was placed under the command of the Division.
On 3rd November it seemed certain that the Axis front was about to crack and the Division was moved to the assembly position ready to take advantage of any breakthrough. That night "Operation Supercharge" (using the 1st and 7th Armoured Divisions, plus the tank reinforced 2nd New Zealand Division) led by the infantry began. By morning of the 4th, with the 11th Hussars on the lead, followed by 22nd Armoured Brigade and with the 131st Infantry Brigade bringing up the rear, the advance began in earnest. The Divisions route lay through El Aqqaqir, where it then turned west into the open desert, with orders to make for Daba and cut the enemy off there on the coast road.
Having pasted the burnt out tanks of the 8th Armoured Brigade, the Division ran into belts of soft sand, but soon afterwards it emerged into the open desert. Everywhere there were signs of a rapid evacuation by the enemy, but no opposition. The Division continued west with each formation maintaining its battle formation. Early in the afternoon of 4th November, the 22nd Armoured Brigade engaged the remnants of the Ariete Armoured Division which still had about 100 tanks at its disposal, albeit of poor quality compared to the German armour. The 15th Panzer Division was on the northern flank to the Ariete Armoured Division and these two formations posed a tough challenge, but with strong artillery support and after a tough tank battle the Italians withdrew leaving 29 tanks on the battlefield, with 450 prisoners being taken, and the Italian repair workshops having to blow up about 40 tanks before making their escape. This effectively meant that the Italian Motorised XX Corps, including the Ariete and Littorio Armoured Divisions had been destroyed.
By the 3rd of November Rommel had only 30 serviceable tanks in action and on the following day began organising his withdrawal.
"Before Alamein we never had a victory. After Alamein we never had a defeat.'" - Winston Churchill.
Sixteen days after the start of the battle of El Alamein an Anglo-American army under General Dwight Eisenhower, landed on the west coast of North Africa, near Casablanca, Oran and Algiers. This placed the German and Italian forces in North Africa between the 'jaws' of two Allied armies. After "Operation Torch" the fate of the Axis forces in North Africa was sealed, it was just a matter of how long they could hold out.
At the end of "Supercharge" the 8th Army still had 600 battle worthy tanks, while Rommel only had 130, mostly Italian M13's, under his command. Abandoning the un-motorised Italian infantry the Germans fled west, taking the Italians transport where necessary, trying to regroup. They were pursued by the three British Armoured Divisions, as Montgomery was determined he was not going allow this to happen. The chase went past the old battlefield of Fuka, Daba and Mersa Matruh, but on 6th November heavy rain, turning the road into a sea of mud. This plus a shortage of fuel caused the British to halt. By 8th November 30,000 prisoners had been taken and the Axis had lost a great deal of equipment, including all the Italian tanks and 1,000 guns.
By 11th November the Axis had withdraw past Bardia and Fort Capuzzo, where the leading elements of 22nd Armoured Brigade were just too late to stop the last train out. Here the advance stopped again, due to lack of petrol and two days later the 11th Hussars entered Tobruk, having picked up a number of prisoners on the Bardia-Tobruk road. Again the pursuit paused for two weeks. The tanks of 22nd Armoured Brigade has my now exceeded their track mileage and supply difficulties prevent only a small force being maintained west of Tobruk until the port had been restored to full working order. So a decision was made to leave 22nd Armoured Brigade at El Adem and the Queen's Brigade at Tobruk, with the rest of the Division continued to advance withe the Royal Dragoons and 11th Hussars, plus the 4th Light Armoured Brigade who had just rejoined the Division. On 13th November the Division was ordered west of Tobruk to cover the re-opening of the port. Meanwhile 22nd Armoured Brigade was ordered to equip 1st RTR with all available tanks from the rest of the Brigade so that they could rejoin the advance. By 14th November the 11th Hussars had entered Benghazi having encountered no resistance en route. The re-equipped 1st RTR of the 22nd Armoured Brigade did encounter a rearguard at Agedabia and the battle took the form of a duel between the British Tanks and artillery and the enemy anti-tank guns, which were well concealed in an arc across the road. With the small British force there an out flanking action was not possible, but a number of enemy guns were destroyed, during the day. The intention was to put a company of infantry with anti-tank guns on the defenders flank and cut off their withdrawal, but this was spotted and the rearguard withdrew during the night.
Montgomery decided against an attempt to cut across the Jebel, to block the road again at
Beda Fomm, as he did not trust the wily Rommel. The 8th Army rolled onwards like a juggernaut, fighting in Divisional or Corp sized units, thus depriving Rommel of the type of spoiling counter attack he has used so effectively in the past and they were aided by the Desert Air Force. With the armoured car regiments continued to harry the retreating Germans and Rommel had little or no chance to re-group. The fight was not all one way as the Luftwaffe did there best to delay the British advance, which gave the anti-aircraft units such as the 15th Light AA (Isle of Man) Regiment, some activity.On 25th November 22nd Armoured Brigade went into reserve to re-equip and was temporarily replaced by 8th Armoured Brigade, consisting of 5th RHA, 3rd RTR, the Sherwood Rangers, the Staffordshire Yeomanry and 1st Bn The Buffs. The new Brigade was at full strength and equipped with Sherman Tanks, which were a great improvement on the old Grants and Crusaders 22nd Armoured Brigade had been equipped with.
Field Marshall Rommel was a great soldier and he did gain some distance and with his supply lines shortening and reinforcements arriving, he turned on the 8th Army at Agheila and again at Buerat. At Agheila, on 14th December, the 4th Light Armoured Brigade and the 2nd New Zealand Division destroyed a number of tanks and captured some prisoners, with the Germans withdrawing after dark. On 15th January a rearguard of German tanks was engaged between the Geddahia - Bu Ngem track and the Wadi Zem-Zem. During a hard days fighting a number of German tanks and anti-tank guns were destroyed, with the loss of some British tanks too. The position could not easily be taken by frontal assault and an outflanking was not possible either. However, the Germans withdrew during the night, but by 19th January the 11th Hussars had caught up and were engaging the trailing units.
Most of these positions were soon outflanked and on 23rd January 1943 the 8th Army entered Tripoli. A victory parade was held, witnessed by Winston Churchill. The Division had traveled nearly 1,400 miles in three months.
After the Battle of El Alamein and during the pursuit along the coast, Winston Churchill at a speech at the Mansion House on 10th November said;
"Now this is not the end. It is not even the beginning of the end. But perhaps it is the end of the beginning"
Engagements 1940 Engagements 1941 Engagements 1943 Engagements 1944 Engagements 1945